Swarm Intelligence and how it relates to Making, Design Thinking, and Creativity….

img_7345

A couple of years ago I attended the 2014 WESTAF Cultural Policy Symposium, co-hosted by the California Arts Council and Gehry Partners. It had a rock star line-up of big brains talking about creativity, many of them referred to STEAM education, Makers education, and creativity. Today I was reminded of one speaker in particular of an idea that was so striking to me that it continues to resonate, Edward Clapp from Project Zero. It filled the room for me. Today I saw a visual image from one of my colleagues that brought it to the front of my brain. It’s a worthy read from Edward P. Clapp at Project Zero. Here is the to his paper, and the video (which isn’t great):

edwardclapp
http://tinyurl.com/jomxs3n

And here is a link to a similar set of ideas from Jennifer Oxman Ryan, a Researcher and Project Manager at Project Zero.

screen-shot-2017-01-14-at-8-26-45-pm

http://tinyurl.com/zb2y8ye

Enjoy!


WIP 004: Getting Things Done

This week’s Work In Progress has a number of ideas for articles and designs that I managed to publish before uploading this post. The time from idea to product is getting shorter. I’m approaching publishing something every day or two which is a step up from my typical post every two weeks.

Sylvia Martinez’s urgings to the FabLearn Fellows to post content without over thinking and polishing it has been in my mind the past few months. Over the years, there has been a ton of idea that never make it to the page. Part of it is that I’ve always aspired to  DesignMakeTeach having magazine quality content. (What if there was a MakerEd magazine!) However, with all the great books, articles and content about MakerEd/FabLearn/Makerspaces the bar has been set pretty high. This has caused me to doubt where my blogging efforts fit into the bigger scheme.

How can I provide value to my rather niche audience? I’m leaning towards treating the blog more of a maker/artist/educator’s journal/scrapbook/portfolio kind of thing. What do you think?

Design Ideas: Greater America (DONE! https://designmaketeach.com/2017/01/08/greater-america-a-3d-portrait/).  Myth busters logo. Refine Flexy Washington Monument dimensions (DONE! http://www.thingiverse.com/thing:2013449). Hidden Figures.
greater_america_portraitimg_4243img_4249

Idea: Creating a life dashboard. Explicitly developing/learning/teaching organizational skills. Using Trello at the moment. An extension of the problems in my Maker Project Chaos  post but encompassing entire life.

Idea: Social media diet in order to increase productivity. I spend a LOT of time on social media seeking external validation. The computer is programming me! (Papert Mindstorms reference.)

CNC Idea: Pinewood Derby cars. There is a parent/open category. Might be fun to work in  Fusion 360 and then use Othermill to design cool car.

Project Idea: washedashore.org type sculpture incorporating 3D Printing & makerspace waste. #ScienceSavesSeas

Lesson Plan: Mystery Artifact lesson. Students presented with unidentified artifacts from a particular time period. Need to research and report on purpose and significance of the object. (Reference Antiques Roadshow, American Pickers, Pawn Stars. Maybe History Pickers.) Next phase students create their own artifact for digital fabrication. Provide the correct answer. (DONE! https://designmaketeach.com/2017/01/11/mystery-artifact-lesson/).
img_4205

PD Session: School AVID program uses Cornell note taking method. Is there a note taking method that works for makerspaces / design / engineering?

Blog Management: I’m posting designs on Thingiverse & other sites. What happens when those sites go down? I should post designs on my site first & then to Thingiverse/Youmagine as secondary distribution channels. Drive viewers to my site for design details so they can find other content?

This article is cross-posted from my blog, DesignMakeTeach.com.

How Do you Get Young Students Used to New Concepts?

img_8949
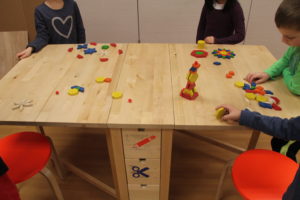
Kepler Tech Lab and its middle-high school students who take after-school engineering classes and workshops have had epic November and December of 2016! Wow, I cannot imagine it’s been two months teaching young students! It was an extraordinary experience to get young students with zero knowledge about engineering and tinkering with things get started with experimenting and testing what technologies have to offer. Last two months of 2016, we enrolled and taught middle-high school students for the first time and it was amazing to see how they were excited to build their own things, play around with Arduino kits, and try out the concepts of electricity using Squishy Circuits. From this experience of exposing innate innovators, I’d say, who cannot otherwise get a chance and an access to technologies without Kepler Tech Lab at the moment, I gained a better understanding of interactive learning and what it means for educators.

As defined by an instructor, Lindy Hatten, of the study.com, “interactive learning is a hands-on approach to help students become more engaged and retain more material.” Lindy added that “with or without a form of technology, interactive learning helps students strengthen [problem-solving] and critical thinking skills.” (Lindy Hatten)

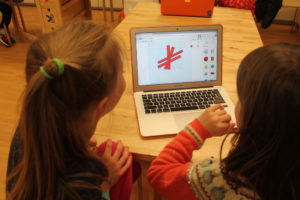
Let’s get back to the topic; how do you get students acquaint themselves with new concepts? To share my experience, the rest of the article is about how no technological students have been experiencing Scratch, the MIT Media Lab programming language that allows individuals, mostly young students, create and tinker with stories, games, and animations, not forgetting physical computing. The week of 9 Jan 2017, we introduced Scratch to our students and we have had wonders if learners with little to no knowledge about using computers for programming or anything else can do something.

sample-exercise

Sample game of guessing numbers to show to students

I’d say, we were late to start because Scratch requires only critical thinking and then drag as you drop graphics without typing anything, except if the story contains written messages. As always, our students are interested in doing many things at once trying to catch up with what they have missed during their early ages. The lab staff, we only need to regulate what they have to learn, how much they can support, and what are our goals for them to get the most out of our concepts.

How have we got started? Firstly, we realized that we cannot wait until our students are fluent in using computers. We helped them to navigate through Graphic User Interface of Scratch to get them understand how to pick a sprite, customize the sprite, change its style, make it move, add a message and add sound, just to list a few. Isn’t it enough for beginners? We use to have three sessions in a week with these young students and that was for day one. On day two, after understanding what they can do with Scratch, I gave them a homework about writing stories of their choice so that they can start day 3 with funny activities of making stories in a scratch. See what they have written and worked on day three. Do not try to read the first one from the right, except if you can understand Kinyarwanda. To provide you with a hint, it’s a love story of which a girl passed a long time with no see her lover and decided to let him go. A guy, in turn, visited a girl and started to sing for her. It’s a long story. I would love to share a full story once students are done with animating.

img_9008img_8947

Students’ written stories in brief.

The day three was about turning their written stories into animations using Scratch, still ongoing! The activity was not only about teaching them how to make animations but also to present to the whole class what they have made so that they can be able to develop technical communications.

img_8937

We still have a lot to do with Scratch and students’ smiling faces are promising that they are enjoying and learning a lot from Kepler Tech Lab.

References
Hatten, L. (n.d.). What is Interactive Learning? – Overview & Tools. Retrieved February 19, 2018, from https://study.com/academy/lesson/what-is-interactive-learning-overview-tools.html

Stuff for Cutting Cardboard

My daughter’s class is doing some sort of maker project and the teacher asked for students to bring in stacks of cardboard. To be helpful I grabbed a few shears from my personal makerspace and sent them in. The next day I was looking through a bin of odds and ends and ran into a pumpkin carving kit. I grabbed the saw and checked that it could cut through some cardboard and tweeted out a picture. What started as a simple Tweet about a use for a junk box item turned into a leap down the cardboard cutting rabbit hole.

It is really easy for maker educators to obsess over stuff and lose track of the why of MakerEd/FabLearn. We use cardboard because it is cheap, ubiquitous, forgiving, sustainable. Scissors are a poor tool for the job and box cutters and hobby knives aren’t safe without proper training. Which one you have, isn’t as important as students access to tools that can quickly and safely cut and shape cardboard to make their projects.

Pumpkin carving kit saw

EMT/Medical Shears

Canary Knife

Hacksaw blade with tape handle

Klever Cutter

ZIP Snip

Dremel Moto-Saw

Clauss Corsage Snips

Where do you get stuff in Europe?

Have a favorite cardboard resource? Leave a comment or contact me on Twitter.

What’s in Your Makerspace?

A common question I hear from fellow maker educators is, “What’s in your makerspace?”

My school is one of 10 winners of the US Department of Education’s CTE Makeover Challenge so my answer is much different this year than last. In total, we won $50,000 in cash in prizes in addition to the existing hardware provided by the school system.

Here is the list that we have for the teachers in our building.

Laser Cutter: Cuts/engraves wood, acrylic, cardboard, paper, plastic. Engraves glass and cylinders with rotary attachment.
-Epilog Zing 50 Watt (existing hardware)

3D Printers: Print objects from plastic.
-Afinia H800 (existing hardware)
-Makerbot Replicator+
-2 x Dremel 3D40
-Printrbot Play

CNC Machines: Cut and shape wood, plastic, aluminum, circuit boards, linoleum blocks.
-Othermill by Othermachine
-Handibot by Shopbot
-Techno Isel CNC mill (existing hardware)

Vinyl Cutter: Cut vinyl and paper for stickers, signage and t-shirts.
-Titan 2 Vinyl Cutter 28” from US Cutter
-Clam shell Heat Press from US Cutter
-Hat Heat Press from US Cutter

Button Maker: Make buttons 2 1/4” and 1 1/4” and 1 1/4” keychains and zipper tabs.
-Button makers by American Button Machines
-Graphic punch by American Button Machines

Repair Station: Tools needed to repair computers, tablets and phones.
-iFixit Small Business Repair Kit

2 x Mobile Maker Carts: 8 tool totes with hand tools, crafting supplies and consumables. (This will be a separate blog post.)

Makerspace Modules
-8 x littleBits electronics invention kits for prototyping
-30 Makey Makey Classic kits for creating controllers and inventions
-14 SparkFun Tinker Kits (Arduino)
-2 Raspberry Pi Kits
-Cubelets easy block robotics kit.
-Sphero robot for programming
-LEGO regular and Bionicles

Coming Soon: SnapOn Tool Chest filled with hand and power tools.

So… what’s in you makerspace?

Feel free to leave your answer or a link in the comments section or reach out on Twitter @DesignMakeTeach.

Giving a Makerspace

Today, my friend Nichole Thomas @MrsThomasTRT and I gave away a Super Deluxe Makerspace Starter Kit to a colleague.


Nichole and I hosted an Edcamp style session on makerspaces at the December meeting for Technology Resource Teachers (TRTs) in our school district. One of the participants was really excited about the idea of makerspaces and the potential for her students but had no money to get started. She is from a small school that doesn’t have the same community resources as the larger schools in our district.

Nichole and I put our heads together and decided to do something to help out. Professional development about starting makerspaces is great but it doesn’t create a change if you can’t put those ideas into action.

We started by grabbing extra tools and supplies from our personal maker collections. My school makerspace regifted a MakerEd.org Possibility Box we received from Maker Ed as a part of our prize winnings from the US Department of Education’s CTE Makeover Challenge.

img_4169-2

I emptied out a 17L tote that I used for storing materials for presentations and we filled it up. In addition to crafting supplies there were Makey Makeys, littleBits, Snap Circuits, Drawdio, supplies for an artbot and some maker swag from Maker Faire. We also asked our fellow TRTs to raid their craft rooms and tech toys and bring supplies to the meeting. We scored a couple Google Cardboard units to add in.

img_4208img_4210

The recipient of the Super Deluxe Makerspace Starter Kit was surprised by the gift but had already cleared a 10′ x 10′ space in the library where she works for a makerspace and now has tools and supplies to get started.

If the idea of makerspaces in schools are going to spread, we need to pay it forward and help other passionate educators when we can.

If you have ideas on how to grow makerspaces in more schools or want to donate supplies to help other schools start makerspaces, leave a comment or contact me on Twitter @DesignMakeTeach.

Mystery Artifact Lesson

img_4205

What is this object?
What does it do?
What is its historical significance and value?

You are professional appraiser brought in as an expert by shows such as Antiques Roadshow, American Pickers and Pawn Stars to determine the value of an unknown artifact. Your job is to research the object and give a 3 minute appraisal of its historical significance and value. The value of the object increases with the number of verifiable historical connections and associations you can make with the artifact.


Walking into school yesterday, I started chatting with a teacher about our plans for a joint maker challenge with our two advisory groups. I told her about the Martin Luther King Jr. design challenge I announced last week. https://designmaketeach.com/2017/01/05/design-challenge-mlk-2017/ We started brainstorming how we could incorporate this idea into her current unit and utilize the school makerspace.

Today I brought in the artifact above and presented the broad outline of the Mystery Artifact Lesson. The idea is to present students with a challenge that cannot be easily Googled and rewards depth of research.

Students might need some hints. For the object above we could tell students that the owner lives in the south. Or that the key was owned by someone in law enforcement.

Students will present their appraisals and then we’ll compare to a previous appraisal that the owner had done locally. (ie. The answer of the creator of the object.)

The next phase is to challenge students to research and design their own Mystery Artifact related to the current unit they are studying. They will need to provide information such as photographs, documents that support the accuracy of their design. They will also need to create a video/document presenting the ‘correct answer’ in the appraisal format.

We plan on introducing the lesson to students next week and are looking for objects related to Presidents that we can use as the mystery artifact. The object needs to be something we can digitally fabricate using a 3D printer, laser cutter, CNC mill, 2D printer/button maker or vinyl cutter.

Please fee free to give us suggestions/links/ideas in the comments or contact me on Twitter @DesignMakeTeach. Seriously, we want to make this lesson better. 🙂


Did you figure out the Mystery Artifact?

Screen Shot 2017-01-09 at 11.30.34 PM.png
It’s a key.
A key to a jail cell.
A jail cell in Birmingham, Alabama.
A cell where Dr. Martin Luther King Jr. was incarcerated.
A cell in which he wrote the Letter from Birmingham Jail.
A letter which defends the strategy of nonviolent opposition to racism.
A strategy which became a pivotal part of the American Civil Right Movement of the 1960s.
A movement which helped to end segregation in America.

You can download a replica of the MLK Birmingham Jail Key on Thingiverse for 3D printing. http://www.thingiverse.com/thing:2027104

3D Printing with Primary Students

When I started teaching my students about 3D printing, I limited my audience to only students in intermediate and middle school grades. I knew there could be value in also having younger students experience the process, but I wasn’t sure where to start. In my experience, many of the apps that transform 2D drawing to 3D file programs didn’t seem to work as I expected or were too glitchy to risk having classes of students using.

screen-shot-2017-01-09-at-10-19-08-am

Here are some tips to how I found teaching 3D printing using TinkerCAD to primary students (ages 5-7) to work best:

  • Have students work in pairs, sharing one computer.
  • Make sure students have prior usage of computer/mouse/trackpad navigation. The fine motor movements of shaping and rotating objects alone in TinkerCAD can be challenging for the youngest makers.
  • Before working in TinkerCAD, have students use pattern on the table to stack, rotate, and otherwise manipulate shapes. Discuss terms like rotate and flip.
img_4458
  • Explain to them that CAD programs aren’t always designed for their age group in mind. Remind them to have patience with themselves and their partner through the process. Learning something new can feel hard and that’s ok!
  • Start with the basics- You don’t have to show them all the capabilities in one session. Slowly add to their repertoire as they gain confidence and understanding.
  • Start with creating objects that allow for more imagination than realism- Students are less likely to get stuck on the fact that it doesn’t look the exact way they had in mind. Some ideas include:
    • Robots
    • An animal that doesn’t exist
    • Creating a hole with obstacles for a miniature golf course (using a marble as a golf ball)
    • Snowflakes
  • Have the 3D printer running so they can feel excited and inspired! While it’s printing, walk students through the process of how designs get from the computer screen to a completed print.

img_4463

Built to Last?

I try not to look at my old elementary classroom / lab / makerspace (sic) when I walk by these days.

It doesn’t look like this, anymore:

K4STEMLAB | Overall Shot

The K4STEMLAB at Northfield Community Elementary School, a student-centered, engineering-focused technology learning space, circa September 2012.

I have only been gone a year (I now teach in our middle school – in the same district and building). The space has since been repurposed (made back into two very needed classrooms). The teacher who took over for me has new digs in another part of the school. She’s doing amazing things, with a solid making / design thinking / science bent, and I’m happy for her and the elementary kiddos she teaches. Truly.

But, what I built – painstakingly, passionately, over an entire summer in 2012 – is gone. Three years, the program ran, integrating Engineering is Elementary into a screen-based K-4 technology ed class. (Here are some photos.) We did things no one did before, incorporating an engineering (making!) focus to elementary technology class, and it was glorious. Or, so we (I) thought.

Growth is a natural thing, and when I was offered the chance to literally design a middle school maker / STEAM program from scratch last year, I leapt, without hesitation.

And, then, we built this. (Actually, we built this, the photo below is this year’s version, our v1.1)

Lunch Bunch, Grades 5 & 8

Students enjoy “Lunch Bunch” in Digital Shop, the Northfield Community Middle School Makerspace, circa November 2016.

And so, as I walk past my old elementary classroom, reminding myself not to glance over and see what’s become of it, I wonder … will what we’ve created in our middle school endure? I’m thinking beyond the physical space – the program, its emphasis on inquiry, on making, on design as pedagogy, on student voice and choice.

Many of my Fablearn colleagues have maintained wonderful makerspaces like these for years. Certainly, while we’re still with our districts, in the same role / capacity, the life expectancy of the space and program is essentially limitless. Maybe?

But … what happens when or if you move on or change roles?

What will become of your space, your program?

Who will take over for you?

What will your legacy be?

-kj-

WIP 003: All About Sharing

Problem: How do students share their 3D designs with the world?

I’m a 3D printing enthusiast in the world of education and believe me when I say I understand the challenges of classroom implementation. Design / Printing / Sharing
How to have each student contribute?
Screenshots, Tinkercad embeds, Sketchfab, video, renders.

Edith Ackermann Tribute: FabLearn Fellows post with Lessons from Edith Ackermann. (Overdue)

Remix Culture: Gimbals and flexy designs. How digital fabrication lends itself to remixing objects and why that can be a good thing in the makerspace.

screen-shot-2016-12-31-at-9-32-34-pm

Idea: Digital Fabrication as applied to project like http://www.nybeyondsight.org/

Idea: American understanding of history is tied to things. Objects in museums that are the focus of stories. Other cultures have oral traditions, an understanding of history through songs and stories. Digital Fabrication of artifacts as way to understand history.

Article Idea: Mobile Maker Cart guide. Knolling the maker totes. Buying suggestions.

img_4168

Article Idea: Flexy design iteration and workflow.

img_4161

Article Idea: MLK Design Challenge. March on Washington button. Ebenezer Baptist Church sign.

img_4170

Question: Should I host my 3D designs on my website as separate posts in addition to posting on Thingiverse? Or should I put up an article about the design and have the model on Thingiverse?

Article Idea: Writing is a form of making. Ideas for digital writing.

To Do: Donate makerspace kit to local school that wants to create a makerspace. Loan out a 3D printer with set of Print It Forward items.

img_4169