I teach an introductory physical programming course in curricular classes at a public school in São Paulo for middle school students who have never programmed before. In my classes, I try to propose activities suited for iteration and that provide possibilities for multiple pathways in the creation process through a tinkering approach.
In this post I would like to share the experience I had with seventh grade students working on a pinball machine project.
The materials included pegboards to be used as the support base, screws and nuts, rubber bands, clothespins, cardboard tubes and the beta kit for physical programming (a kit I created to allow tinkering explorations in physical programming). The kit is composed of an Arduino with a shield that converts the pins to audio jacks, servo motors, buzzers, LEDs, lasers, light sensors, switches and potentiometers – that can be connected to the Arduino through audio cables. In our classrooms, we use the S4A for programming because of its easy way to monitor the sensor values.
In the future, I would like to integrate more crafts materials for kids to decorate their machines in artistic ways. Springs are also great materials to this activity and can be used, among other things, to make the ball launcher. Since we didn’t have them, most groups used tubes to launch the ball, and didn’t explore too much other possibilities that could have been fun too.
Why pinball?
I’m a big fan of creating pinball machines as a learning activity. I love how they can be explored in diverse ways, incorporating different materials, technologies and features. That is why I like to introduce this theme in starter activities to kids who don’t have fluency yet in physical programming: they get really excited about building their machines and this creates a high level of engagement.
Three different 7th grade classes worked on this activity earlier, but in previous experiences I had determined that the project would last only 2 weeks (1.5 hour/week ), since it was part of a research project and I had some time constraints. This time, kids were really engaged in the first two classes and I could see their projects getting better and better – so I let them have more time to keep working on it instead of moving on to the next programmed activity. They worked on the project during 4 weeks, and the outcome of more time was impressive for me, both in the high level of engagement and in the complex development of their creations.
Using learning resources for programming
One thing that added more engagement was the use of some new learning resources that I’ve created based on Scratch Cards. In previous experiences, students needed to find out by themselves how to program their machines, or ask either for my help or colleagues’ help. Hence, much energy was spent on trying to get the code right to do what they wanted – sometimes with high levels of frustration that would make them want to give up on some features, keeping it simpler. Using these resources was a great experience not only for students, who could have more autonomy to develop ideas and explore more diverse pathways, but also for me as a teacher, since I had more time to reflect with the groups about other aspects of their machines and about their ideas and processes.
It was also great to see kids learning about variables in a contextualized way. Many groups wanted to find a way to score points in their games, and the need to learn about variables emerged from their own interests.
I could see students effectively engaged in testing, refining, and changing their paths along the process, and that made me reflect on the importance of having appropriate time to create, develop and complexify ideas, shift to other directions, fail and try again. It was a valuable learning process for me as a teacher to have the freedom to try out new approaches and to be open to what comes up during the development of the classroom activities.
Another point that made me happy was the emotional climate during the last class, when kids had some time to play with other groups’ machines and a free time enjoy their our creations. Although some groups just kept improving their machines and testing it over and over again, it was nice to have this hands-on sharing experience, where students were not only showing their creations to others, but actually providing a playful interaction with them.
Other possibilities for pinball activities
During my trip to the FabLearn Conference in 2016, I had the opportunity to work on pinball machines in the Educators Meet Up at the San Francisco Exploratorium (thanks Ryan Jenkins for inviting me to that!). It was great to try out new techniques and materials, like working with wood and integrating copper tape to make some circuits.
Also, in the Cardboard Arcade Workshop at the FabLearn Conference, I worked together with my group (Holly and Jessica) on a cardboard pinball connected to Scratch through a Makey Makey to make sounds and scores points. The materials were very simple, and the outcomes were great.
It’s amazing to see the diversity of materials and technologies that can be used to create pinball machines, and the high level of motivation of kids (and adults!) to make them work, integrating construction and programming. Since pinballs can have so diverse features, it’s a great activity for tinkering, allowing people to focus on different types of things in their creation process, based on the resources available and on the things that they find more interesting and fun.
* Special thanks to the teachers Rodrigo Nogueira and Cida Godinho, for giving me the freedom and the time to test out ideas in their classrooms and for all the help during this year.
CoderDojo Bologna is a group of volunteers helping kids from 8 to 18 to express their creativity through digital technologies. We organize a free coding club almost twice a month on Saturday for 20-40 kids, according of the capacity of the space that hosts us ( public libraries, makerspaces, co-working, research centers..).
Since 2013 we have offered our ninjas (that’s how we call our participants)a creative learning environment where they can experiment with the fun of sharing ideas and helping each other while creating withtechnologies.
The club is open to everyone, so our kids are different ages, backgrounds and experiences. To design a learning environment that can be useful for everyone, we always try to focus on what we wish them to experience during our club:
have fun
discover new things
feel free to create
work on something meaningful
talk to each other and share ideas
It is a major goal that our ninjas will flow through the experience with their own style. Each of them will experience fun, discovering, creating, expressing and collaborating in a way completely different from everyone else. For the mentors it’s always fun to discover each kid’s special way and to go along with them in the creative learning process!!
For example, in November 2016 CoderDojo Bologna was hosted by a Social Service Community Center in a district of Bologna with an high number of immigrant families, most from North Africa and Eastern Europe. We choose to set up a “Tinkering with Circuits” experience with low-cost materials, so they can replicate the experience at home without the need of expensive technology like laptops or robots.
It was the first time that kids from the Community Center had the chance to attend a Dojo with other ninjas from all over town.
It was the first Dojo for Isabel and her brother Mark (not their real names). They arrived with two different attitudes: she was very happy and curious, while he was very upset because the other kids were younger than him.
The first part of the Dojo was a “getting started” activity, which is useful to explore how a circuit works.
In our Dojo we call this activity “My First Paper Circuit”. Kids use tinfoil and a battery to light up an LED.
The second part of the dojo was designed to facilitate tinkering with the notion of circuit. With tinkering I mean to play and experiment with materials and elements of knowledge without boundaries or clear goals.
The space was set up with a huge collection of different kind of materials and tools and a few examples of circuitry creations that kids could disassemble. Kids can take anything they want, play with the materials, and follow their inspiration.
It’s amazing to see how many different ways kids construct their creative learning experience. Some of them try multiple paths and ideas, while others fall in love with an idea and try until success.
Ninjas have different styles in the interaction with mentors too. Some kids want to work alone, others choose to work with peers, while some don’t feel comfortable creating without the help of an adult.
Are you curious to see Isabel and Mark’s creations? Click here
In CoderDojo Bologna we truly believe in Papert’s idea of Epistemological Pluralism, every kid (and every adult too) has a personal way of construing and flowing into experience, that depends on a constellation of elements like family background, previous experiences, self-esteem, interests, boundaries and social interaction patterns elicited by the context.
The best we can do is offering a learning environment that supports wide diversity of pathways and projects, so that anyone can express creatively in his own special way.
At the end of the Dojo, during the show & tell moment, it’s amazing to see how kids embody this idea with each of their own light creations!
A big THANK YOU to CoderDojo Bologna for letting me share this story and for the passion that every mentor puts in our Dojo. It’s an honour to be a part of this wonderful community!
Sylvia Martinez, head cat wrangler for the FabLearn Fellows, says to post more stuff. She says that it doesn’t need to be perfect, just jot it down and publish. Unfortunately, this ethos doesn’t fit with my normal workflow.
A typical post on my DesignMakeTeach.com blog involves a lot of work. Steps include brainstorming a project, designing the physical product, fabbing the design, taking photos/videos, publishing the design files in a public repository and then writing the blog post itself. There is lots of research, iteration and false starts in the process. The result is that I don’t publish that many posts.
My projects folder and notes apps are filled with ideas and partially finished projects and posts. Usually I micro-blog bits and pieces on Instagram and Twitter but due to the perishable nature of social media, many of those ideas fade away.
The gulf between what I’m working on and a finished blog post is huge. (I think the same is true of student projects. The one end-of-year project after the state standardized test is over looms large as a giant piece that needs to be perfect. In many cases, students complete these projects in a short concentrated burst of activity. There is little reflection on the process and the search for answers. As I work towards bringing makerspaces into formal education environments, I’d like to explore the differences between documenting and reflecting on the process versus the final product.)
Which brings me to the idea of trying a Work in Progress, WIP, style blog posts. I was introduced to Work in Progress documentation in hobby and miniature gaming forums. Hobbyist would documents projects such as painting a miniature or building a diorama. Many of these projects would takes weeks or months to complete. The person documenting the project would share updates on the forum and invite feedback. WIP style posts from top hobbyists were especially popular for others trying to learn step-by-step how to create similar projects.
My idea for a Work In Progress style post is to put down ideas and experimentations on a regular basis. Taking a few minutes each week to collect photos, tweets, questions, etc. I would then be able to update these posts or continue certain ideas from week to week. When I develop enough material, I can then collate the material into a final project post. Hopefully, this style of documentation would allow more feedback when I’m having problems or incentive to continue to pursue an idea. WIP posts could offer more chance at collaboration and interaction. The posts may be pretty rough but sometimes just a single photo or sentence is enough to inspire someone else’s project idea.
Tell me what you think about WIP documentation in makerspaces and for this blog. Leave a comment or contact me on Twitter @DesignMakeTeach. Visit my blog http://DesignMakeTeach.com
UNESCO Director-General, Irina Bokova mentioned in the 11th annual Education for All global monitoring report that “poor quality [of education] is holding back learning even for those who make it to school.” (Provost, 2014). This is about literacy, though. What about fabrication and making? The remaining question to answer is: how can we get millions of people living in the base of the pyramid communities used to fabrication and making? If those people cannot get access to quality education, how is possible they get skills to exploit any tools and be part of world’s fast-growing maker movement?
Being exposed to the concepts of electricity and electronics for the first time is so scaring, ahem-ahem, but brings much curiosity of exploring how things work. In developing countries where maker movement is lagging behind that of the developed countries, kids learn everything in theories but to put hands-on experiments is rare to happen, not because they don’t want to but because there are no means to practice what they learn. What if they get access to practical hands-on experiences and get the freedom to explore how things in fabrication get executed? It’s undoubted that they can be part of maker movement where innovators behave as independent inventors, designers, and tinkerers as described by the Time Magazine. The key indicator that students in the developing world have many theories is that if high school students asked anything about electricity and electronics, they could tell everything they have learned in physics; ugh, which is not too bad, though.
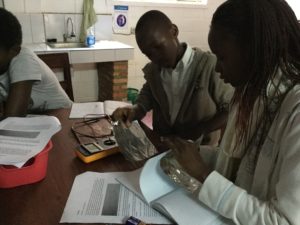
For students to get things work, they would need to know how industrial materials are built and try to rebuild them using raw materials. This is being said that the learners would need to explore by themselves how they can be able to build their own things and try to make them work as industrial components do. That’s what 2nd-year (8th grade) students of high school level have been doing with capacitors and resistors at Kepler Tech Lab, a science and engineering teaching laboratory-based in Kigali, Rwanda while experiencing concepts of electricity.
Homemade Resistor
Every material is resistive, meaning that it resists charge going through it. Even a conductor, like a copper wire, has some resistance. A commonly available and easily shapeable resistive material is graphite, which you can draw into any size or shape. Given their background of theory-based knowledge, it took students who take engineering class with Kepler Tech Lab about two weeks to get a better understand of how a resistor works through the variety of experiments. They took a clean sheet of paper and draw some shapes on it with pencil and calibrated multimeter on the “resistance” setting where they measured resistor’s quantity called resistance.
Particles of graphite on paper for resistivity activity
The engineering class at Kepler Tech Lab for ordinarily level (O’level) students of high school is intended to get them used to practical hands-on experiences during their young ages.
Homemade Capacitor
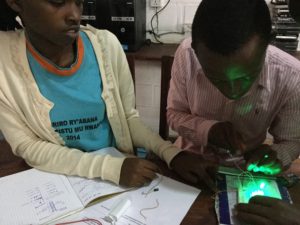
Breaking things down and show students how things are built gives them a chance to compare what has been already made and what they are about to make. This leaves enough room for them to be more creative while arranging required materials to assemble their own components. A capacitor as a component used to store charges has been broken into pieces and students were excited to see how it is made with only layers, insulators, and electrodes (anode and cathode). A homemade capacitor has 2 sheets of tin foil as the conductor and sheet(s) of papers as the insulator. To get it work, makers start with 3 large sheets: 2 of tin foil and 1 of paper. Sandwich the paper between the 2 pieces of tin foil, and make sure that the tin foils are not touching each (see Figure 2). If that happens, current will flow between the two pieces and no charge will be stored. In order to secure the placement of the sheets, pieces of tape should come into a play, and then, calibrate the multimeter on the “capacitance” setting to see if you can be able to measure a capacitance between the paper and the tin foil.
Students putting layers of papers as spacers between tin foils while experimenting with capacitor
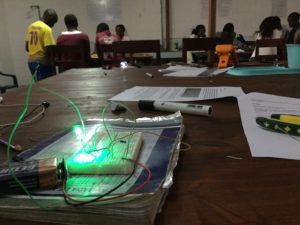
What about if students cut the pieces smaller and measure the capacitance again? To do that allow them to explore the effect of surface area of the tin foil. What if they use multiple sheets of papers or other spacers to change the spacing between the two sheets of tin foil? The students must be encouraged to keep iterating their experiments and note down all changes they are getting. It is recommended that students work in groups and the first group to finish the activity gets an opportunity to mentor their fellow classmates.
Students leaving their stations and teach fellow students what they’ve made and how they made it
The same capacitor can also be made using salt, water, tin foils as conductors, and a plastic water bottle as an insulator. First, the bottle has to be filled with water dissolve a spoon full of salt into water. Tin foil is wrapped around the bottle without wrinkles on the foil. An easy way to do this is to flatten the tin foil and gently roll the water bottle in it, taking care to smooth out any wrinkles. After that, screw on the top of the water bottle, and poke a nail through, so that the bottom of the nail touches the water. Then, capacitance has to be measured between the nail and the foil. Students should keep exploring more what happens if they add more salt, use less tin foil, or if they add a sheet of paper between the tin foil and the plastic bottle.
Like any other learners, young students in developing world need to exercise how things work by trying to make their own and use them in their projects. I do believe that they get the most of making things rather than handing them industrial/finished products, which is not bad, to be used without knowing how they are built. Hang in there and see what future generation of makers will bring to the world’s changing technologies.
References
Provost, C. (2014, January 28). One in four young people in developing countries unable to read, says UN. Retrieved February 19, 2018, from https://www.theguardian.com/global-development/2014/jan/29/illiteracy-education-young-people-developing-countries
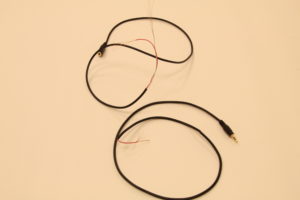
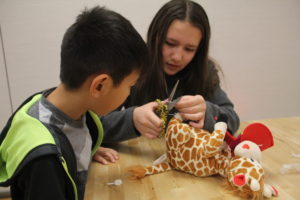
One of the most impactful projects my fifth-grade students take part in is a project to hack toys to make them accessible for kids with disabilities. This simple project, that typically costs families upwards of a hundred dollars can be done for under one dollar. The toys, which began as a standard plush toy with a push-button to produce sound and movement were transformed to a toy equipt with a 3.5mm stereo jack. This new plug that students installed, allows for any standard adaptive switch to be plugged in and used. This modification allows kids who already have specialized switches to plug in and play. In addition, the fifth-grade students made their own tap switch that can be activated by a slap, tap of a foot, or nod of a head.
To begin, students took apart the seam of the stuffed animal, leading to the press switch. Once inside, they cut the wires attaching the original press switch. From here, they stripped the two wires.
Next, students took a 3.5mm stereo extension cable and cut it in half. Next, they stripped both of these. Then, they took the stereo extension jack and wired it into the two wires in the stuffed animal. My students used electrical tape to secure the wires, but you may also want to solder them for a more secure connection. Once the new jack is in place, students tucked the extra wire into the stuffed animal and sewed it so just the end of the jack was sticking out.
Students then worked on creating switches in a most basic and economical way. Students took two squares of recycled cardboard and covered them with foil, then “sandwiched” the two boards together with extra bare cardboard placed in the middle. Students then took the remaining half of the stereo extension cable and taped one wire to each side of the “sandwich.” The switch could now be plugged into the stuffed animal and activated. There is a lot of room here for modifications and creativity. Challenge students to invent their own switches to meet the needs of various children you are making the toys for. Perhaps a child can only use a foot tap, a head nod, or a breath sensor, so encourage students to create switches that will work for specific situations.
“Steam” for a well-educated German speaking science teacher is an invisible form of water which is around us all of the time but nobody takes notice of. “STEAM” is the same thing in a capital letter headline – any drunk graphic designer may have thought this would be funny like Comic Sans. Just a few people know that STEAM is the smarter cousin of STEM, the acronym for the school subjects Science, Technology, Engineering, and Math. The new addition of the A in STEAM is for Art.
Why?
First, there’s no need for such knowledge in the German school system. Ha ha! School subjects mostly are separated in the same manner as 100 years before. Actually, there’s a synonym to STEM – this is spelled MINT (Mathematik, Informatik, Naturwissenschaft, Technik, in English, math, computer sciences, [natural] sciences, engineering). But, there’s no school subject like MINT at all! Just a few schools (e.g. FASW – Freie Aktive Schule Wülfrath) decided to integrate the classical subjects biology, geography, chemistry, and physics for younger students into one subject called Nawi (short form of “Naturwissenschaften” – natural sciences) and to focus on the connections between all these sciences. Most curricula and gradings insist on the conventional classification. So, even a comprehensive MINT approach is not easy to establish, not to mention something like this plus something further.
Second, typically there are no additional resources available for special activities in a German public school. It’s hard enough for a principal or an eager teacher to initiate and establish a STEM program, so go away with this weird “A”! If the schedule is tight and personal resources are subject to be cut, guess what subjects regularly are first to be reduced? Arts, music, sports and other subjects are often seen as “nice to have” but not essential. This is not an easy environment for art teachers: they feel bound to honor the fine arts, so they won’t easily support designing e.g. Raspberry Pi enclosures with students for their tech colleagues STEM project instead of analyzing an oil painting by Rembrandt.
Third, schools are the recipients of a MINT overload by politicians, organizations, companies, and lobbyists. Many teachers roll their eyes when the next MINT wave reaches their mailbox. Originally, MINT was an initiative from the mathematician Prof. Gudrun Kalmbach H.E. for supporting talented youth and especially girls in math and science fields. And, funny enough, it’s more than ten years older than the STEM acronym in the US. The initiative spread out to student competitions, and later was grabbed by politicians and representatives of different organizations for their own purposes. So, today every teacher knows the abbreviation MINT – it has become a buzzword. But nobody in the target group of the teachers exactly knows the actual goals of the different MINT programs funders. More or less all of the funders try to get access to talented young boys and girls and to engage them in their programs – the earlier, the better.
Nothing to say against that, but: MINT is just math, computer sciences, natural sciences, and engineering – nothing more! Where’s the “A” here? Where’s a concept for free development of kids which isn’t guided by the numbers, facts and figures of politicians or by companies interests? Where’s creative boredom, leisure, play, where’s the Kunst (art in German) as a motor for creative solutions?
It is in the air, in the steam around us! But we have to recognize the limitations as well as the possibilities. It’s an impossible mission to establish an extra letter into MINT – nobody would use something like MINKT or KMINT. Maybe it could become an interesting challenge to raise awareness for this steamy issue during the next months as a fablearn fellow…
Fig.: What’s this? Students are creating nativity sets for their homes in advent. To which subjects does it belong – religion, engineering, arts? We don’t care about that question in our makerspace at FASW: they make things, and nobody asked them to do so – just that is important! One thing is obvious: This is not MINT in the limited sense of most of the official MINT initiatives but it works.
The FabLearn conference in October 2016 signaled that Maker Education is ready for the next phase. After lots of try-outs, freedom and pleasure it’s time to face the difficult questions. How does Making in education fit into a set curriculum? When you read Papert, or ask Gary Stager, then the answer is clear. Both Papert and Stager say that if you truly wish for your students to learn something, then the first thing to do is to toss the curriculum out of the window. This is an interesting idea, but not my reality. Not that I don’t feel the attraction of a revolution every so often! Nevertheless, I choose evolution. There’s simply too much at stake here: the learning and development the students. I also love the system. To me making is a means for my students to express themselves and to expose their ideas.
Do away with curriculum. Do away with segregation by age. And do away with the idea that there should be uniformity of all schools and of what people learn. – Seymour Papert
In this blogpost I will discuss a few ways in which Making in education can be applied. The beautiful aspect of education is the infinite shades of grey there are. Making in education is no different. Perhaps it is more evident, as we like to celebrate diversity as part of the movement. For blogposts like these this does pose a challenge. The topics I have chosen to discuss in this post is not precise and should be seen as a starting point for a discussion of the matter. When I look at all the different projects that we have had at my school, then you can roughly distinguish three categories:
Assignments in which students are left to make all their own choices.
Assignments that have some freedom within boundaries.
Assignments in which students are supposed to follow fixed recipes / manuals.
In the latter students have very little freedom. You could align maker assignments next to these three types of assignments with increasing freedom. Obviously, the boundaries are not as clear-cut, however I will go into these three: freedom, boundaries and recipe. One could call it the ‘how’ of learning. Because the curriculum deals with what (“What do they learn”), I will take that into account too. For each category I will discuss the how and the what, I will give examples and incentives for assessment.
Freedom
The assignments that have the most freedom are those in which students make what they want to make. It’s doesn’t really matter what, you make what you want to. We often have only one restriction: the outcome has to be something that actually works. You could say that in this type of assignment you can’t measure how the student learns, but you also don’t really know what is learnt. Have a look at this video by The Children’s Museum in Pittsburg and you will understand what I mean.
Curriculum
Obviously this is the complete opposite of a curriculum. I presume that even Papert and Stager have this line of thinking when they discuss education. Still it does have value for an educational program with a curriculum. The learning takes place on different levels: knowledge, skills and meta skills. Obviously, students do need skills and knowledge in order to be able to start. The problem lies in the fact that giving students freedom makes it a challenge to know how, where and what it is that they are going to learn, prior to them doing so.
An additional issue is time. Have students work on different projects makes managing time difficult. This way of learning is probably not the best way for teaching pure knowledge. The quality of the learning, however, is most often very high. Students learn a lot from projects like these. It would be worth some research, but my personal opinion is that one’s long-term memory is challenged more often than in the other two forms. Taking the time aspect and the uncertain outcome into consideration it is difficult to find how this fits into a curriculum. We tend to use an assignment like this at the end of a trajectory. Like in the final module of NLT (High school course focusing on Nature, Life and Technology): de meesterproef (2015 and 2016). By selecting the modules carefully (so we cover all the exam objectives) at the end of a trajectory we are left with some ten weeks in which we can follow our own program. Students choose what they want to make and where their challenge lies. That way they are able to show us what they have learnt.
The best aspect of these kinds of assignments is that student motivation – the holy grail of education – is often extremely high. We have often seen an extremely efficient student turn into a hardworking hermit without a watch. It is most probably the best lubricant for starting the learning process.
Apart from that, it is a true form of art to get students to work on a proper and feasible project. Students who are used to a clear structure often have difficulties with these types of assignments. It’s simply a matter of letting them do it themselves. This is probably what makes it difficult to transfer (from classroom to classroom, between teachers) these kinds of projects. In my own school, experience has given us guidelines. We make sure the students’ ideas are feasible first and gradable after (bigger, crazier, better, more beautiful, …). Arts teachers often have a abundance of experience with similar processes and are therefore important to consult.
You don’t teach the maker mindset. The practice creates the mindset. – Dale Dougherty
Working on these kinds of assignments most often also means working on the school culture.
Because you, as a teacher, don’t always have all the answers, so you discuss your learning strategies with your students, and you use other people’s expertise (colleagues, outsiders, students). All this conversation makes the learning process the center of attention. It is great to see students asking for feedback themselves, helping each other and, above all, persevering in order to get things done. It gives them focus.
Assessment
The assessment is often difficult. How does one assess a process in which the how and what isn’t clear from the start? For the ‘meesterproef’ we use a matrix.
In the matrix one axis represents the challenge (the assignment is: ‘make something that holds a challenge’), the other axis represents the product itself. You could say that the one axis represents the ‘how’ and the other the ‘what’, without it actually being worked out any further. The terminology used is mainly descriptive. We hand out the assessment beforehand, which seems to work rather well. The students are very capable at explaining their proceedings. Using a matrix also enables you to compare the students with each other, by using the same matrix for all their work. Do the mutual relations compare? These comparisons often lead to interesting conversations.
Summary of Assignments with Complete Freedom:
High motivation.
Creates a culture of learning.
Coaching is difficult and takes time.
Basis: knowledge, skills.
At odds with the curriculum: time and assessment.
Outcomes are unclear at the beginning.
Difficult to communicate (transfer)
Boundaries
Competitions are often examples of “maker” assignments that are more constrained. One of the longer standing assignments at my school (the Populier) Making in education avant la lettre, is the mousetrap car race. For the past fifteen years the final year Physics students have been making cars that drive on the energy from the spring of a mouse trap.
The assignment is simple: make a car that can travel farthest on the energy from a mouse trap. Instead of complete freedom, the assignment has an outcome – as well as the assessment (the result of the race) – that is clear-cut. There is still room for freedom: you choose yourself how to make the car. Motivation for these kinds of assignments is still high. One thing to bear in mind for the race is that not all students are competitive. You can easily deal with that by having different ‘prizes’. Best design, most beautiful product, although that one is difficult to assess. A good example of a race that contained more learning than merely the making process, is the Nerdy Derby by Jaymes Dec. Click here for this great project (including all the materials).
Assignments with boundaries can be brought even closer to the curriculum. You can set the how and what in ways that align to standard educational topics and subjects. Make a product that clarifies the functions of the liver to your classmates. This is an example of an assignment, that has a set what. The function of the liver is knowledge you would have to teach in Biology anyway. You could use this supplementary assignment to do so differently and with more motivation.
Assessment
Here too, the assessment can be done with a matrix. Here an axis is much easier to assess. Have all the functions (e.g. ask for five) been explained clearly, then you are rewarded with a point. The product can be assessed on the other axis. Here it will be more descriptive, from insufficient to sufficient.
Next to the what you can also ask students to use a specific tool, technology, or technique – the how. Make an animation in Scratch, which clearly shows the transmission of signals in nerve cells. You are obliged to use Scratch. Tell your class what you will be paying attention to. In the following example a matrix is used for an NLT module. The students were at different levels of prior knowledge (students with / without Biology), but all had to learn about signal transmission. The assignment made all students active (motivation), and they all learned something new. Next to that, the animations gave me, their teacher, insight into their individual levels. Because the how and what are set, this assignment is easier to assess and to explain to students.
Summary of Assignments with Boundaries:
High motivation.
Creates a culture of learning.
Coaching is easier.
Fits into the curriculum easier, but remains an area of concern.
Basis: knowledge, skills is less necessary, students work on them.
Part of the outcome is clear from the beginning.
Easy to communicate (transfer).
Recipe
With recipes or manuals there is linear learning. You know what it is that they are learning, most often in set steps. The how is set too. Recipes are a good way of teaching skills, techniques, and basic knowledge. Because the outcomes are often uniform, recipes are usually used when safety is an issue. Learning soldering, for example. Motivation is a challenge here. You will have to be clear as to why they have to learn whatever you are dealing with in the assignment.
Curriculum
Because recipes are so clear in how and what, they are often found in regular curricula. Whenever you want to start making, then it is easy to incorporate new technologies and skills into the curriculum. Programming, soldering, digital designing, they can all be fit into one of the existing parts of the curriculum. This accounts for the fact that these kinds of assignments are easy to communicate. This explains all the manuals on skills that can be found on the Internet. E.g. watch the classes by Instuctables.
Obviously it is nicer if the students feel the need to learn themselves. Skills and recipes can often be embedded into an assignment that has boundaries, but allows for some freedom.
If you want to build a ship, don’t drum up people to collect wood and don’t assign them tasks and work, but rather teach them to long for the endless immensity of the sea. – Antoine de Saint-Exupéry
I have manuals ready for those students who encounter difficulties in Scratch. Besides that, there are also students who learn Scratch on their own by trial and error, or they ask each other, or people outside their class – on the Internet (especially YouTube).
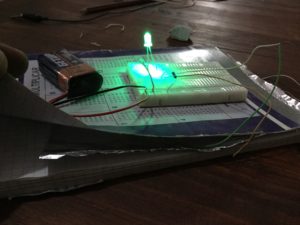
My goal is not to teach my students how to program. I want them to learn to express their ideas and I don’t mind them going about it in their own way. If you want to be sure that they all understand the conditional loop, then you will most probably have to try a different approach. Placing skills learning in a larger project is a good way to solve the motivation issue. In a project on LED objects the assignment is to make an object that lights up. First the pupils are shown all kinds of cool examples. Then they get to work with a standard practicum in which they make a series and parallel links. After that they are allowed to follow their own ideas and apply their knowledge.
Assessment
Assessments is usually not so hard in these assignments. Checklists, rubrics, or grades, these are all possible when the what and how have been set. Because recipes are usually linear, they lend themselves well for the matrix axis that we used for freedom in the framework assignment. You can first teach skills separately and let them come back in a project after, in order for you to let them play and indirect role in a freer assignment. When you are already able to solder, then you will probably use that skill sooner in a project. When you can solder well, then your product will work better.
Summary of Assignments with Recipes:
Low motivation.
Creates a common starting point.
Coaching is easy.
Fits well in the curriculum.
Firm basis not necessary.
The outcomes are clear from the start.
Excellent communication (transfer)
This blogpost was a good incentive for me to share my experiences and to discuss the more difficult questions about Maker Education. In the times to come I hope to share posts about how to start Maker Education and other topics. So, join the discussion and start writing too!
Per-Ivar Kloen
(This blogpost was first published in Dutch and has been translated by Claire Ohlenschlager. Thank you Claire!)
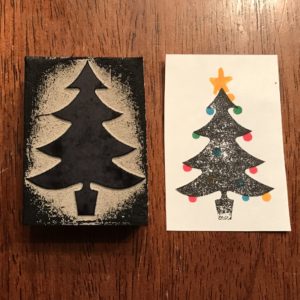
This is a quick project journal entry to document creating a linoleum stamp on the Othermill Pro. I have been trying to figure out workflow and some project examples to share with teachers on the use of desktop CNC machines in the classroom. One of the advantages of CNC machines is that they can utilize a wider range of materials than a 3D printer or laser cutter. This is not meant as a tutorial but more as a quick reference of what I’ve tried as I know other educators with desktop CNC machines that are also just starting out.
Material: I’m using 2″x3″ linoleum blocks from Inventables (https://www.inventables.com/technologies/linoleum) bought during a Black Friday sale. I cut the blocks in half on a bandsaw creating blocks approximately 52mm in x, 38mm in y and 22.5mm in z as measured using a pair of digital calipers. Per stamp cost is around $0.50.
Bit: I’m using an 80 degree engraving bit from Othermachine (https://othermachine.co/store/cutting-tools/engraving-bit/) which is recommended for general purpose engraving. I probably could have saved time using a combination of the engraving bit and a larger end mill but the bit was already in place so I just went with what I had to skip doing a tool change.
Fixturing: I use Intertape 591 Double Sided Flatback Paper Tape that I bought in bulk years back for CNC work.
Image Processing: I found a .jpeg image of a tree via a search. I downloaded the image and imported into Adobe Illustrator and used the image trace feature to create a vector outline. I saved this image as an .svg. (If I didn’t have access to Illustrator, I would have used the website http://image.online-convert.com/convert-to-svg ) This is a simple image with a single outline. The first image I tried had nested outlines. The Otherplan software does not recognize the interior lines so I switched to an easier image to start. Have to figure out how to do more complicated SVG files. Maybe Fusion 360 or MeshCam?
Setting Up OtherPlan: I entered the size of the material and then opened the tree.svg file. I selected the 80 degree engraving tool and deleted the other tools listed. I changed the Engraving Depth to 1 mm. I unselected Cutout. I went into Advanced and changed Invert setting to Yes, everywhere.
Milling: I homed the machine and checked my setup. I put in my ear protection and then clicked Mill All Visible. I ensured that everything was cutting correctly and the machine milled for approximately 45 minutes.
Finishing: I opened the machine and vacuumed out the dust. The stamp popped off easily. I cleaned up a few areas on the edges with a hobby knife.
Stamping: I used a Ranger Ink archival stamp pad and inked the stamp and then applied to plain white copy paper. The coverage of the stamp wasn’t total and I would like to try a few different type of ink pads. (My 7 year old used markers to decorate the tree. My daugter wants to use these as gift tags. We would use card stock.)
Finishing: I made a stamp on plain paper and glued this to the back of the stamp. I would probably want to round off the corners using a band saw or maybe a sander.
I plan on showing this to the art teachers in my school to see if this might work with their printmaking lessons.
P.S. I did this project during family crafting time on the weekend. I don’t have time during the work week to experiment with new making technique so took advantage of family holiday decorating to work with the CNC.
Have some tips or links to cool CNC projects? Leave a comment or contact me on Twitter @DesignMakeTeach Crossposted on my blog http://designmaketeach.com
Rooted in legacies of struggle and resistance, the story of the Fruitvale district in Oakland, California exposes the historical displacement and disenfranchisement for intersectional communities of race, class, and gender. The Fruitvale was named after its beautiful fruit orchards and most poignantly after experiencing the first wave of refugees displaced by the 1906 San Francisco earthquake and fire.
Most recently, this story of displacement and disenfranchisement is retold through the tragedy of the Ghost Ship fire. The Ghost Ship was a converted warehouse into an artist live/work space. The residents of the Ghost Ship as well as the party-goers on that fatal night embodied the maker culture as empowered, inclusive, and conscious not only DIYers but creative beacons for their respective communities. Nonetheless, survivors of the Ghost Ship tragedy have to mourn their loss amidst a public stoning.
From progressive1 to more reactive2 critics, the Ghost Ship tragedy exposes the ugly tax intersectional communities pay for whom making culture is not always just a choice. Progressives prematurely point out that the narrative of displacement has not taken center stage until now that we see the deaths of poor and marginalized white artists. Reactives complain about not understanding why these people would put themselves in the position of being trapped and killed in a fire.
All this heat (no pun intended) make me wonder about just how wide the disconnect really is between K12 Maker Education and the rest of the world? Is making in the context of living in real poverty here in America getting enough attention? How is making in poverty here in America different from making in poverty in Africa, for instance? Does our American society really value makers if it’s so willing to crucify them as soon as something goes wrong for their innovation at problem-solving? How will my students’ maker identity formation 3be impacted going to school just 2 blocks away from the Ghost Ship? Will they internalize the critics of these maker artists or will they learn to value what these makers added to a community torn in its own geopolitical battle?
One of the best makers I teach hardly ever shows up for class. Of course I can’t use his real name, so let’s call him Andres. When Andres does come to class, he finishes the project we’re doing in a single class. For context, it often takes many of the other students weeks to finish a project. If you’re thinking to yourself “you need to give this student more challenges”, I’m right there with you.
I teach at a few different locations in the Bronx. One is at an art center open to all young people in the Bronx. It’s a beautiful center with amazing programs that incorporate social justice, the arts and making. I also work at a middle school and a high school. The high school grew out of the art center, but is now completely operated by the New York City Department of Education. Art and social justice are heavily promoted and discussed in the school and it’s created an interesting array of cliques and identities within the school culture. I love teaching in such a diverse place, and teaching in this school has given me an opportunity to witness and reflect on the many types of diversity out there – including diversity in learning styles and educational needs.
One class I teach is completely made up of students with Individualized Educational Plans (IEP), so students have an array of different learning, emotional and behavioral support needs. Many students in this class also have significant attendance problems.
This brings me back to Andres. Andres is labeled with an intellectual disability, and has attendance problems. I’m not a psychologist and I haven’t done any assessments, but I believe he has been wrongly labeled. There are many things that can go wrong when students are evaluated for intellectual, learning and emotional disabilities. For example, there are cultural competency issues both in regards to the evaluation tools and the person giving the evaluation. Furthermore, there are too few school psychologists (especially in New York City), so they are generally overworked and not able to consult with teachers and parents when doing evaluations. Additionally, sometimes people giving the diagnosis are not psychologists and not fully trained and qualified to be labeling students in ways that will seriously impact the rest of their educational careers. In sum, there are many roads that can lead to a misdiagnosis.
Not only will a misdiagnosis affect the services and educational experience of a student, in the case of New York, it also often prevents students from graduating with the same type of diploma as other students. In New York, many students with IEPs are not prepared to take the Regents exams (New York state’s standardized examinations), which disqualifies them for a Regents diploma (the “normal” high school diploma). As a means to address this issue, policy-makers changed the requirements for receiving what is called a local diploma. Students now just need to pass the math and English exams to receive the local diploma, as opposed to three additional exams to receive the Regents diploma. While this policy shift is a huge improvement from the previous offering of IEP diplomas, it’s likely that employers and colleges will discriminate against applicants with local diplomas.
Let’s examine Andres’ situation again. He was diagnosed with an intellectual disability, which unfortunately carries a lot of stigma. He does not come to school regularly and is thus not emotionally engaged with what happens there. However, in my maker classes, he demonstrates a level of talent that strikes me as in the gifted range. For example, when he entered my class, Andres had no prior exposure to programming of any kind. With almost no instruction and seemingly lightening speed, Andres was able to develop a digital instrument on Scratch (with no prior experience) and fabricate a physical controller linked by a MaKey MaKey. As this was happening, most other students were still at the very beginning of figuring out scratch basics. The other teacher and I were stunned.
Andres’ situation points to the limitations of standardized assessments and diagnostic labels, and how they can not only construct a negative relationship to learning and school but completely miss areas of intellectual talent. On a systemic level, the message being communicated to Andres and other students with IEPs is that people don’t expect him to achieve at the same level as his peers. Thus, he will be getting a different, “inferior” type of diploma from them.
To clarify, my intention is not to critique individual teachers and school leaders; there are a great many working hard to increase student expectations and push low performing students to reach greater levels of potential. I’m calling into question a message that is communicated at the systemic level through the (often) sole use of standardized testing, previously given diagnostic labels and a lack of learning opportunities that address different learning needs (such as kinesthetic or visual/spatial learners). Andres is a junior right now and the school is doing its best to prepare him for passing the math and English Regents exams, so that he can earn a local diploma. The low expectations placed on him along with what seems like a misdiagnosis have a created a situation where he doesn’t feel the need to show up to school.
This may be an oversimplification of a very complex issue, and I’m not at all advocating for the elimination of IEPs. However, I think that Maker has something very significant to contribute in the quest for a solution. Former FabLearn Fellow Christa Flores wrote a lot about the use of self-assessments in MakerEd. They’re a great alternative, or at least supplement to the current system of standardized testing. I think for students with IEPs, especially students like Andres, self-assessments could be a life-changing tool. Given that IEPs already incorporate goals and measures to evaluate progress, self-assessments would be easy to incorporate.
What exactly would this look like? First, maker teachers could be part of the student’s IEP team. Incorporated into the goals of the IEP, the student could list projects/interests she would like to pursue. Let’s call it the Individualized Education Plan + Project (IEP+P). The Maker teacher would support the student in completing the project and related self-assessments. This data would then be added to the student’s portfolio of academic work and progress. This process would empower a student like Andres to take more ownership and thus initiative in his learning process. This, in turn, could transform his relationship with school and learning. He would have a seat at the table that is attempting to guide his future, he’d be able experience and demonstrate his own strengths and be more empowered as a self-directed learner.
Andres is goal-oriented. He has plans to join the military when he completes high school, although he needs to receive a diploma first. The military can provide a lot of opportunities for students who don’t want to or are not ready to pursue college. But what if Andres had the opportunity to pursue those opportunities first in school? Wouldn’t that given him greater confidence and prepare him more for what comes next?


 It’s amazing to see how many different ways kids construct their creative learning experience. Some of them try multiple paths and ideas, while others fall in love with an idea and try until success.


 UNESCO Director-General, Irina Bokova mentioned in the 11th annual Education for All global monitoring report that “poor quality [of education] is holding back learning even for those who make it to school.” (Provost, 2014). This is about literacy, though. What about fabrication and making? The remaining question to answer is: how can we get millions of people living in the base of the pyramid communities used to fabrication and making? If those people cannot get access to quality education, how is possible they get skills to exploit any tools and be part of world’s fast-growing maker movement?
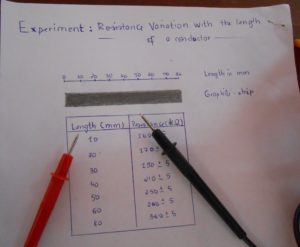
 One of the most impactful projects my fifth-grade students take part in is a project to hack toys to make them accessible for kids with disabilities. This simple project, that typically costs families upwards of a hundred dollars can be done for under one dollar. The toys, which began as a standard plush toy with a push-button to produce sound and movement were transformed to a toy equipt with a 3.5mm stereo jack. This new plug that students installed, allows for any standard adaptive switch to be plugged in and used. This modification allows kids who already have specialized switches to plug in and play. In addition, the fifth-grade students made their own tap switch that can be activated by a slap, tap of a foot, or nod of a head.