How to Make Silicone Molds:

This article has colaboration of Pietro Domingues.

Silicone molds are excellent, because they can be used to make complex geometry objects
with a low cost.

In this section, we will see how to make a silicone mold.

ms_1

Materials:
Liquid Silicone + catalyst
A container to mix up the silicone
A stick
Another container, if necessary, to retain the silicone with the original workpiece
Original workpiece (Any kind of object to reproduce, the workpiece can be some 3D printed part, or a sculpture, etc.)

There are two kinds of Silicone:

ms_2

On the right side of the image we can see the white Silicone. It’s made to mold materials at
room temperature, while the brown silicone, on the left, is made for high melting temperature
materials.

ms_3

There are two workpieces produced by melting them at high temperatures. The first one is
Paraffin wax and the other is Tin.
The rest of the workpieces are made of Plaster of Paris (the white one) and resin.

ms_4

Silicone comes from factory in liquid state, and it is sold in small containers ( 1L or ¼ gallon).

ms_5

Before putting into the small container, it is recommendable to stir with a stick to ensure the
homogeneity.

ms_6

Now drop the catalyst at the right amount (usually indicated on the manual) on the small
container.

ms_7

After stirring the mix a time (ensure if the catalyst mixed completely), drop the liquid inside
another container with the original workpiece (In this case the workpiece is the container
itself).

ms_8 ms_9 ms_10

It takes about 30 minutes to some hours for the Silicone to cure (it depends on the amount of
silicon). Touch the silicone, if it glues on fingers, it is not good.

ms_11

After it is ready, remove the Silicone carefully :

ms_12 ms_13 ms_14

Now the mold is ready to use! Let us reproduce the workpiece!

See too:

The molds of Civilization

http://fablearn.stanford.edu/fellows/blog/molds-civilization

Reproducing/replicating workpieces
http://fablearn.stanford.edu/fellows/blog/reproducingreplicating-workpieces

The molds of Civilization

This article has colaboration of Pietro Domingues

In this section we are going to talk about molding. We introduce talking about its utility and the current methods used in this process. We will explain step-by-step how it is possible to make these molds and how to use the molding process in many types of materials.
Reproduction by molding

It would be very interesting to think about something and it appears magically!

mc_1

However, according to nature’s laws, it’s easier things to get messy instead of getting some well defined shape. Actually, shaping something is fun, even if it takes a long time. When we want to make one single part, we can spend hours and hours, and it still is a pleasuring thing. But can we reproduce a lot of them, keeping the same quality at the same time there is no much effort on doing this? This is a challenge that the mankind has been facing for a long time.

To solve this problem, we can use molds! There’s a very simple way to make mudbricks using molds:

mc_2

Photo: http://www.manutencaoesuprimentos.com.br/conteudo/4372-quais-sao-os-dife…

mc_3

Photo:http://magodafloresta.blogspot.com.br/p/obra-do-gamarra.html

The process allows us to put a pliable or liquid material (such as liquids) in a cavity called mold, and after being transformed, we obtain a solid part.

mc_4

Photo: http://www.betaoetaipa.pt/servicos_detail.php?servico=adobe

An everyday example is the ice cube: it’s made putting the liquid water into the ice cube tray, and after some minutes, it turns into solid in a cubic form. Bonbons are made this way also.
This transformation is the main ideia of metallurgy since the beginning of civilization:

mc_5_0

Museum of anatolian civilizations – Ankara, Turkey. Photo by Gilson Domingues

mc_6

Museum of anatolian civilizations – Ankara, Turkey. Photo by Gilson Domingues

mc_7

Museum of anatolian civilizations – Ankara, Turkey. Photo by Gilson Domingues

mc_8

Museum of anatolian civilizations – Ankara, Turkey. Photo by Gilson Domingues

The photographs above are examples of molding where liquid metals are casted into rock molds.

Since antiquity, mankind has been making products based on molding process. Jewelry, weapons, domestic utensils, tools, etc. were already made this way.

Currently, big industries as well little communities and artisans still make products through molding and casting.

If we pay attention carefully, we will see that many objects of our everyday life are made by molding. As an exercise, identify 5 objects made through this process. Try to find out how each object was manufactured and projected. Taking a look on everyday objects, you will see that this process allowed engineering and design to develop new technologies over the history.

See too:

How to make silicon molds
http://fablearn.stanford.edu/fellows/blog/how-make-silicone-molds

Reproducing/replicating workpieces
http://fablearn.stanford.edu/fellows/blog/reproducingreplicating-workpieces

collaborative work in the classroom with etherpad

First the good news, I am now a teacher and expert at the Montessori School Potsdam. After a year of testing, I am now responsible for the digital technologies at this school next to my work in the FabLab.

In several courses, I made an introduction for students and course teachers in some tools (which we use) for collaborative documentation and their use in the classroom. One example is Etherpad. I started using this software sevral years ago in my own project-groups . This software is open source and can be installed as a server on almost any hardware.

http://etherpad.org/

There are some free accessable Online-Pad Server like :

http://piratepad.net

In my class are between 10 and 20 students, all write simultaneously in the pad. you can track the discussion with a time-slider button. In the 6 weeks project courses a specific pad will be used as a general documentation tool.

20141230_0061 20141230_0052

Example (only in German) :

http://piratepad.net/my7A7pH2kQ

One Topic in the current course is the installation of the etherpad on the Rapberry Pi and use it as a mobile local documentation server. The big advantage is also that any device can be used for Etherpad for instance Smartphones or Tablets.

Furthermore, I am looking for extensions to easily integrate such as images and videos in such a system.


Experiences :

– the students are happy to use their own devices in the classroom. (We want to introduce a mixed BYOD in our school this year. 95% of my students have android or ios powered smartphone)

– there is a testing period in the beginning with fun filled discussions in the pad.

– then slowly forms a structure in the text working groups were created.


some links :

(1) http://jasontbedell.com/using-etherpad-in-the-classroom

(2) http://de.slideshare.net/jamieromance/etherpad-energizing-and-engaging-c…

(3) http://pcgeeks.bugs3.com/?p=235

Intel MakeHers Report: Engaging Girls and Women in Technology through Making, Creating, and Inventing

makehers_picture_2

Intel and Intel Foundation released an insightful report on MakeHers and the role of making in engaging girls and women in technology. The report explores why girls make, their role in the maker movement, as well as statistics on the number of girls and  women engaged in making.(As well as why they are underrepresented in the field of science, technology and engineering). Research shows that girls respond better to hands on learning which is a great platform to get women involved in STEM.  This report highlights the potential that the  Maker Movement offers to inspire more girls and women to take up an interest in science and technology. Ultimately, this would lead to the uptake of more women in STEM careers.


Making can be an effective pathway to attract under-represented groups in computer science and engineering fields. The playful and creative nature of making provides an avenue for people to engage in scientific and engineering problems that have personal meaning for them.


The report also includesmaker profiles on women who make – MakeHers. This also includes a feature some of the work I’m doing at Foondi Workshops.

Here’s a video with highlights of the report’s findings:

http://www.youtube.com/watch?v=meqbyg_TxT0

Hey Kids – Follow the Directions!

Four years ago at a Young Makers meeting, a parent-mentor told the group, “Following directions is not making.” When I recently saw the same sentiment on a post or tweet, it made me think about our practice at the Lighthouse Creativity Lab and when following directions is making.

We can place most making projects & activities on a spectrum from step-by-step to completely open-ended (similar to a spectrum of inquiry) and we choose where the learning activity falls based on what we want students to learn and student prior understanding and experience. My instinct is to always push towards open-ended student driven projects, but there are times when following directions can be powerful.

In that first year of our maker program, I knew that many of my student groups would be following directions from tutorials or magazines because they had never been asked to create a project of their own vision before. They had trouble even conceptualizing what was possible.

When my daughter first started playing with Legos around age 2, I purposefully didn’t give her any directions. I wanted to hold off on directions so that she wouldn’t come to rely on them, thinking that the more I could encourage her to free build, the more likely she would apply this mentality to the world around her. And, so far, the plan seems to be working. Then and now she builds towers, vehicles, spaceships, sculptures, and buildings all while telling intricate stories about what was happening (and using minifig heads as structural components).

lego

Then at about three-and-a-half she received a kit and wanted to build the mining truck on the front of the box. I tried to stay out of it; only helping her align what she was building to the picture in the instructions when she got stuck. What did she get out of this experience? First of all – pride. She was extremely proud to have built the mining truck just like the one in the picture. Second, watching her work through the directions, she was clearly developing her precision and spatial thinking.

How does this apply at the Lighthouse Creativity Lab? We try to make the project’s place on the continuum from step-to-step to complete autonomy match its educational purpose.

wind_sm

Our Physics students build wind turbines  based on a specific design – meaning all students work from the same directions.  One of our goals is that five years from now students remember magnet, coil of wire, motion = electricity.  Just building the turbine helps with that. But we also want them to experience a more open-ended, process-based aspect, so we ask them to make it better.  But even if they were just building the turbine itself, they are still learning core Physics content, building skills, learning the importance of precision, and developing persistence.

In our high school making elective, students start the year with skill builders that involve following a lot of directions: they make a chair (woodworking), a pillow (sewing), a circuit board (soldering), and play around with Arduino (programming and circuits).  The core goal in all of these projects is to build student confidence and comfort in each of these areas so that when they undertake their independent project, they will venture outside of their initial comfort zone.

chair_sm

The circuit board is a step-by-step process students follow exactly, but after only a few class sessions, they are decent solderers and much more knowledgeable and comfortable with electronic components.  Working with Arduino is a move away from this step-by-step.  We ask students to move through the existing Arduino example code and tutorials so they learn how to find references. Then they engage in an Instructables Arduino project to experience all the issues that come with following someone else’s directions to do something new, because it turns out that following directions is not always easy.

Ideally students should be able to move fluidly between referencing directions and moving forward with their own vision. Like in the Arduino projects, I want students to know how to find a tutorial, video, or other reference to get started and then take the project in their own direction.

So is following directions making?  It can be.  When students use directions to get started, they build confidence and learn perseverance and precision that will take them beyond the directions. When we find that students are afraid to leave the directions, it’s our job to nudge them into their own creating.

Toward Making Change: Beyond #BlackLivesMatter (Two: Strategies for Networking & Community Participation)

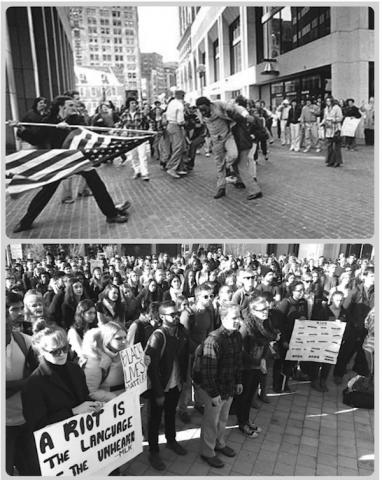
This is the second of a series of posts documenting the progression of a collaborative project at the South End Technology Center @ Tent City supported by the Harvard Graduate School of Education Dean’s Equity Project.  The goal is to create a safe and creative space for high school and college youth to explore their identities and the issues that have come up for them with the #BlackLivesMatter movement through activities based on Hip Hop Culture.  Then, using the design engineering process, the youth will imagine a better and more just future, reating a participatory art and technology activity that will engage other youth during the 2015 Learn 2 Teach, Teach 2 Learn program.  

Our ultimate end must be the creation of the beloved community.  – Martin Luther King

Engaging people from the local community in maker education projects enriches education for our youth and brings fresh vitality into programming.  Visiting educators can serve a role models and expose youth to possible STEM career paths. Many talented people are also are seeking ways to give back to their communities and have creative outlets for their talents beyond work. The question often is, how do educators go about “making” these relationships?

At South End Technology Center @ Tent City’s Learn 2 Teach, Teach 2 Learn program, we used a number of practical strategies in developing collaborative partners for “Making #BlackLivesMatter: Using STEAM to provide opportunities for Boston youth to explore and express possibilities for change.”

STRATEGY: Seek role models who look like our youth

As a white education organizer working with 90% youth of color in our Learn 2 Teach, Teach 2 Learn Program, I know I bring much love and skill to our youth.  However, I feel it particularly important for our youth to experience role models who not only look like them, but have developed interesting STEM skills and exemplary achievements in higher education. So, I work hard to find those community members who look like our youth and can share their talents and stories through social media and networking.

STRATEGY: Cultivate long-term relationships with local programs and people in higher education institutions

Over the past 12 years, Learn 2 Teach, Teach 2 Learn has developed a lively and deep relationship with the MIT Media Lab Lifelong Kindergarten Group (LLK).  Our youth have been among the early testers and adopters of LLK technology education tools such as Scratch, PICO Crickets, and Makey Makeys.

chainreactiondowntable_0

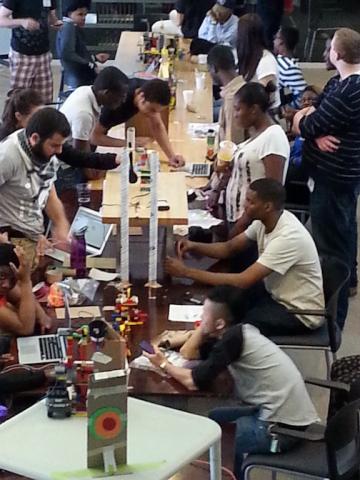
2014 Youth teachers with LLK Graduate Student Abdulrahman Idbli in Chain Reaction Workshop at MIT Media Lab

So, when LLK researcher Dr. Karen Brennan moved to the faculty at the Harvard Graduate School of Education (HGSE), she reached out to Dr. Amon Millner and I to serve as guest speakers about our work with Learn 2 Teach in her T-550 course called Designing for Learning by Making.

STRATEGY:  Youth are the the best ambassadors for developing community relationships

Amon and I decided that we could have the most impact on the Designing for Learning by Making graduate students at Harvard by bringing youth teachers as guest speakers and by showcasing some of their projects.  We decided to provide some history and perhaps a few contextual comments here and there, but were convinced that youth teachers should be lifted up as the main speakers.

We recruited 2nd year youth teacher Naeem Wilson and 1st year youth teacher Cynthia Johnson to speak in the class.  I contacted the headmaster and principal at their schools, as well as their parents, to explain how this opportunity could enrich the education of the youth AND the Harvard graduate students.  This allowed us to get written permissions so that Naeem and Cynthia could miss their own high school classes one morning.  We also packed up some of the youth projects to showcase at their Harvard talk.

Naeem and Cynthia were “rock stars” in the class and our guest speaking time was extended well beyond what had been planned to accommodate the many questions from the Harvard graduate students.  It turned out that Cynthia and Naeem were not just the only youth to speak to the class;  they were among the few people of color guest speakers. Their impact was palpable, especially among the graduate students of color.

hgsel2tt2l

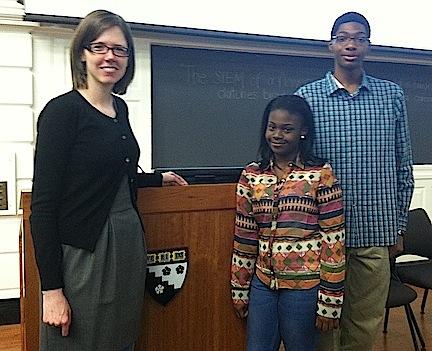
Dr. Karen Brennan with L2TT2L youth teachers Cynthia Johnson & Naeem Wilson at Harvard Graduate School of Education

STRATEGY:  Mentor local education students and community members

As a result of this Harvard visit, I received many emails from graduate students.  One, Adia Wallace from Mississippi, visited our technology center and began hanging out with our youth in her “spare” time.  Adia even participated in our Digital Embroidery and Sewing Group and helped out with our youth teachers’ holiday Pop-Up Store. Her infectious enthusiasm made developing relationships with the youth come quickly and easily.

adia

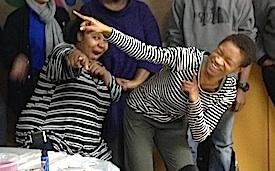
Adia Wallace with youth teacher Tyla in a playful moment during Eek! Electronics Explorers Klub

I began mentoring Adia, connecting her with a local social justice STEM network and other maker educators of color in the community.  Adia and I began to brainstorm strategies for her to both work with Learn 2 Teach, Teach 2 Learn and complete her graduate work through independent study and developing projects for her classes.

When the Dean of the Harvard Graduate School of Education put out a request for proposals for Equity Fellows to complete projects during the J-Term or January Term, we jumped on the opportunity!  We came up with the idea of engaging the 7 Learn 2 Teach, Teach 2 Learn youth in our after school Eek! Electronics Explorers Klub and Fab Lab Steward and some college mentors in a special project that would allow them to create an art and technology activity responding to the #BlackLivesMatter youth movement.  The successful proposal we submitted was called ““Making #BlackLivesMatter: Using STEAM to provide opportunities for Boston youth to explore and express possibilities for change” (proposal: https://docs.google.com/document/d/1yHMX1TL4zynvwTC84zXsl_NTFwHXzxuIW77DhPSLfd0/edit?usp=sharing and supporting letter from SETC: https://drive.google.com/file/d/0B-UMdcVPeHUJcnZmSVZKTG9xNVU/view?usp=sharing).

STRATEGY:  Participate in local STEM professional networks

Adia wanted to have local STEAM educators participate in our project.  So, I began to connect her to people in our local Race, Education and Democracy STEM network that seeks to provide meaningful STEM opportunities for educators and youth of color.  This network grew out of the wonderful Simmons College Race, Education and Democracy Lecture and Book series directed by Professor Theresa Perry.

This past fall, the RED STEM Network held an event that featured a Makerspace Panel for local educators and parents at the South End Technology Center @ Tent City.  One of the most engaging speakers was the new STEAM Lab Director at the Boston Arts Academy (local high school), Dr. Nettrice Gaskins (see FabLearn blogpost)

img_3484

Adia, Nettrice and I met together several times for lively conversations, imagining how hip hop culture and AfroFuturism could be incorporated into the project. Nettrice generously offered to participate as a collaborator in  “Making #BlackLivesMatter: Using STEAM to provide opportunities for Boston youth to explore and express possibilities for change.” Her unique approach to maker education is helping both Adia and I to expand our own understanding and practice of culturally responsive making, breathing a new vitality in our work!

An interesting article on “Culturally responsive computing: a theory revisited”

Among the FabLearn Fellows and at the Fab Learn Conference this past October, there has been a focus on thinking about how to put youth of color, young women and youth living in families with low incomes at the center of the maker education movement.

As part of my own research for a current project at the South End Technology Center @ Tent City, Dr. Nettrice Gaskins, the Director of the STEAM Lab at the Boston Art Academy High School, recommended I read this excellent article that she cited as part of her dissertation.  I wanted to share it with the community.

Kimberly A. Scott, Kimberly M. Sheridan & Kevin Clark (2014):
Culturally responsive computing: a theory revisited, Learning, Media and Technology

http://goo.gl/NgH1nR

Toward Making Change: Beyond #BlackLivesMatter (One: Introduction)

This is the first of a series of posts documenting the progression of a collaborative project at the South End Technology Center @ Tent City supported by the Harvard Graduate School of Education Dean’s Equity Project.  The goal is to create a safe and creative space for high school and college youth to explore their identities and the issues that have come up for them with the #BlackLivesMatter movement through activities based on Hip Hop Culture.  Then, using the design engineering process, the youth will imagine a better and more just future, reating a participatory art and technology activity that will engage other youth during the 2015 Learn 2 Teach, Teach 2 Learn program.  

“If we want a society and culture that works for everyone, we need innovation in our relationships along with innovation in the STEM fields and STEM education.”   – Mel King

In our STEAM program at Learn 2 Teach, Teach 2 Learn, most often we start designing teaching activities by identifying the big ideas and skills connected to a technology we teach, be it computer and physical programming, electronics or digitial design and fabrication.  Then, we work to create a “cool” culturally relevant activity that engages the youth in those big ideas and skills.

What excites me about this project is that we are “de-centering” or taking these “technologies of the earth” away from the focus of activity design and putting them in the service of “technologies of the heart.”

What has most engaged me as an educator for the past few years are these technologies of the heart — those technologies that are necessary to bring out the best in humanity and enhance our relationships with each other — and documenting how they support the STEAM education of our Boston youth of color.  (I’ve addressed my thoughts about this in some of my older blogposts:  http://fablearn.stanford.edu/fellows/blog/some-thoughts-making-technolog… and http://fablearn.stanford.edu/fellows/blog/making-justice-youth-restoring…).

During the school year at the South End Technology Center @ Tent City, we have two small afterschool programs for teenagers — our Eek! electronics explorers klub and our Fab Stewards program.  During circle-up sessions, the youth teachers have been talking about they have been discouraged at school — and even banned — from talking about #BlackLivesMatter and participating in the nationwide school walkout.  Some even spoke about how their parents were fearful about talking about #BlackLivesMatter and asked them not to participate in any activities.  The lack meaningful opportunities at school or home to explore and express their ideas and feelings about the #BlackLivesMatter movement deeply saddened me because the courage and ideas of youth have historically been at the center of social movements here and across the planet.

I am also beginning to understand #BlackLivesMatter as a maker movement that indeed is seeking to create new technologies of the heart to address social justice issues.  So, in collaboration with graduate student Adia Wallace from the Technology and Innovation in Education program at the Harvard Graduate School of Education developed a successful proposal to the HGSE Dean Equity Fellowship to ask the question,

How can Science, Technology, Engineering and Math enrichment help youth of color meaningfully address issues related to #BlackLivesMatter in historically and culturally relevant ways in Boston, Massachusetts?

Through a series of blogposts here at the FabLearn Fellows website, I will document our process and progress and hopefully provide insights that will be of use to others who would like to initiate similar collaborative projects with youth.

ferguson-photo

Photos chosen by Adia Wallace to submit with our successful HGSE Dean Equity Fellowship Proposal 

Sequencing activities to support discovery

joIn the quest to create an authentic student-driven learning experience I find myself thinking a lot about the role of a maker educator as facilitator.  If I were to distill what that ideal is for me, it would be to provide an environment where students could find their own way creatively, all the while gaining skills they could take into the world to make new things.

Student-centered and skill-building?

Yet, I get stuck.  These stalls tend to happen at junctions in a project where things have to be learned in a certain way or produce something lacking a personal stamp. Exploration pauses and gives way to more direct instruction or jumps ahead to focus on a product that neatly packages all of the learning objectives we hope to achieve with our students.  A co-teacher colleague and I have been trying to balance this in our  Engineering and Design class through the sequencing of activities and maintaining maker portfolios that put students at the center of their learning.

This past year we set out to design our course and the big question we asked ourselves was, “Where do we want our students by the end of the year?”  We wanted them to identify and design solutions to problems that have personal meaning to them.  The next question was, “How do they get there?”  This was the harder question, mainly because we have a makerspace full of digital fabrication machines and tools and wanted our students to gain the literacy necessary to maximize their making capabilities in our space.  What we settled on was dedicating the first the half of the course to developing a base knowledge of circuits, microcontrollers, and 2D-3D design for fabrication, while the second half of the course was reserved for student-driven projects.  A new question emerged: “How can we create opportunities in skill-building projects that put students in charge of their learning?” We set out to address this through activity sequencing and reflection in maker portfolios.

capture4

Activities from student maker portfolios leading up to a synthesizer build in the Engineering and Design Lab. Project notes here.

The exploratory lead up to the culminating project

When developing our units we looked for ways to incorporate exploration, play and self-expression while ordering the activities to maximize opportunities for discovery.  The culminating project was to build a simple synthesizer that brought together some working knowledge of circuits and covered techniques and a wide range of skills for making.  These included reading schematics, debugging with a multimeter, breadboarding, soldering, measuring with calipers, 3D modeling and 3D printing.  This was a project with a product. Everyone made a synthesizer.  It was less of an exercise in creating something uniquely theirs and more of an exercise in bringing together a huge amount of techniques and skills that they can work out in a challenging hand’s on way.  However, the activities leading up to the synthesizer were more process-oriented and exploratory in nature.  Students were able to approach learning about circuits by asking questions, tinkering and finding their answers through their peer network in class and resources on the web.  Furthermore, students were asked to reflect on their learning.  The following projects preceded the synthesizer build:

Circuit boards- project from the Tinkering Studio at the Exploratorium

What they did:

Explored circuits including: parallel, series, switches, potentiometers, motors, plus unique items from teardowns, like alarms and music boxes.

Skills they picked up along the way:

How a basic circuit works from simple to more complex.  Safety–avoiding short circuits.

Reflection:

Design a circuit tutorial or “How To” using the circuit blocks as a teaching tool.  Post in maker portfolio.

Teardowns

What they did:

Students brought in expired electronics as objects to teardown.  They were charged with breaking them down to their smallest parts.  Document the teardown in an artistic way.  Inspiration: Tom Sachs “knolling,” and Todd McLellan

Skills they picked up along the way:

Research skills, learning how to identify electronic components.  Safety–discharging capacitors.

Reflection: Identify five components in your teardown to research.  Share your research in your maker portfolio.

Paper Circuits- from High-Low Tech Group

What they did:

Create a prototype and a final paper circuit with at least three lights in parallel and switch.

Skills they picked up along the way:

soldering, multimeter

Reflection: Write a blog post documenting and reflecting on the process.

The culminating project: The synthesizer

Our class progressed through their synthesizer build as outlined in these project notes: Atari Punk Synthesizer.

capture5

synth

As we were planning the final build we were faced with another compromise.  Wanting to introduce 3D design for fabrication but knowing that custom designed enclosures would be too time consuming to print and wouldn’t be an ideal first experience with 3D modeling, we charged students with the task of designing knobs and amplifiers for their synthesizers.  These parts are small and would allow students to go through several design iterations.  We provided basic box enclosures (wood or 3D printed) that they could customize.

Project as prototype

Overall the project was a success but with all work we do with students, we look for ways it can be improved. If we end up recreating this build, or modifying it in the future, we undoubtedly tweak it and make it more aligned with the skill-set of our incoming students.  The beauty of building a program is that as it grows so does student knowledge.  The next crop of students will have more experience in the lab than the students before them.

The Role and Rigor of Self-Assessment in MakerEd (Part 2)

The Role and Rigor of Self-Assessment in MakerEd (Part 2)

by Christa Flores


zenIn part one of this blog, we discussed what self-assessment is, and the relevance of using alternative assessments in your MakerEd program or school wishing to usher in more student choice into the curriculum. In this blog, we will do a shallow review of what has been written about self-assessments. This will include work being done on the frontlines by teachers (blogs and articles), as well as published studies from academia about the efficacy of self-assessment. We will focus our discussion of efficacy on two parameters, accuracy and return for time invested.

How effective is Self-Assessment?

Giving a student a rubric and asking him to grade himself is a form of self-assessment. Expecting that student to be honest (remember grades can be high stakes) or to understand the rubric created by another person, brings to question not only the accuracy of this assessment tool but also the time payoff, especially when compared to quicker or traditional forms of assessment.  While rubrics are helpful and make the self-grading process appear more democratic. when not co-created with the student, rubrics may have inherent bias or erred perceptions of understanding built in to them. Studies done at Stanford in 2001 around self-assessment tools in medical school, confirmed that students were inaccurate at assessing their level of knowledge on a given subject (Dunning 2004).

Stories and studies that paint a positive light on self-assessment argue that the focus of these assessments should be formative, to avoid issues of disenfranchisement or inaccuracy (Andrade 2009). Formative assessment is process versus product centered as well as more authentic, or embedded into a student’s learning. As such, formative assessments foster a growth mindset and a safe space to give and hear critical feedback. The message of a formative assessment is that “we are all still learning.” Examples of formative assessments can be design or engineering logs that record diagnosis and design ideas, Maker portfolios or informal work shares for peer feedback.

Because formative assessment happens more than just at the end of a chapter or unit, they can be seen as too time consuming. The time used to do these assessments, some will argue, is a vital part of the learning and offers a deeper more holistic payoff compared to the quicker standardized test (MacDonald 2012). Furthermore, self-assessment was found to make students smarter and more motivated according to a 2012 study by Dr. Betty McDonald of the University of Trinidad and Tobago. MacDonald found that, “students of the experimental group (those who used self-assessment) were able to pinpoint their specific areas for improvement whilst those of the control group took no interest in determining ways for improvement.”

Thankfully self-assessment does not have to be based on content knowledge, nor does it have to be done in a vacuum to be effective. Developing assessment literacy does seem to be key to successful self and peer-assessment, however (Smith et. al. 2011). Combining forms of peer-assessment with self-assessments can help students gain this vital assessment literacy.

In an Edutopia article from 1997, a seventh and eighth grade math teacher using a design based math project, describes assessment literacy as follows, “We want (students) to be able to judge for themselves whether a piece of work is excellent or falls short of the school’s standards. It may seem like a lot to ask of adolescents, but once we started using strategies such as critique circles and portfolios, students quickly showed they were willing and able to take more responsibility for the quality of their work.”

This idea of assessment literacy or quality, as relevant to one’s own education and experiences, is one that took time for me to trust. Especially after reading  Zen and the Art of Motorcycle Maintenance, which dissects the idea of quality ad nauseum. In the end, once I realized quality was relative, collaborative and constructivist, I began to trust the process much more. Now, I ask students to pick out works of quality and to attempt to define the terms for themselves.

Three ideas that seem to point towards effective self-assessment are as follows:

  1. Using self-assessment to reach a letter grade that is more summative in nature versus formative can lead to inaccuracies, defeat the goal of the assessment, and give alternative assessments a bad name. Assessment needs to feel safe for students and that is possible when you practice a growth or “maker” mindset around work and assessment.

  2. Self-assessment can facilitate deeper learning, as it requires the student to play a more active role in the cause of their success and failures, as well as practice a critical look at quality.

  3. The role of peers and the sharing of work leads to a community wide assessment literacy that increases the accuracy of self-assessment, as well as the rewards of using alternative assessments.

The efficacy of self-assessment, as well as return for time spent, is reliant on two factors. First we must create a safe space for self and peer critique to occur by promoting process over product and a growth mindset. Second, we must collaboratively build assessment literacy. As with any kind of literacy, assessment literacy takes time and gets better with modeling and practice. Deeply dependent on collaboration and communication with peers, practicing assessment literacy together leads to more effective assessments, as well as a more democratic and engaging learning environment.


Up Next:

The Role and Rigor of Self-Assessment in MakerEd Part 3: Examples of Self-Assessment in Middle School and Engineering School


WORKS CITED

  1. Andrade, Heidi, and Anna Valtcheva. “Promoting Learning and Achievement Through Self-Assessment.” Theory Into Practice 48.1 (2009): 12-19.
  2. Dunning, David, Chip Heath, and Jerry M. Suls. Flawed Self-assessment: Implications for Health, Education, and the Workplace. Malden, MA: Blackwell Pub., 2004. Print.
  3. MacDonald, Betty (2012) “Self Assessment and Student Centered Learning” Online pdf
  4. McDonald, Betty. (2012) “Gestalt Effect of Self-Assessment” Online pdf
  5. Pahomov, Larissa (December 2014) What Meaningful Reflection On Student Work Can Do for Learning. Mindshift article
  6. Pirsig, Robert M. (1974) Zen and the Art of Motorcycle Maintenance: An Inquiry into Values. New York: Morrow
  7. Smith, Calvin Douglas, Kate Worsfold, Lynda Davies, Ron Fisher, and Ruth Mcphail. “Assessment Literacy and Student Learning: The Case for Explicitly Developing Students ‘assessment Literacy’.” Assessment & Evaluation in Higher Education (2011): 1-17.
  8. Yoshida, Clyde (1997) “Creating a Culture of Student Reflection: Self-Assessment Yields Positive Results” Edutopia article