Sweet Tweets: Remixing the Electric Cuff Activity

As a maker-educator, I love Twitter and have many Twitter maker friends who inspire my practice.

Recently, my Twitter friend @joshburker (who recently published a rockin’ maker guide you definitely want to buy!) did a light-up electric cuff soft circuit project with his senior citizen technology group at the library.

This past summer, we made hundreds of electric cuffs with elementary and middle school youth in our free Learn 2 Teach, Teach 2 Learn STEAM (STEM + art) camps

Recently we were remixing the Electric Cuff activity for teenagers in our STEAMing Up Teen Central workshops at the Boston Public Library.  When shown Josh’s prototype, the youth teachers immediately wanted to use not only velveteen as an embellishment, they wanted to try all-velveteen cuffs!

Prototyping with velveteen.  Prototyping how to cut and sew with velveteen took a whole day — it’s not so easy!  The velveteen needs wide seam allowances because it unravels quite easily.  Then, even when it was pinned, it was slippery to sew on the machine. Online tutorials recommended hand-basting before sewing. . . but that was too much like work for 20 cuffs!

The approach that worked involved cutting the cuff pattern out of iron-on interfacing, then ironing the pattern onto the back of the velveteen before cutting.  This made both cutting and sewing the right sides of the cuff together a breeze. After turning the cuff inside out, topstitching made the cuffs lie nicely and was a quick way to sew up the opening at the top.

Lasercut felt designs suggested by youth.  Captain America, Pikachu with Pokeballs, and Polkadot bows were among the ideas that youth teachers brainstormed.  I made a Papercut dragon design.

Color-changing and candle flicker LEDs.   Sparkfun carries reliable fast and slow color-changing RGB LEDs and you can get a 20% off educator discount.  Evil Mad Scientist carries a wide variety of candle-flicker LEDs that were perfect for Pikachu’s tail and the dragon’s eye!  You can also find these cheaper on ebay, if you order a month or so ahead of time and don’t mind a little gamble on their quality!

3D printed LED diffusers. Naked LEDs on wearable electronics are not so aesthetic.  We’ve hidden them underneath white felt, which makes a great diffuser. Andrew, our 3D printing enthusiast (a  Wentworth Institute of Technology work-study student), watched me looking at Thingiverse 3D printed diffusers and thought he could design some cool ones.  Then, Brad Presler, our resident industrial designer, caught the design bug too.  Using SolidWorks software that we received free from the Fab Foundation, they created small and large balls, hearts and stars that pressfit over our LEDs!

Our workshop at Teen Central at the Boston Public Library was a lot of fun.  Here’s a little video showing the process and the results!

Here are some links to the guide, in case you might want to try the activity in your makerspace or class!

Toward Making Change: Beyond #BlackLivesMatter (Three: Using Design-Thinking, Collaboration & Hip Hop Culture to Plan Activities)

This is the third of a series of posts documenting the progression of a collaborative project at the South End Technology Center @ Tent City supported by the Harvard Graduate School of Education Dean’s Equity Project.  The goal was to create a safe and creative space for high school and college youth to explore their identities and the issues that have come up for them with the #BlackLivesMatter movement through activities based on Hip Hop Culture.  Then, using the design engineering process, the youth will imagine a better and more just future, creating a participatory art and technology activity that will engage other youth during the Learn 2 Teach, Teach 2 Learn program.  

It’s like falling in love when you first imagine an big idea for a new maker activity.  There are those same highs of excitement, energy and the transforming power of the idea!  You find yourself wanting to share your idea with EVERYONE!

However, If you are an experienced maker educator, a second feeling of being overwhelmed often follows. You have vivid memories of how much work it is to plan, pilot and often the worst and most tedious process of all, documenting your new beloved activity.

One way to both share your idea and really refine a plan for the activity is to use a participatory design and the ideation step from design thinking.  Participatory design can involve gathering together your favorite colleagues and students to help with planning.  Ideation is a part of the planning process where you concentrate on generating ideas. As the folks at the Stanford D-School suggest in their excellent design thinking resource, “It’s not about coming up with the ‘right’ idea, it’s about generating the broadest range of possibilities.”

To plan Beyond #BlackLivesMatter and Toward #MakingLiberation, Adia and I gathered makers and colleagues from our support network to imagine what we could do with youth and generate ideas for the activities.  Not all of these people we loved could participate as facilitators in the activity, but they were excited to come and “think with us.” Our goal was to create a mind map that could help guide and plan the 6-week after school workshop.

All our friends had busy lives, so we designed this planning session to meet after everyone’s work and do the planning while “breaking bread” together.  Adia Wallace (a Technology and Innovation in Education Graduate Student at the Harvard Graduate School of Education at the time) and I ordered take-out from a small local ethnic family business in the neighborhood of the South End Technology Center @ Tent City.

After sharing our exciting big, ambitious and slightly fuzzy idea for #MakingLiberation, we gave each of them a pen and a stack of sticky notes.  As we ate and talked, many ideas emerged.  Using ideation techniques from design thinking, we asked them to write all their ideas on sticky notes.  Then we arranged the sticky notes into categories on a whiteboard — and worked and worked — until an activity plan emerged!  We celebrated by taking some silly photos:

Organizing the ideas imagined on sticky notes into a map helped us create a clear goal that we often referred to while planning the activities:

This lead to define what the youth would do:

  • use hip-hop expression, such as cyphers, graffiti, spoken word,  to engage in authentic conversations regarding identity and bigotry

  • expose youth to hip hop maker culture and its techno-innovations

  • build knowledge together through constructionism, a theory of learning through making developed by Seymour Papert

  • use technology as both the medium and the message

Silhouettes – Old and New Technology of Portraits

In August, while I was thinking about for a simpler laser cut project to teach Inkscape and the laser cutter in my 8th grade history class this year, I happened upon two things at about the same time. One was a blog post by Sylvia Martinez about starting the year with making (http://sylviamartinez.com/back-to-school-start/) and the other was the image of a page of silhouettes of the family of John Quincy Adams (yes, the one who became president).  So I decided start with the students themselves, using new tools to create an old-fashioned silhouette or profile.

I used my own children to test the work-flow, and it was not difficult to do. The process starts with a backlit photo (taken in a dark room against a light curtain, I taped paper on the window in my classroom). The photo needs to be edited it in the basic iPad editing software to make it a black and white image against an even lighter background.  This introduced the students to the photo editing tools they all had on their devices, but many had never explored.

Importing the photo into Inkscape, using the paint bucket tool to fill the shape of the head, and deleting the fill leaving only the stroke line creates a clear vector line for the laser cutter.

The students enjoyed creating their profiles, even as they expressed some frustration with the tools (Inkscape is sometimes difficult to download and install on a Mac, and if the image is not dark enough the shape is not clear, but these challenges allowed for some useful discussion about how to figure out what had gone wrong, and how to trouble shoot our technology and our projects).  They learned several of the editing tools in Inkscape, and they will be well prepared to do more complicated projects using the software later in the year. These are all things I expected to come out of the project.

What I was not so sure about was how well they would see the historical issues involved, but I should not have worried.  I showed them the John Adams profiles and several other late 18th and early 19th century examples, and then we talked about what it cost to have a profile cut (25 cents for two copies in 1808, according to one source I had found), and why these images were so popular. They could clearly see how important it would be to families to have an image of a loved one, especially if part of the family were moving away, or going to war. They talked about how many photos we have today, and how different it would be not to have those images to look at. We also talked about when photography was invented, and when it became available to ordinary people. In the course of a short discussion we covered economics, settlement patterns, and the human desire to have images of ourselves. Not bad for a simple laser cut project.

I hung the silhouettes on the wall of the classroom, and the students had fun recognizing themselves and their friends. At back-to-school night the parents loved seeing their own children, and I had to laugh at the sight of them using their smart phones to take photos of the silhouettes, somehow bringing the idea full circle, and proving the point that today we cannot possibly have enough images of ourselves.

Making Middle School Science

In 2011, I became the 5th and 6th grade science teacher at the Hillbrook School. That same year the school undertook an audit of the science program for areas of strength, as well as areas for improvement. Simultaneously, the Next Generation Science Standards, emphasizing problem solving and engineering, had just been released, and that spring (2012), I attended my first Bay Area Maker Faire. After reviewing the available research on teaching and learning, attending workshops such as FabLearn at Stanford, and the Innovative Learning conference at the Nueva School, I was inspired to bring more engineering and design into the science curriculum. To learn how to do this well, I consulted with experts, such as Ed Carryer of Stanford’s Smart Product Design Lab (learn more about SPDL in Tony Wagner’s book Creating Innovators), to learn more about the use of prompts for semester long engineering projects. By the 2012 school year, I felt ready to prototype the new 5/6th grade science curriculum, now renamed Problem based Science. Problem based science (PbS) encourages students to gain a love of scientific thinking, applied math, and the creative use of technology, while learning through the lens of invention, design thinking, fixing and tinkering. Now in its fourth year of researched-based development, this blog describes how problem based science differs from traditional middle school science classes (i.e., how I used to teach) and lists the four core units of the curriculum. While these units currently make up only the 5th grade science curriculum at Hillbrook, the units are designed to be open ended enough to be applied to any age/grade level with varying degrees of content detail, technology integration, and design challenge difficulty.

How is PbS Different from the Science Classes We Took in School?

Most likely the science classes you experienced in school were loosely based on a real approach to science called the scientific method. In science class, you were tasked with “rediscovering” well established phenomena, such as density or double replacement reactions, via carefully scripted demonstrations or lab experiments. Although you were going through the steps of the scientific process, you were arriving at a predetermined outcome created by your teacher, far in advance of you existing in her classroom. You may have had a textbook explaining a lot of concepts, and tests that measured your knowledge on those concepts. For deeper evaluation of your work, you were expected to follow a rigid lab report format, mirroring those found in academic journals, that did little to assess your personal level of problem-solving, adaptability, creativity or essential understanding of the concepts involved. In short, you most likely consumed your science education, rather than constructed it. If you were lucky, or attended a progressive school, your science teacher knew how to orchestrate science classes around the authentic inquiries of students, allowing you to be creative and to make mistakes while you learned (driving principles #2,4). The rest of us, however experienced a version more like the first.

In comparison to a one-size-fits all curriculum, Problem based Science, reunites students with the complexity, richness and fun of science. Learning through inventing and problem solving – while using the latest in fabrication technology, like 3D printers and laser cutters, as well as more traditional making skills, like electronics, robotics, sewing and carpentry – immerses students in the messy, iterative nature of real science and engineering.

In essence, PbS allows students to create their science literacy, by behaving like a real scientist or engineer. David Perkin’s, author of the book Make Learning Whole, likens this model of learning as providing students with “threshold experiences, that stimulate curiosity, discovery, imagination, camaraderie and creativity.” In PbS, students will make mistakes, encounter obstacles, and experience failure. If a student can not solve a problem due to a lack of knowledge or skill, that student must chose between constructing new literacy, or choosing a more accessible solution, based on their available literacy. Rather than shy away from failure in PbS, we embrace and redefine it as a crucial step in the learning and design process (driving principle #4).

How is a Problem Given or Decided On in Science?

In Problem based Science lessons are best likened to a game. In the game, there are rules that make learning purposeful, safe and fun. We call the rules of the game prompts (4,8). Using prompts, rather than a linear set of instructions, is an open-ended approach to learning that affords students choice and voice, which promotes confidence, engagement and self-esteem (12). An example of a prompt might be;

A) design and build a structure that can support 100 grams   B) using only 10 straws and a yard of tape.

or

A) make something that makes art

Once given the “game-like” rules to follow, students are given weeks, or months (driving principle #1) to brainstorm, form teams based on passion and/or skill sets, then test and iterate on various solutions. No solution will look the same, allowing for a highly differentiated learning experience for each student. The open-endedness of prompts provides students with control over the “why, how and what” of their learning journey (driving principle #3), while promoting a growth mindset.

What do Students Learn in PbS?

In 5th grade, emphasis is placed on practicing the kinds of thinking routines and process skills that real engineers and scientists use, such as working in a self-directed space, to solve problems collaboratively. These core process skills include:

  • Identifying problems and needs, independently or with others (diagnosis, empathy, listening, observation)
  • Identifying the parts, purposes and complexity of structures and systems (observation, analysis, inductive reasoning)
  • Testing ideas and prototypes (using the scientific method)
  • Gaining literacy from various available sources (active and passive research)
  • Taking responsible risks to learn new skills, tools, share ideas or show leadership (risk taking)
  • Effective partnering with peers, adult mentors, and experts to give and receive feedback on work (communication/collaboration)
  • Iterating on ideas, designs and solutions based on feedback and research (listening, iteration)
  • Documentation of work (self-reflection, documentation)
  • Forming claims and conclusions based on evidence (evidence based reasoning)
  • Setting learning goals and making daily agendas (executive functioning, self-direction)

In addition to process skills, concepts that students are exposed to in PbS include; measurement, types of patterns, forces and energy, basic electronics, three dimensional geometry, and more (see tables below for a more detailed list of core concepts). More importantly perhaps, each student’s curriculum will consist of what he or she is passionate about, or what ever inspires their designs. To make a unit more interdisciplinary, simply add a prompt to encourage historical research, interviewing, art work or writing. Below is a list of the core questions, concepts and skills students explore during each unit, along with sample prompts or challenges I have used in the past for each unit.

How is Student Work Assessed?  

Due to the student-centered nature of this course, assessment is based on several different modes to allow each student to share and demonstrate their growth and understanding in authentic and empowering ways. The following list consists of ways to blend formative and summative assessments, to help students make their learning visible in a classroom that centers on inventing and problem solving. While I do not use rubrics, many of my colleagues do. Check out the Edutopia article on Creating an Authentic Maker Education Rubric, for more on rubrics.

  • Design or Daily Log Entries (journal to record ideas, blueprints, and progress on a problem/product)
  • Building and Making (all hands on work, pass/fail)
  • Product Design Reports (like a lab report, using concepts in graphic design to detail original student designs)
  • Check-Ins (like quizzes)
  • Self Assessments (student argues a grade of passing or failing, based on evidence and reasoning) See examples of that here: video logs, written claims to justify a pass/fail
  • Peer Critiques, or The “Crit” (sharing work with peers for feedback) See examples of formal and informal critiques here: Formal,  Informal
  • Public Showcasing of Work (sharing work outside of the classroom) This can be done at all school showcases or Maker Faire style.

If you are curious about what PbS looks like, here is a 3 minute video made by Hillbrook parent Amy Atkins. Ms. Atkins graciously spent many hours during the 2014/15 school year interviewing me on what Problem based Science has taught me about teaching and learning. I am eternally grateful to her for helping me to tell the story.

References and Inspiration

  1. 50 Dangerours Things (You Should Let Your Children Do) by Gever Tulley of SF Brightworks and creator of the Arc of Learning Model 
  2. Alternative Assessments and Feedback in a MakerEd Classroom” by Christa Flores
  3. A Whole New Mind  by Daniel H. Pink
  4. The Art and Craft of Science: Science discovery and innovation can depend on engaging more students in arts.” by Robert Root-Bernstein and Michele Root Bernstein.  Educational Leadership, February 2013
  5. “Make something that can jump” Interview with Ed. Carryer, Director of the Smart Product Design Laboratory (SPDL) in the Design Division of Mechanical Engineering at Stanford University. October 2012
  6. Creating Innovators  by Tony Wagner
  7. Change by Design  by Tim Brown
  8. Digital Fabrication and ‘Making’ in Education: The Democratization of Invention” by Paulo Blikstein, 2013
  9. Game Storming: A Playbook for Innovators, Rulebreakers, and Changemakers by Dave Gray, Sunni Brown and James Macanufo
  10. Invent to Learn: Making, Tinkering, and Engineering in the Classroom by Sylvia Libow Martinez and Gary Stager
  11. Parts, Purpose, Complexity” by Agency by Design, Project Zero, Harvard
  12. Self-Directed Learning: Lessons from the Maker Movement in Education” by Christa Flores for the Winter Issue of Independent School Magazine 2014
  13. The ‘What’ and ‘Why’ of Goal Pursuits: Human Needs and the Self-Determination of Behavior”  by Edward L. Deci and Richard M. Ryan
  14. The Impact of Self- and Peer-Grading on Student Learning” by Philip M. Sadler & Eddie Good, 2006. Educational Assessment Volume 11, Issue 1
  15. The Underrepresentation of Females and Minorities in Science” by Christa Flores, Master’s Thesis 2005, Teachers College Columbia University

Thoughts On Learning and Engagement and the Pluto New Horizons Mission

I am sitting next to one of my 6th graders, J., as he flips though one of his favorite books. This book accompanies him to MakerSpace every day and if he is in the lab after school he typically has the book so he can refer to it. The book is a large picture book of the planets and their moons. He is showing me some of his favorite parts, and reading passages to me. As he is doing this, he is holding a model of one of the moons described in the book.


J. designed this moon in Tinkercad and has printed it out using the 3D printer in the lab. It is just one of a half dozen moons or planets that the has designed then printed. Ranging in size from a ping pong ball to a tennis ball, they don’t really look like much, but when you hear J. describe the features and the characteristics of the moon and how he was able to translate that into his own design and then print it and hold it, the shape takes on incredible meaning.


Watching J. and listening to him read about some of his favorite moons, I witness an intensity for learning and a motivation for uncovering more information and exploring creative ways to further be engaged. I see him grasping a physical object, of his own creation, even if it is not something he is actively referring to as he is reading.


NASA provides some incredible 3D resources for those interested in space and space exploration at nasa3d.arc.nasa.gov. The recent Pluto fly-by, “New Horizons” gives us all an opportunity to rekindle the fascination with outer space.


Student’s can explore their interests in 3 dimensions, and students like J. can imagine these far away worlds in a more personalized and immediate way through designing their own 3D models based on their own imaginations, research, and picture books. I am fortunate that my students interests in space led them to these NASA resources. Teachers can also explore and share with their students the many readings about how 3D printing technology and materials are used in the space program.


Links:

http://nasa3d.arc.nasa.gov

“Welcome to the 3D Resources site. Here you’ll find a growing collection of 3D models, textures, and images from inside NASA. All of these resources are free to download and use.”

http://nasa3d.arc.nasa.gov/models

http://www.nasa.gov/topics/technology/manufacturing-materials-3d/index.html

Advanced MaKey MaKey: Remapping Pins

The MaKey MaKey is a popular microcontroller that makes it easy to use any conductive object as an interface for a computer. When you plug a MaKey MaKey into a computer, the computer thinks you plugged in an external keyboard and mouse. So triggering the sensor inputs on the MaKey MaKey just sends keystrokes or mouse commands to your computer. The MaKey MaKey has 18 inputs that it can use to send those keystrokes and mouse commands

“Out-of-the-box,” the device comes pre-programmed to trigger:

keystrokes: w, a, s, d, f, g, up, down, left, right, spacebar

mouse commands: left click, right click, scroll up, scroll down, scroll left, scroll right

Careful readers might note that there are only 17 commands listed above. That is because left click is used twice, once on a female header pin and once on an easier to access mount for alligator clips.

So what can you do with the MaKey MaKey?

You can type. You can move your cursor around and click. You can play video games. You can play digital music instruments. You can navigate the web. You can trigger a webcam. Anything that you might do with a keyboard or mouse, you can do with a MaKey MaKey.

But there are two limitations to keep in mind:

  • You can only trigger the keystrokes or mouse commands that are programmed on the device.

  • You must be touching the earth (or ground) part of the board to trigger these keystrokes or commands. I’m going to address this second limitation in another blog post.

So what if you need the MaKey MaKey to trigger different keystrokes than the ones that are preprogrammed on the device?

Well, I’ll let you in on a secret…the MaKey MaKey is really an Arduino! Actually it’s a special Arduino called an Arduino Leonardo. The Leonardo is a bit different from other Arduinos. It’s processor has built-in USB communication capabilities so it appears to a connected computer as a mouse and keyboard. This means that we can reprogram the MaKey MaKey to trigger any keystrokes or mouse commands that we want. This tutorial will show you how. Please note: if you re-program your MaKeyMaKey, I highly recommend re-programming it back to factory default settings when you are done with it, so that nobody will get confused later on when the device they are using is not behaving the way that they think it should.

You are going to upload a new “sketch” or program into the MaKey MaKey. If you have not worked with Arduino code before, see this tutorial.

  1. Download and install Arduino 1.5 or greater if you don’t have it already.


2. Don’t start the Arduino IDE yet. If you do, make sure to Quit the program before you do the following steps.


3. Download the hardware Addon file for the MaKey MaKey here: https://cdn.sparkfun.com/assets/learn_tutorials/1/9/1/1.6_32U4_Addon.zip


4. Unzip that file. Inside you’ll find a folder called hardware and inside that will be a folder called Sparkfun.

5. Copy the Sparkfun folder highlighted in blue above.


6. We need to paste that folder into our Arduino hardware folder.


7. On an Apple computer, navigate to Documents – Arduino – hardware. Paste the Sparkfun folder there. If you can’t find the hardware folder, you may have to create one.

a. On Windows you need to go to My Documents – Arduino – hardware. Again, if you can’t find the hardware folder, you may have to create one.

8. Open your Arduino IDE. In the top menu bar, go to Tools – Board – and then choose Sparkfun Makey Makey.

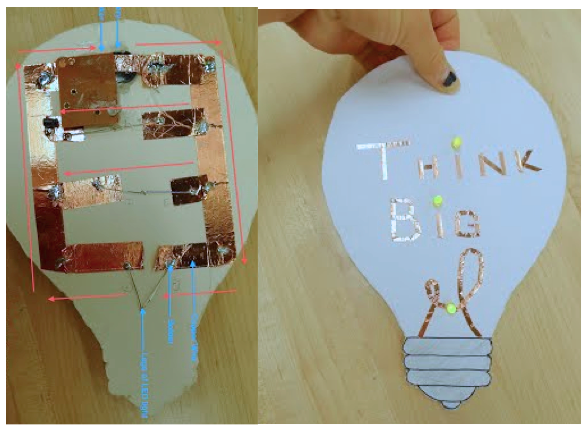
Note: If that board is not in the list of boards, you may have missed a step above. Double check that the Sparkfun folder is in the correct place in the Arduino hardware folder on your computer

9. Plug in your MaKey MaKey device with a USB.

10. In the top menu bar, go to Tools – Port – and then choose the last port listed.

    a. On Apple, the port name will include usbmodem
On Windows, choose the COM port that appears when you plug in your MaKeyMakey
11. Now we have to get the default MaKey MaKey firmware sketch from GitHub.
   b. Click on Download ZIP in the lower right corner
   c. Unzip that file
12. In the MaKeyMaKey-master folder, navigate to firmware – Arduino – makey_makey and then open the makey_makey.ino file.
13. The MaKey MaKey firmware will open on your computer. This is the default firmware for the device, so you should save a copy to your Arduino sketch folder and then when you make edits, make sure to save it with a different filename so that you can always reprogram the device back to factory settings.
    a. From the top menu bar, go to File – Save As, and then save the file in your Documents – Arduino folder.
14. Click on the tab near the top of the IDE that is called “settings.h.” This is where you remap the keystrokes and mouse commands on the device.
15. Read the comments at the top of the settings.h file to see how to change the keystrokes. You change the values listed in the int keyCodes[NUM_INPUTS] array. For instance, if I want my MaKey MaKey to trigger numbers instead of letters and , I could change my array to [EXAMPLE CODE]
16. To upload the new code onto your MaKeyMaKey, just make sure that you have the correct Board and Port chosen from the Tools menu (see steps 7 and 9). Then from the top menu bar, choose Sketch – Upload. Wait a few seconds while the sketch compiles and uploads. You know it it finished when the Arduino IDE says “Done uploading” in the bottom left corner.
Congratulations! You’ve remapped your keys on the MaKey MaKey. When my students re-program a MaKeyMaKey, I ask them to reprogram it back to factory default settings when they are done. Otherwise someone else might have a hard time using it!

Launching Boats

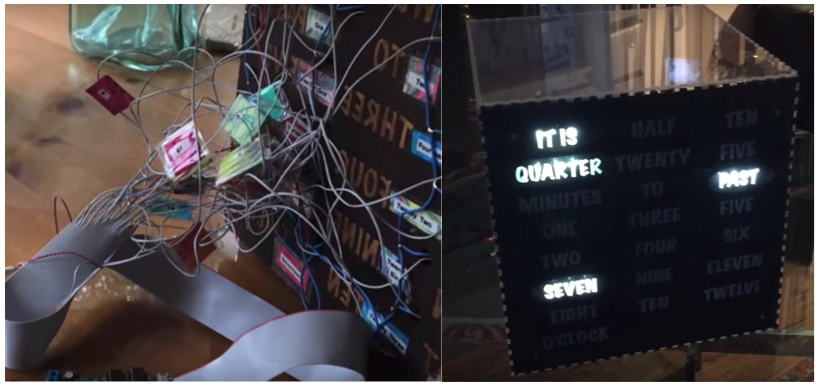
I once heard teaching compared to the act of launching boats.  I love the visual evoked by that metaphor. Could we think of the work we do in our makerspaces a similar process to preparing for, and ultimately taking off on a self-guided journey? Students captain the ship and teachers watch from the shore.

Learning through Play

Children learn through play and exploration. From floating sticks downstream to ducks in the tub, early lessons in how the world works come from play.  Could this be the first step in the progression towards mastery? In an earlier post I wrote about sequencing activities to support discovery. By building upon play, a mode of learning that is rooted in curiosity and joy, we can engage our students in a truly authentic way. For instance, a project involving electronics can be launched with a session with circuit boards, or wood working with a one-block challenge. Both of these activities originate from two of my favorite resources for exploration-based maker activities: the Tinkering Studio at the Exploratorium, and the Makerspace at the New York Hall of Science.

Mastery: Learning the Ropes

Play sparks interest. Interest drives the desire for mastery. Practicing and gaining mastery build confidence. The teacher strives to find the balance between guidance and autonomy. Excitement over making connections, getting better at making things, completing projects, and overcoming obstacles is the process that builds confidence as students move towards full independence.

At Greenwich Academy, one student documented in her maker portfolio, her process for building a paper circuit project including challenges and breakthroughs along the way.  She wrote:

“A great maker is not only one who is willing to make mistakes but one who is willing to still think big in spite of the threat of mistakes. In keeping with that theme I decided to create an Easy Button… 

…I even left a little room for myself to think big during the project. While pasting copper wires down I realized I was missing an essential element to my Think Big Buttona noise component. I remember my favorite part of the Staples Easy button was the little phrase it spit out each time you pressed it…

…So I went to CVS, bought a singing card and removed the sound circuit. The circuit contained a circuit board with and an attached speaker. Probably the hardest part of the whole project was trying to figure out how to get the sound to go off…

…After much trial and error, I found the happy medium that required me to extend the length of the copper switch so it nestled in the center of the battery and placed the clip for the sound right next to the copper…

…This process has not only yielded a successful project but a successful [me]. It shows that I am one step closer to achieving my goal as a confident maker. “

“Think Big” Button design

The launch and the teacher at the shore

On her journey towards understanding her circuit, this student recognized an increase in her confidence.  She was well on her way towards steering the ship. The teacher steps back and the student takes the lead.

Another student’s paper circuit project evolved into artistic handmade paper circuit cards. Accomplished in the art studio, she found her voice through the fusion of media to express her ideas. In this case, this student built upon a strong knowledge of art and craft process, and incorporated an emerging skill base in electronics. The next object she made, a word clock, built around Dougs Word Clock board, included handmade marbled paper in the enclosure and her documentation revealed the carefully considered aesthetic and design decisions she made, while demonstrating confidence and independence with electronics.

Hand embossed card with an LED circuit

Transparent word clock enclosure design with marbled paper

Her reflection about learning in the lab, underscored the importance of building skills on her way to becoming an independent maker. She wrote:

“By the end of this course, I would like to be a maker that thinks beyond ‘outside of the box.’ To me this means, challenging the norms, breaking patterns, and figuring out new ways. The maker I want to be is one that never stops thinking. Even outside of the lab, I want to be thinking about how to take my projects one step further than my mental capacity. Furthermore, I also believe it is important to first build a strong platform on which to build from. I also think it is important to keep an open mind as anything is truly possible. Inside the lab with limitless resources, I believe with enough drive, passion, and learning I will become just that.”

What do people learn from using digital fabrication tools?

In response to the question of what one actually learns from 3D printing, I thought more deeply about the work we do in our school. While I know conceiving an idea and shepherding it into a tangible form is significant, it is important to be able to articulate its value within an educational setting. It’s also important to reveal the many stages in digital fabrication, especially illuminating the often hidden design process where much of the learning takes place.

Digital fabrication, which begins with digital design and ends with output from a fabrication machine, parallels pre-digital processes for making things.  A laser cutter and CNC router cut designs in a manner similar to a scroll saw. A sculptor can build up clay in an additive approach, just as a 3D printer lays down lines of plastic, or chisel marble with a subtractive approach, as the CNC milling machine would carve wax.  Digital design adds precision, scaling, cross-machine capabilities, and reproducibility to the mix.

Those of us working with students using these tools know that digital fabrication is the merging of the human with the technical. The result is a creative product formed from their ideas and executed through a series of complex design decisions. I often observe that through 2D and 3D design and making, students develop multiple skills, not only in growing proficiency with 2D and 3D design, but also in spatial development and a variety of mathematical concepts.

It is also worth noting students’ learning goes beyond acquiring skills and includes strengthening critical thinking as an outgrowth of working through design and fabrication problems. Gaining facility, and refining their ability to be mindful, active learners isn’t limited to digital fabrication; making in general promotes curiosity-driven, self-directed, creative learning.

Using the lens of my own experience helps me address the challenge of articulating what 2D and 3D fabrication projects teach students. New to digital fabrication myself, I started designing and making objects on these machines less than three years ago when our first 3D printers arrived on campus.

Skills-based learning: 2D and 3D design and spatial development

Returning to the original question: What does one actually learn from digital fabrication? What is the breakdown of skills acquired through the process of digital design and production, including controlling the machine to make that product? An online forum for teachers using digital fabrication tools recently addressed a similar topic. (The K12 makerspace Google group). Themes that emerged from the conversation included the development of spatial reasoning, math concepts, and 2D/3D design. The posts revealed that many of these teachers see many layers of learning embedded in the design-to-making process.

A simple way of looking at the skills-based learning that occurs in digital fabrication might be by looking at each machine and design approach used.

3D printer

Learning from the design process:

  • Math and Spatial Reasoning: Navigating the 3D design environment, Designing on all sides-X, Y, Z, Alignment tools, Geometric shape building, Dividing and combining, Measurement tools, Units, Scale, Ratio, Rotating, Mirroring, Boolean operations, and Precision.

Learning from the fabrication process:

  • Machine operation: Machine settings-raft, supports, infill
  • Designing for the machine including its limitations: slicing a model into smaller parts that later get attached, designing supports like cones that can be cut off later, re-orienting the model for better support.
  • Science behind the process: The technology of additive processes, slicing, G-code.

Beginners can jump right into 3D printing with the help of user-friendly software like Tinkercad. The solid geometric forms students build with are watertight which can alleviate certain printing problems and prevent frustrations later on. Complex forms are built up through manipulating positive and negative space and grouping. The learning curve for machine operation is low and students can get involved in the entire design through fabrication process easily.  Once students are comfortable navigating the 3D design space, they can translate their ideas into the 3D world. After a successful introduction to 3D printing, students are excited to attempt more complex projects.

Laser Cutter

Learning from the design process:

2D

  • Math and Spatial Reasoning: Navigating 2D design environment, X,Y , Geometric shape building, Dividing and combining, Measurement tools, Units, Scale, Ratio, Rotating, Mirroring, Positive and negative space, and Precision.
  • Graphics: Vector design, Alignment tools
  • Ordering, sequencing and visualizing: Layering for the sequence of etching and cutting.

2D-3D

  • Math and Spatial Reasoning: Joinery, Visualizing the translation of 2D to 3D (from shape to form).

Learning from the machine cutting process:

  • Machine operation: Machine settings- stroke, fill, hairline, RGB black.
  • Science behind the process: Laser technology.

The laser cutter makes 2D and 3D objects.  A laser cutter cuts (or etches) material in two dimensions, and flat objects can be made three-dimensional by joining the pieces after they are cut. Designing for the laser cutter involves planning and generating these multiple pieces.

Students quickly begin 2D design by converting hand drawn designs into vectors and outputting them to the laser.  The next step is to learn to draw with basic 2D design programs tools such as the shape drawing tools, the pen tool, and shape builder tool in Adobe Illustrator.

When moving from 2D to 3D on the laser cutter, joinery comes into play. Here students refer to a timeless pre-digital skill that requires them to consider width of material; visualizing how flat pieces unfold and potentially fit together engages spatial skills.

CNC/Milling

Learning from the design process:

2D

  • Math and Spatial Reasoning: Navigating 2D design environment, X,Y, Alignment tools, Geometric shape building, Dividing and combining, Measurement tools, Units, Scale, Ratio, Rotating, Mirroring, Positive and negative space, and Precision.
  • Graphics: Vector design
  • Ordering, sequencing and visualizing: Layering for sequence of drilling, milling and cutting.

2D-3D

  • Math and Spatial Reasoning: Joinery, Visualizing the translation of 2D to 3D (from shape to form).

3D

  • Math and Spatial Reasoning: Navigating 3D design environment, Designing on all sides-X,Y,Z, Alignment tools, Geometric shape building, Dividing and combining, Measurement tools, Units, Scale, Ratio, Rotating, Mirroring, Boolean operations.

Learning from the fabrication machine process:

  • CNC Routing and Engraving software software: Tool paths: drill, profile, pocket, V-Carve, 3D modeling, slicing, tool geometry, feeds and speeds, G-Code, measuring.
  • Machine operation: loading stock, zeroing X,Y,Z, switching tools
  • Science behind the process: CNC and milling technology.

A Computer Numerical Control (CNC) machine cuts materials by moving a rotary cutter to remove material and create an object.  The laser cutter and the CNC share many of the same design considerations; both require use of layers and sequencing when planning cuts, carving, drilling and milling. There are limitations inherent in the geometry of the cutting tool that does not account for undercuts and corners. It is also more complex on the machine side with the additional step of selecting appropriate cutting tools and using separate software to generate tool paths.

An added level of learning for the CNC machine is the finish work involved with a woodworking project. Parts are tabbed into the material and require removal and filing.  Some projects generate parts that later need connecting, clamping, filing, and sanding.

The skills acquired from design and fabrication have real world applications in engineering, art, design, science, computer science and math. In addition to these important skills, the culture of a makerspace itself can help students become independent learners driven by curiosity and intrinsic motivation. I experienced this as part of an early user team involved with Greenwich Academy’s establishment of a lab. Mastery of each machine and the unique design considerations required to output to them was new to me. This is what I learned:

I can teach myself to do this.

I can learn how to design in 2D and 3D and use a machine to make that object by seeking out resources to help.

Like with so many new and emerging technologies, there are many resources available. Books, websites, how-to’s, video tutorials are readily available for self-learning.

Why this is important for students: Self-directed learning is a practice that will serve students in all areas of their learning.

I can seek help to troubleshoot problems.

If I can’t find an answer to my question with the resources I have available, to can reach out to others.

When you are really stuck you can call someone, consult an online community, or bug your friends at the local makerspace.

Why this is important for students: There is no shame in asking for help.

I can teach others to do this.

Even if I’m not an expert, the knowledge I have can help others.

When we opened our digital fabrication lab we were all newbies in using the technology. Each one of us learned as we went along, and had something to share with the group.

Why this is important for students: Students contribute to the collective knowledge base.

I can solve new problems.

I can merge ideas, extrapolate, and find connections when I do not have a solution to my specific problem.

Learning comes with all sorts of challenges. Maybe the software isn’t compatible; maybe you have a Mac but they have a PC; perhaps what you are trying to do doesn’t quite match up with the resources you have at hand. We have all experienced a situation when we cannot neatly follow a step-by-step recipe to arrive at a solution. It forces us to dig a little deeper, perhaps learn something different but related, and by doing so, make the connection.

Why this is important for students: It encourages flexible, creative thinking. It provides opportunities for learning to be applied to a situation in a new or indirect way.

Learning is not a one-time thing.

I can tackle increasingly complex problems

The iterative nature of these kinds of projects, plus the unlimited versatility of these tools creates a positive reinforcement cycle. Even when tools are difficult to use, or don’t work as expected, students learn to adjust and accommodate their designs to these constraints. As they use the tools more, they increase their competency and therefore can tackle more complex designs.

It’s okay to go on a tangent with your learning.

I find more opportunities to learn when teaching myself.

The journey of self-learning opens the door to new ideas. Stumbling upon projects, processes and new tools are the raw materials for idea generation. If I don’t know exactly how to get to my goal, there is room to move off course.

Why this is important for students: Students follow their interests in the process of learning. Students learn there is more than “one right answer.”

In the quest to answer a question, I find myself with more questions.

The more I learn, the more questions I have.

I think it must have something to do with wanting to find connections between ideas, but I find as I seek answers to questions, more emerge.

Why this is important for students: Learning fuels curiosity.

I can learn my way.

There are different ways to achieve the same goal.

Learning is personal when you can craft your own strategies for solving a problem. They may not always the most efficient, but they are yours, and become part of your larger body of knowledge. As new ways of doing something are adopted, an old strategy can be applied or modified to future situations and becomes part of a creative problem solving vocabulary.

Why this is important for students: Creative, personally meaningful solutions are prized.

I end with this: making, digital fabrication in schools, is a creative process. Students learn all sorts of skills and ways of thinking that help them become better learners.  Whether it is Boolean operations or how to research problems, the main thing they learn, is how to navigate the process of going from idea stage to final object. 

Grades four and eleven working together on digital fabrication problems.

“SpaceBox” and Children Learning Space in FabLab Bangkok

Fluke in a Thai TV program, sharing about his project and first draft of “SpaceBox” project.

His “SpaceBox” from 1 km above the ground and Fluke was sending off the helium balloon with his team.

I recently discussed with one of my student, Thunpisith Amnuaykiatloet (Nickname Fluke). Fluke won the third prize in cube sattlelite design from THASA (Thai NASA). It was a wonderful news to all of us at our school. Fluke is a happy, outgoing and energetic student. We always have fun discussions about his new ideas for inventions.

For technical wise, his project is called SpaceBox (mini). He designed this small cube sattlite that can communicates with a base by radio frequency(RF) communication system. Inside this mini cube consists of controller board and sensors such as global position system (GPS), pressure and biometric sensor, accelerometer sensor, temperature sensor, etc. This cube sat. was actually launch by Helium balloon which can float and lift up at 1 kilometer above the ground.

This project was a part of his individual research in his 12th grade. He made many engineering projects in the past such as his “Cloudbot” (his version of quadroter) in 2011 and “iDrive” (his version of segway that he made when he was in grade 10) in 2012.  He started off with gogo board for his Cloudbot and iDrive.

And now this project has inspired other younger students, 7the and 8th graders, to learn how to make cube sat. (in 2015)

Cube Sat Project (2015)

Conclusion (part 5 of 5)

Finally, this is the last part. 🙂

Teachers from thirteen schools in rural area of Thailand attended a basic fabrication workshop for the first time in 2012.
(Workshop provided by team from DSIL FabLab@School, Bangkok.)

Conclusion

This paper has discussed the perspective of how people’s interaction in the FabLab learning environment clearly shows that we need new vision and attitude about the role and responsibilities of the teacher. Instead of focusing on content area and thinking of how to “deliver” it, the teacher should rather focus on having the right interaction and atmosphere which would have a better chance of triggering self-directed learning in students. The decentralization of power, freedom and knowledge requires teachers to “relearn” how to act differently in order to make the most out of such a “learning-rich” environment.

One of the major changes for teachers would be for them to become “learners.” This is not to demote the teaching profession but as Lave and Wenger(1991) suggest, “everyone can to some degree be considered a “newcomer” to the future of a changing community.” The existing world is so dynamic and involves so many rapid changes, I would argue that with the rich internet infrastructure and widely accessible knowledge resources, the role of the 21st century teacher is no longer to provide content, but rather to model the character of a life-long learner, who strives to grow in an ever-changing world. I would like to end this paper with a quote from Senge, Cambron-McCabe, Lucas, Smith and Dutton (2012) from a book called Schools That Learn:

“Throughout our lives, as we move from setting to setting, we encounter novelty and new challenges, small and large. If we are ready for them, living and learning become inseparable.” (p.4)

I wish to see a country that embraces the “making and learning” lab and sees it as an opportunity to make changes in the system in order to sustain such learning environments. I am convinced that would make going to school so much more appealing to students and teachers alike.

end of note.