Presenting Mamadou Diallo’s Pitcher : the Magic glove

For all those who are used to making presentations with slides, you have certainly used several methods to move from one slide to another.

So far, the most commom method to perform this task is to do it directly from the PC.


This is a useful technique when projection equipments are close to the one presenting but it becomes a challenge when he is far away from it.

Secondly, the person presenting can also benefit from the help of another person. He can signal that other person to pass to the next slide whenever he is done with the ongoing slide. This is also an option but clearly, this is not very convenient either.


Thirdly, one can use a pointer laser, a small pen-like that you can click on to move on to the next slide.

The young Mamadou Diallo looked into these issue and decided to design « the Pitcher » which is a ” magic glove ” that allows you to move from a slide to another during a presentation. With Mamadou Diallo’s Pitcher, there is no need to move, or press a button or ask for the help of someone else anymore because you can change slides by simply touching your fingers ! In fact, the Pitcher is equipped with sensors that are connected to the computer. Moving to the next slide or going back to the previous slide can be controlled at your fingertips !!


Yes I know you want to know how it works and how he did it ….

Components

Mamadou Diallo Pitcher Kit

Pitcher Box to be plugged to you computer

Wear the Pitcher’s Glove

Mamadou Diallo’s Pitcher Kit


An open source and Low Cost all in one computer

 Pi-COMP is a all-in-one computer composed of a central unit ( Raspberry Pi) interconnected with a flat screen from recycled computers .

The objective of this project is to design and build a low-cost computer replicable locally and easily. Since computers are still expensive for most of users in developping countries, Pi-COMP is a Low Cost and OpenSource solutions to tackle this issue.

Pi-Comp_3

To meet this objective, we will need the following tools :
– RaspBerry Pi which is a small OpenSource and low cost computer.
– Recycled Flat computer screens (which are abundant in most African countries and cheap)

Pi-Comp_8
Pi-Comp_5

Hacking the screen to connect it with the Raspberry PI, fan, and power supplier InPut and OutPut

Once we have thesedevices in hand, the next step is to incorporate the screen and the Raspberry PI into a single container (made if wood– polywood or other relevant materials). These can also be find easily in Africa. Once these devices are assembled and operationalized, Pi-Comps can be installed at local libraries, schools, bookstore, homes, cyberspace, Fablabs, Video game centers, Offices, etc. They can be connected with local data server and internet so that users can develop their IT skills, creativity and imagination.

Pi-Comp_7
Pi-Comp_6

Back cover with fan


PI-COMP can be manufactured in any FabLab, Hackersapce, Maker Spaces…everywhere with minimum material and ressources.

Ready to be used

The problem I am trying to solve is digital divide and access to technology resources in Africa. There is still a limited access to computers given its high cost for most consumers in Africa.

PI-COMP will democratize technologies. It will help African kids & students acquire IT skills. They will then be able to unlock their creativity and contribute to their community well-being.
The project should be documented and licensed (Creative Common – CC BY SA) to make it available to as many people as possible in Africa and around the world. Pi-Comp was first prototyped at the DefkoaKniep Fablab (Dakar, Senegal). I would like to rethink the design process by simplifying it.

0 Things: Diversity, Opportunity & 3D Printing

0 Things is a call to action for students, educators and makers to design and share 3D models that celebrate diversity, social justice and equality. Even with over 2 million things, searches of popular 3D printing repository Thingiverse often find 0 relevant models for topics related to identity, heritage and culture. Each empty search is an opportunity for students to make a difference in the world.

0 Things was first given as a Pecha-Kucha style presentation at the Construct 3D conference at Duke University in May 2017. (more…)

VLOG 001: Where Are All the MakerEd (YouTube) SuperStars?

I’ve been looking for maker educators that are using video to tell the story of making and makerspaces in schools and haven’t been having much luck finding any. (Please share links if you have them)
So I am starting the DesignMakeTeach YouTube channel to fill the gap and work on scaling up MakerEd to a larger audience.
Here is the pilot episode: VLOG 001: Where Are All the MakerEd Superstars? Please check it out and give me your honest feedback.

I’ve also published a couple different series of videos from ISTE17.
3D Printing & Maker Education Vendors – ISTE17 Expo

Maker Education Sessions – ISTE17

Makers Of Color – Maker Educators Share Their Stories

Please SUBSCRIBE to my YouTube channel and visit http://designmaketeach.com for more great #3DPrinting #MakerEd #FabLearn #Makerspace content.

Wood and Metalworking Experience Through Trebuchet Making

Beyond computer programming (Scratch), physical computing (Arduino) and other electronics related concepts, another topic to explore in our workshop with middle-school students at Kepler Tech Lab was about to teach them how to use woodworking and metalworking tools, such hacksaw, drilling machine, etc… through a construction of Trebuchet. A trebuchet is a type of catapult that uses the gravitational potential energy of a raised counterweight to throw something off the ground (Finio, 2016).

The workshop of building the trebuchet was not only about raising something off the ground (maybe a stone) or launching a projectile tho it was the heart of experiment but also the application of physics and mathematics, not to mention the ability to use wood and metal working tools, were explored.

Through trebuchet, students explored the principles of physics and mathematics. They learned the applications of kinetic, and gravitational/potential energies, and conservation of energy in which they were able to understand the difference between those energies and their working principles.


References
Finio, B. (2016, May 19). Build a Mini Trebuchet. Retrieved February 19, 2018, from https://www.scientificamerican.com/article/build-a-mini-trebuchet/

The Tech Lab’s Girls in STEM Education Initiative

What would it take to bridge the gap between girls and boys in Science Technology Engineering and Mathematics (STEM) fields? It is believed that anyone can create/build things out of his/her creativity, but how can one do it? I think it requires one to be interested and committed to face challenges and celebrate successes if the end results look great. How about stimulating someone’s interests through introducing developmental concepts and establish different ways to be exposed to the applications of those concepts?

As of June 12, 2017, Kepler Tech Lab has established a strong partnership with Igire Rwanda Organization, a not for profit organization that empowers youth to use their talents, skills, and opportunities they have to create their own jobs. With Igire Rwanda, girls are being provided with soft-skills at the same time with technical skills through STEM education right in the lab.

The lab is leading four major STEM education (engineering enrichment programs in Computer Programming and Electronics Recycling) initiatives with girls who recently graduated from high school or dropped in the middle of their studies. Students have been in the lab for three sessions a week, 3 hours each session,  learning some basics in Electronics (performing resistivity activity using graphite and papers), how to use electronic equipment, and exercise technical communications through a variety of presentations about performed projects/experiments.

The goals of Girls in STEM Education initiative is to encourage equal participation of girls and boys in Engineering fields, more importantly, to facilitate them through independent projects, establish continuity plan of their projects and become their mentors to turn the projects into tech business opportunities or learners be ready to work in a certain tech field.


4 Day-Long Facilitator Training

One of the main objectives of Kepler Tech Lab is to get connected with local/corporate organizations to implement practical education in schools or local communities for students to learn by doing and solve critical problems in their communities. After a partnership with Igire Rwanda Organization of providing STEM (Science Technology Engineering and Mathematics) education to its beneficiaries, the tech lab hosted teacher training with Pivot Academy of Mothering Across Continents to train a team of facilitators who were training 10th-grade students in Southern Province of Rwanda.

Are you wondering what Pivot Academy and Mothering Across Continents actually are? Mothering Across Continents is a not for profit organization that provides “[consultancy], coaching and mentoring [students] to develop dream projects that help raise tomorrow’s leaders. Pivot Academy is a MAC program that creates “awareness of the need for and value of STEM Education, coupled with ICT (Information Communication Technology).”


Kepler Tech Lab hosted 4 day-long teacher training programs with Mothering Across Continents‘ Pivot Academy to train their 17 facilitators plus 5 lab staff. The trainees, except 3 of 5 lab staff, were prepared to training senior 4 students (10th-grade students) from four high schools, the fifth not yet confirmed, in Southern Province of Rwanda and at least 511 students will be trained during the course of the month of July 2017.

The training was about performing experiments such as water filtration/solar desalination, solar dehydrator, zeer pots, and food preservation (putting food in different solutions such as salt, vinegar, sugar, etc.., to maintain their expiration dates).

Facilitators were trained to help students performing the same experiments but focusing on the principle of Design Thinking. The students will also be provided with STEM and ICT Education in ways that move away from textbook-driven memorization to approaches that are more student-centered and focus on problem-solving.


Challenges, Constraints, Competition?

Stick with me, this is a bit of a long story to get to some things I am thinking about in terms of making in the classroom.

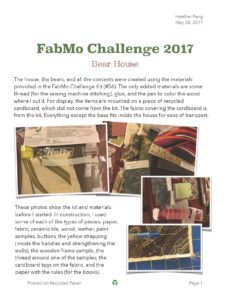
I can now check one thing off that bucket list, I won a blue ribbon at the San Mateo County Fair. (What, that is not on your bucket list?) I do not raise livestock, and my quilting abilities are not quite there yet for serious work. I don’t make jam either. But San Mateo County is in Silicon Valley, so the organizers of the fair try to keep things up to date with a thriving Sustainable Living section. Think of it as home arts for the recycling set. One of the categories was sponsored by my personal favorite recycling and reuse organization, FabMo. (If you are in the San Francisco Bay Area and you don’t know about these folks, stop reading my post and hop over to their website to check out how they collect fabric and other decorator materials that would otherwise end up in the landfill and make them available for a small donation to teachers and makers.) The FabMo challenge for the fair was to take a bag of their materials and make something. The rules were that at least 75% of the entry had to be the materials from the bag (so I added thread, glue, and the cardboard base, but the rest came from the bag). While there was no requirement that you use all the items in the bag, the notes said that judges would take that into account. I took on the challenge and created this little bear house and its two occupants.

The rules also asked for up to two pages describing the entry and your process. This is what I wrote:

At first I thought of this as a fun challenge for myself, but I also had it in the back of my mind that next year I might want to see if students in my “Maker Elective” would want to try the challenge.

Having finished the process, and enjoyed seeing my winning entry at the fair, and talking to some of the organizers about the idea of having students participate, here are some of my thoughts.

  1. Constraints: time and materials

The idea of this challenge is to reuse materials, so the material constraints are essential and they forced me to be creative. Looking at the other entries, I could see that people took that creativity in many different ways (I don’t have photos because it was not clear if photos were encouraged at the fair display). There were several bags (including a really nice backpack) and some interesting pieces of art. The entries by children were great, including a wall hanging mask, a battle field (with added pipe cleaner soldiers, and a model home for a dog that looked like a fantastic apartment for a full family!). People thought of different things looking at the same (or similar) materials and that was fantastic.

The other constraint was time. To enter your item, you had to make the deadline, so the project could not go on for a long time. I had to make some quick decisions, and I might have made other choices if I had more time, but the point was to make a decision and get on with it, which forced me to keep moving and not get stuck. The same thing can happen in the classroom, sometimes with good results, but sometimes it can be painful.

  1. Lack of Constraints: make anything

The lack on constraints was also a source of creativity. The blank slate meant that anything was right. I don’t get a chance to teach this way that often in history class, but it works well for the “Maker Scouts” elective that I teach. It can be challenging to come up with an idea, (hard fun) but when you have one that works for you, you know it is right, and you can go with it. You can also change it as you go. I was sure at the beginning that I would make little outfits for the bears in my house, but that never happened. I think that was fine, they don’t need clothes, they are bears. At the last minute I did decide they needed books, so I made books, which were not on any of my early planning drawings or lists.

  1. Research and just-in-time learning

I knew how to sew, but I did not have a pattern for small bears or for a fabric house, but I know I can find these things on the web or at the library. One of the things that I think making brings to the classroom is that confidence that if you don’t know how to do something make something there is someone out there who does know, and has probably published some tips or even full instructions. I had never needed to use the band saw in the maker space, but I knew I could learn to use it when I needed it (which I did to cut up the wood tiles and make the table and bookcase).

  1. Having the right tools (maker lab)

Which leads me to my final point, the right tools are essential. I had access to the internet, but I also had access to a sewing machine (mine at home, but there is one in the lab as well), sewing supplies (a good cutting mat and a rotary cutter are essential), a laser cutter (for the map of California and the bear silhouettes on the walls), scrapbooking punches (for the flowers and leaves), and a really nice hot glue gun (where would we be without hot glue?). Part of what allowed me to be creative was knowing when I thought of things that I had tools to make them. I was ready to go to that place in my head that says “yes, and…” not “I don’t have the tools for that.”

I don’t know if I will get any students interested in the project next year. Part of that will depend on the timing of the registration for the FabMo Challenge bags. I hope students will see the fun in this, and I can’t wait to see what they make. Since this is a moment when my personal making might cross over into my making with students, I am already making a list of things I might want to make next year, if the kit has some of the same materials. Knowing how things go, I will probably think of something else altogether.

The final point I want to make is the competition aspect of this challenge. I am not sure if that will be motivating or intimidating for students. Some people love the idea of having their work judged. Others find it terrible. And some just don’t care. What I like about this challenge is that everyone who enters (and pays the $3 entry fee, which I am sure I can get the school to pay for student groups) gets at least two tickets to the fair with free parking. So in that sense everyone wins, even if they don’t take home that blue ribbon. I like the authentic audience part of the competition, but I do wonder if some students will find it an unpleasant part of the process.

If I get student interest next year I will blog about how it goes.

WIP 006: In the Weeds

Musing: Right now a lot of professional development for educators is about just showing up. Seat time doesn’t equal engagement. How can educators receive credit for making/creating/implementing things? MakerEd for Maker Educators.

Musing: People are weird about numbers. My school division has a per pupil expenditure of ~$12,500. (Which isn’t high when compared to our region or nationally.) We’ve hit a student population of around 81,000. If you do the math it means the proposed budget is over a billion dollars. Somehow that is a crazy number that indicates the budget and school system are out of control.

Fortune: A solid challenge will bring forth your finest abilities.

3D Design Idea: Simplify3D support material makes interesting flexy design. How to use this deliberately?

Idea: KonMari method for digital life? Sparking joy in the makerspace? Does this design/tool/furniture spark creativity and joy?

Teaching Tolerance: Makerspace theme or unit? http://www.tolerance.org Empathy as antidote for bullying. Empathy as element in design process?

In the Weeds: Pushing this blog post out just to clear out some old notes. In the weeds right now in terms of balancing many of the commitments in my professional/personal/fablearn/maker worlds. Lots of stuff happening but blogging and personal fitness have taken a big hit. Trying to self-coach more productivity out.

How are you doing? Leave a comment or talk to me on Twitter @DesignMakeTeach.

Always Be Hustling – FormLabs Edition

Anyone that follows me on social media is probably well aware that my Hidden Figures – Friendship 7 model is up for Top Educational Model in FormLabs 3D Design Awards powered by Pinshape. (Vote for my design here!) I’ve been asking for votes on Twitter, Facebook, Slack, Google+, Google Groups, LinkedIn and Instagram.

Screen Shot 2017-06-03 at 2.22.42 PM

Some of my maker friends complain that I spend too much bandwidth ‘begging’ for free stuff. There is truth to that criticism because it is the reality for educators that want to introduce students to a new mode of learning that requires a lot of stuff.

Maker educators are always looking for resources: time, space, tools, equipment, consumables and mind share. You have to ask for all the things that you need. A friend once told me, “a closed mouth doesn’t get fed.”

Maker educators need to always be hustling. Hustling means applying for grants and prizes, entering contests, asking for donations, promoting student work on social media, tagging hardware/software companies in posts, creating partnerships and applying for awards and recognitions (like the FabLearn Fellows). This type of hustle can mean cash and equipment for your maker program but can also mean better support from vendors or more leeway from school administrators.

Applying for grants, awards and contests can be time consuming but are worth the pay off. The FormLabs 3D Design Awards is a good example. I’ve been interested in the FormLabs resin 3D printer since I first saw it as a member of the Make digital fabrication review team. I want to explore the possibilities of a high resolution resin 3D printer in an education setting so am always on the look out for FormLabs contests. This contest doesn’t have a 3D printer as a prize but winning could help establish a connection that might lead to something in the future.

The prizes for the Top Educational Model would expand the capabilities of my maker programs. The Wacom Cintiq Pro 16″ could be a great way for students to create digital designs by drawing directly on the screen. Right now I use a much longer workflow having student hand draw a design, take a photo, vectorize the photo and then bring into the 3D design software. The Wacom Cintiq Pro 16″ would simplify the process. I’ve tried using the Wacom Bamboo tablet but students have trouble using an input device that is separate from the screen. The Adafruit gift certificate would purchase a few Circuit Playground Express boards which can be programmed using a Chromebook which would greatly increase classroom access.

A resin 3D printer, a drawing tablet and a new circuit board are things I want to experiment with, to explore the possibilities for use in the classroom, to see how students interact with them. These are things that I can’t justify spending my limited makerspace resources on right now but they are worth my time to apply and try to win them. So apologies to my friends and followers on social media for the spam but to the maker educators out there, Always Be Hustling.

P.S. Seriously, I could use your vote for my Hidden Figures – Friendship 7 design. Vote for it here!