As a maker, one of the things I like is spending a great deal of time on something, going deep, and feeling that the result is really due to my hard work. I have taken up quilting recently, because it is that kind of project. I need to learn new things, and then do them. It makes me happy.
As a teacher of history, I love bringing in that maker mindset, but I also have a few other priorities that I need to balance with that idea that the maker (in this case the student) should figure it all out. Even when I am teaching in the maker space, or a sewing elective, I still wonder about that perfect balance between what I should do to help and what I want the students to figure out for themselves.
One of the things I have started to do when I explain something to students (something fun, like using the laser cutter, or something perhaps less fun, like constructing proper footnotes using the Chicago style) is to remind them that even though I am telling them all the steps they need, and they have them in the instructions, I don’t expect them to get it all the first time, and they should ask each other and me for help. I do want them to read the instructions and help each other. We are all still working on that.
But it always comes back to the same questions I have asked myself about instructions, kits, prepared sets of parts, and other methods to move things along a bit faster. How much is too much? How much is too little? In some ways this gets at the heart of the difference between my own personal making and my making with students in the classroom. The goals are different, and some of the methods are different too. So rather than thinking in terms of strict rules of making, I want to think in terms of questions to ask and ways to balance competing goods. It is not a case of one right answer, one good answer and one bad one, but rather in any given situation, which of the two good arguments gets to win out a little, even as I try to give some space for the opposite argument.
In some of my projects I have come to a pretty satisfactory balance. When I do my project on the telegraph, I have both instructions and parts, because the lesson is about history, and the making activity brings life, a tactile understanding, and amazing questions and observations from the discussions (questions that have never come up when we just read about the invention and use of the telegraph). But my goal is not to teach the science of electromagnets, or current, or anything. It is not a bad thing that students sometimes ask questions about these things, and I invite them to explore the answers. If I were teaching science class I might reverse the order, give them few instructions and let them figure that part out. Likewise when students make display boards for National History Day I don’t make them discover that contact paper is the best thing to use for covering the cardboard (spray paint will warp the cardboard, leaving it plain won’t work since we recycle the boards) or that if you mount an iPad at the top of the board it normally tips everything over. They could learn from trying other backgrounds, or breaking several iPads, but I have made the decision to start by telling them these things. Sometimes they don’t listen, but that is a different story. I also use the large format color printer to print their images for them — they don’t have time or access to that particular printer, and their other choice would be to pay a copy service, and that costs money some of them don’t have.
There are other projects where I still go back and forth about how much I take away from their opportunity to learn when I tell them the answer. I guess I always will. I do think after almost two decades of teaching 8th graders I am getting better at asking the questions.
What does the item I would be giving or doing for them have to do with the point of the lesson?
How realistic is it that students can figure it out themselves or make the item themselves?
Could I give some help but not do it for them?
How much is time a factor?
How much joy will they get out of doing it themselves?
Can I do less for them to do more?
Can I teach one member of the group and have her teach the rest?
Can I use this lesson to teach students how to figure it out? Should I?
The list of questions could go on, but the idea is there in these first ones. What questions do you ask yourself?
I co-teach a sewing elective for middle school students. This is the second version, the first ended in some frustration, so we stopped offering it for a while, and I went on to be part of other electives.
This year we resurrected the idea, and I am co teaching with a colleague (great fun, and so much calmer). The first time I had taught the elective I ran into one big problem: I was the only one there who could fix the sewing machines; they broke all the time. Beginning sewing students often have trouble with the machines, and things get tangled and messy pretty quickly. In particular, the “heavy duty” Singer machines we have are not in fact heavy duty, and they seem to have chronic bobbin alignment problems. These problems are made worse when students just keep sewing, rather than stop as soon as they hear or see a problem.
So with 10 students and 5 machines, I spent most of my time untangling machines, and very little time was left to help with actual sewing projects.
The new model does not completely remove that problem, but it does offer a model that is more sustainable and allows students to move forward with sometime even if I can’t get to the machine quickly.
We now offer hand and machine sewing together to about 12 students. Half of them start out on the machines (we still have about 5, usually 4 working at any one time). The other half start out with my co-teacher on hand sewing. When they have completed their first project they move to the other group.
All the sewing machine students start out making a tote bag from a pattern I have put together, and all of the hand sewers start out making a small felt stuffed animal from a silhouette they find online. We then have a variety of projects for them to go on to more advanced sewing once they have completed the two basic ones. The most popular advanced machine sewing project has been a zippered pencil case bag. Getting a zipper in correctly feels a bit like magic, and they show off their new bags to everyone. We have offered the option of finding their own patterns or using some of the ones I have brought in, but so far we don’t have any takers for the task of learning to use commercial patterns. It is interesting that they are much more likely to go online and find video instructions.
We have run this elective twice this year (each one runs 8-9 sessions) and I think the new model is a success. I still have to fix machines, and there is some frustration, but we can spend more of our time working on sewing, and if all the machines break at the same time we can do hand sewing projects while I fix them. A few students have taken the elective for a second time, and they are starting to learn how to fix the machines themselves. They watch me clean out the loose threads from the bobbin case, and re-threading the machine each time, and they realize they can do that too.
In Edith Ackerman’s paper “Hidden Drivers of Pedagogic Transactions: Teachers as Clinicians and Designers,” she shows that as teachers take on the role of clinicians (facilitating communication around a problem) and designers (imagining and creating a safe learning environment for exploration and negotiation of old and new thoughts), a pedagogic transaction takes place between the teacher and the learner, in which both parties are shaped by and shape a problematic situation.
I would like to share a learning experience that took place between me and a small group of my 5th and 6th grade students, which can serve as another example that shows what Ackerman stated, “that learning occurs because participants are jointly engaged in exploring, expressing and negotiating ideas [on a topic that matters], because they create and use external forms as a means to mediate ideas and experience, and because they come at it from different angles.”
It started with a small group of students (5th and 6th graders) who I was coaching to prepare for the county Rube Goldberg competition. The team of 8 students had broken up into smaller teams of two to build separate components of their Rube contraption, which had a Route 66 theme. The story that their machine was to follow centered around an imaginary family going on a road trip along Route 66, from Chicago to San Bernardino. Their project had already included various setups of inclined planes with cars traveling “cross country.” However, I knew, as well as the students, that their project needed a “wow” factor, something to be engineered so creatively that viewers of their project would be highly impressed. We decided to look at the idea of simple machines from a different perspective, and where else do eleven- and twelve year-olds look for new ideas and inspiration other than YouTube?
Off to YouTube the children went, watching Rube Goldberg videos, looking for something different. At first the children were growing in excitement by seeing other ideas, but as I probed them to think deeper about what they were seeing (e.g., “Is that really a new idea?”, “Is that a unique use of a simple machine?”), they realized they continued to see a lot of the same, old thing. Inclined planes with objects rolling down, pulleys being activated and releasing an item to the next location, wheels and axles rolling along. I went home that night and decided to do some of my own YouTube research. I came across a video in which cans rolled upward along an inclined plane. Now, this was something quite different- it almost looked like magic. The next day, I showed them the video in slow motion, and we watched the cans rolling upward multiple times, analyzing the movement, attempting to figure out how it worked. The students came to the conclusion that some sort of magnet must be involved. Nevertheless, their challenge was set before them. They needed to include SOME way for SOMEthing to roll UPWARD.
Back to YouTube they went. They wanted to find more examples. Now at this point, of the 8 team members, 3 were assigned the task to figure out how to make something roll upward, so only 3 students YouTubed their way through their challenge. After about 20 minutes on YouTube, they came across an example of a cardboard Rube Goldberg project in which a small marble was deposited at the bottom of an Archimedes screw and traveled upward along the screw to be deposited at the top of the machine, where it would then continue to travel downward along the typical Rube inclined plane setup. This was what the students wanted to accomplish.
So, they got to work. Student #1, who I will call Monica, was the small team’s artist. She began sketching the contraption they wanted to build. Student #2, who I will call Moses, continued to analyze the video to try to figure out how the Archimedes screw worked. Student #3 ended up leaving the group to help other teams and never returned.
As a side note, I’d like to mention that none of the students ever read the description of the video, in which the word “Archimedes screw” was used. They went along for weeks not knowing that what they were attempting to build was called an Archimedes screw. It was really fun to have them later read about Archimedes and learn the history behind the design they were to build.
Back to the story. After Monica and Moses were done sketching and analyzing, they searched the room for materials. They came to me with a clear plastic pipe that we had lying around the lab- I believe it is the type of plastic pipe that is used for encasing electric cords to keep them in place. It was just one of many random items I had purchased at Home Depot the month before that I figured may be used for something or another over the course of building the Rube Goldberg machine. They wanted to use the plastic pipe as the center of their screw.
Next, they needed to add the rounded inclined planes, the screw, around the plastic pipe. They thought of cutting cardboard out into strips like in the YouTube video and came to me for advice. I probed them with a simple question, “Why struggle with scissors and thick cardboard such as this when we have thin sheets of cardboard that can easily be cut with our laser cutter?” Their eyes widened and they set to work. They retrieved our digital caliper to start measuring the diameter of the plastic pipe. Then, they measured the diameter of the ball they wanted to use (a small 3D printed ball I had lying around the lab, similar in size to a ping pong ball). Then, they logged into CorelDraw (a graphic design software) and with a little reminder from me on how to set their lines to RGB red and Hairline, they sketched a circle to match the diameter of the pipe, and then another circle to match the diameter of the pipe + the diameter of the ball. They included one straight line to connect the two circles, which had the same centerpoint, and they sent it to the printer. It was done in 15 seconds. They tested it out, and sure enough, it fit perfect and snugly around the plastic pipe. They went back to CorelDraw to duplicate their drawing multiple times, enough to fit the sheets of cardboard we had, and printed multiple sheets of these circles.
Laser Cut cardboard spirals to create a screw around a plastic pipe
I’m going to fast forward a bit here. Basically, they were able to create a “screw” with their plastic pipe and many, many laser cut cardboard “donuts.” Their next hurdle was to make this pipe rotate. Luckily, we had a few windshield wiper motors in our lab leftover from last year’s animatronics projects. I suggested to them that if they could find a way to mount their screw to the motor, the motor would rotate the screw for them. The problem was that their pipe was hollow- it had no bottom or top that could be attached to the motor. Coach Emerson to the rescue. “If you could find a way to solve your last problem by designing something to be lasercut, don’t you think you can find a way to solve this problem by designing a part we could print?”
Now, for this task, Monica and Moses needed a lot more of my help. With the last task, they were able to find the tools they needed mostly on their own and were able to design what they wanted in CorelDraw because they were both very familiar with the program, from previous classes they had with me in which I taught them CorelDraw. For this new problem, they would need to use SolidWorks (an advanced CAD software, used primarily in the manufacturing industry), and neither Monica nor Moses had used SolidWorks in over a year. So, we sat down together, each at our own computer with our notebook, the caliper, and the plastic pipe. We discussed together, with a lot of my probing (“What is it that you need to design?”, “How should it look?”, “What features does it need?” “Is this what you expected it to be?”) and came up with a sketch of what we wanted. We took measurements of both the inner and outer diameter of the pipe and came up with a cup-like design, basically an extruded cylinder base with a hole in the middle to screw to the motor, and two more raised, hollowed cylinders to encase the sides of the pipe. The pipe would sit inside this cup-like design and be screwed to the motor.
These are initial sketches and calculations before designing in SolidWorks.
This is Monica’s close up sketch of the part to attach the screw to the motor.
This is the 3D printed part that was attached to the windshield wiper motor.
For the next step, they needed to learn how the motor actually worked. Monica and Moses did not participate in our school’s animatronics project from the previous year, so they sought out another student whom I will call Bianca, who was known to be the electronics expert of the team. She had worked on a number of the motors during the animatronics project the year before and easily taught Monica how to set up the wires so the motor would run. They tested it out and it worked! The motor successfully turned the screw, however, they immediately noticed a new problem. Because their screw was so tall, it swayed outward and did not stay directly upright while being moved by the motor. So, they decided to use two wooden dowels spaced purposefully at the exact distance from each other to hold the ball from falling off the edge of the screw. This idea they got from the YouTube video. This would keep it in place on one side, but did not stop the screw from swaying outward. So, with the help of my colleague Richard, who probed them to think about securing the screw from the top, just like they had on the bottom, they duplicated the part they had already printed to mount the screw from the bottom, added a top to the part that could spin inside a small hole, similar to how a gear spins in place, and it was now secure! They tested everything out, and it finally worked. They completed their challenge to have an object move upward, creating that unique almost “magical” effect that we knew their project needed.
In the end, they took their project to competition and placed second place against other teams of mostly 7th and 8th graders. We were all very proud of their accomplishments, but what I know to be the most powerful aspects of this project are all of the “transactions” of learning that took place between these students and myself. We designed solutions to problem after problem, using and manipulating technology and tools at our fingertips, and I was able to design, immediately and authentically, challenges that stretched my students’ minds and allowed them to mediate and share new ideas with each other.
We are pleased to share a recent webinar with guest Tony Perry, Invention Education Coordinator at the Lemelson-MIT Program that celebrates outstanding inventors and inspires young people to pursue creative lives and careers through invention.
Tony shared the goals of the program and current opportunities for young people in their Invention contests and programs. Justin Brown, one of the FabLearn Fellows, discussed how the InventTeams program works in his high school in Hawaii. It was an interesting conversation, as we discussed the similarities between “maker” and invention programs in schools, how to gain support from students, parents, teachers, and administration, fundraising, and encouraging students to believe that they can invent things.
Invention Resources of the Lemelson-MIT program: Activity guides, resources about inventors and inventing, Howtoons library, and case studies https://lemelson.mit.edu/resources
Boston’s Learn 2 Teach, Teach 2 Learn is a 16-year-old maker program where annually 36 teens of color to learn, build and then teach 6 different technology, coding, and engineering modules. Each year our youth teachers engage 700+ children at 30+ community organizations with constructionism-based activities at free 4-week summer STEAM camps. This blog post offers insights on the process and planning for teaching paper electronics to families at a large book festival. A switch sampler manipulative for teaching and reflections on how to make our activity better next time are included!
It’s not always …easy to turn attention to processes, strategies, and practices—but that is at the core of the learning experience…Once you make something, it’s something you can reflect upon, share with others.
Mitch Resnick, MIT Media Lab Lifelong Kindergarten Group
Boston Book Festival calling! Well, actually they emailed. Learn 2 Teach, Teach 2 Learn (L2TT2L) youth teachers were invited to do a paper electronics workshop. Inspired by Mitch, I want to share the processes, strategies, and practices involved in planning and carrying out this opportunity. I also want to use this as an opportunity to reflect on and document the lessons learned!
I love “hatching two birds with one egg,” so my plan was to:
Design a paper electronics activity to blend Reading & STEAM, with focus on authors of color with characters of color who look like our youth
Refresh an old “Blinkie Paper” activity with new ideas for summer STEAM camps
inject high expectations & STEAM opportunities in a complex setting
Use preparation as a “project exercise” for the online “Learning Creative Learning” course I am taking with the MIT Media Lab Lifelong Kindergarten Group
OK, that’s” hatching 4 birds with one egg”- a little crowded in that egg, but I enjoy a challenge!
Blending Reading and Paper Electronics
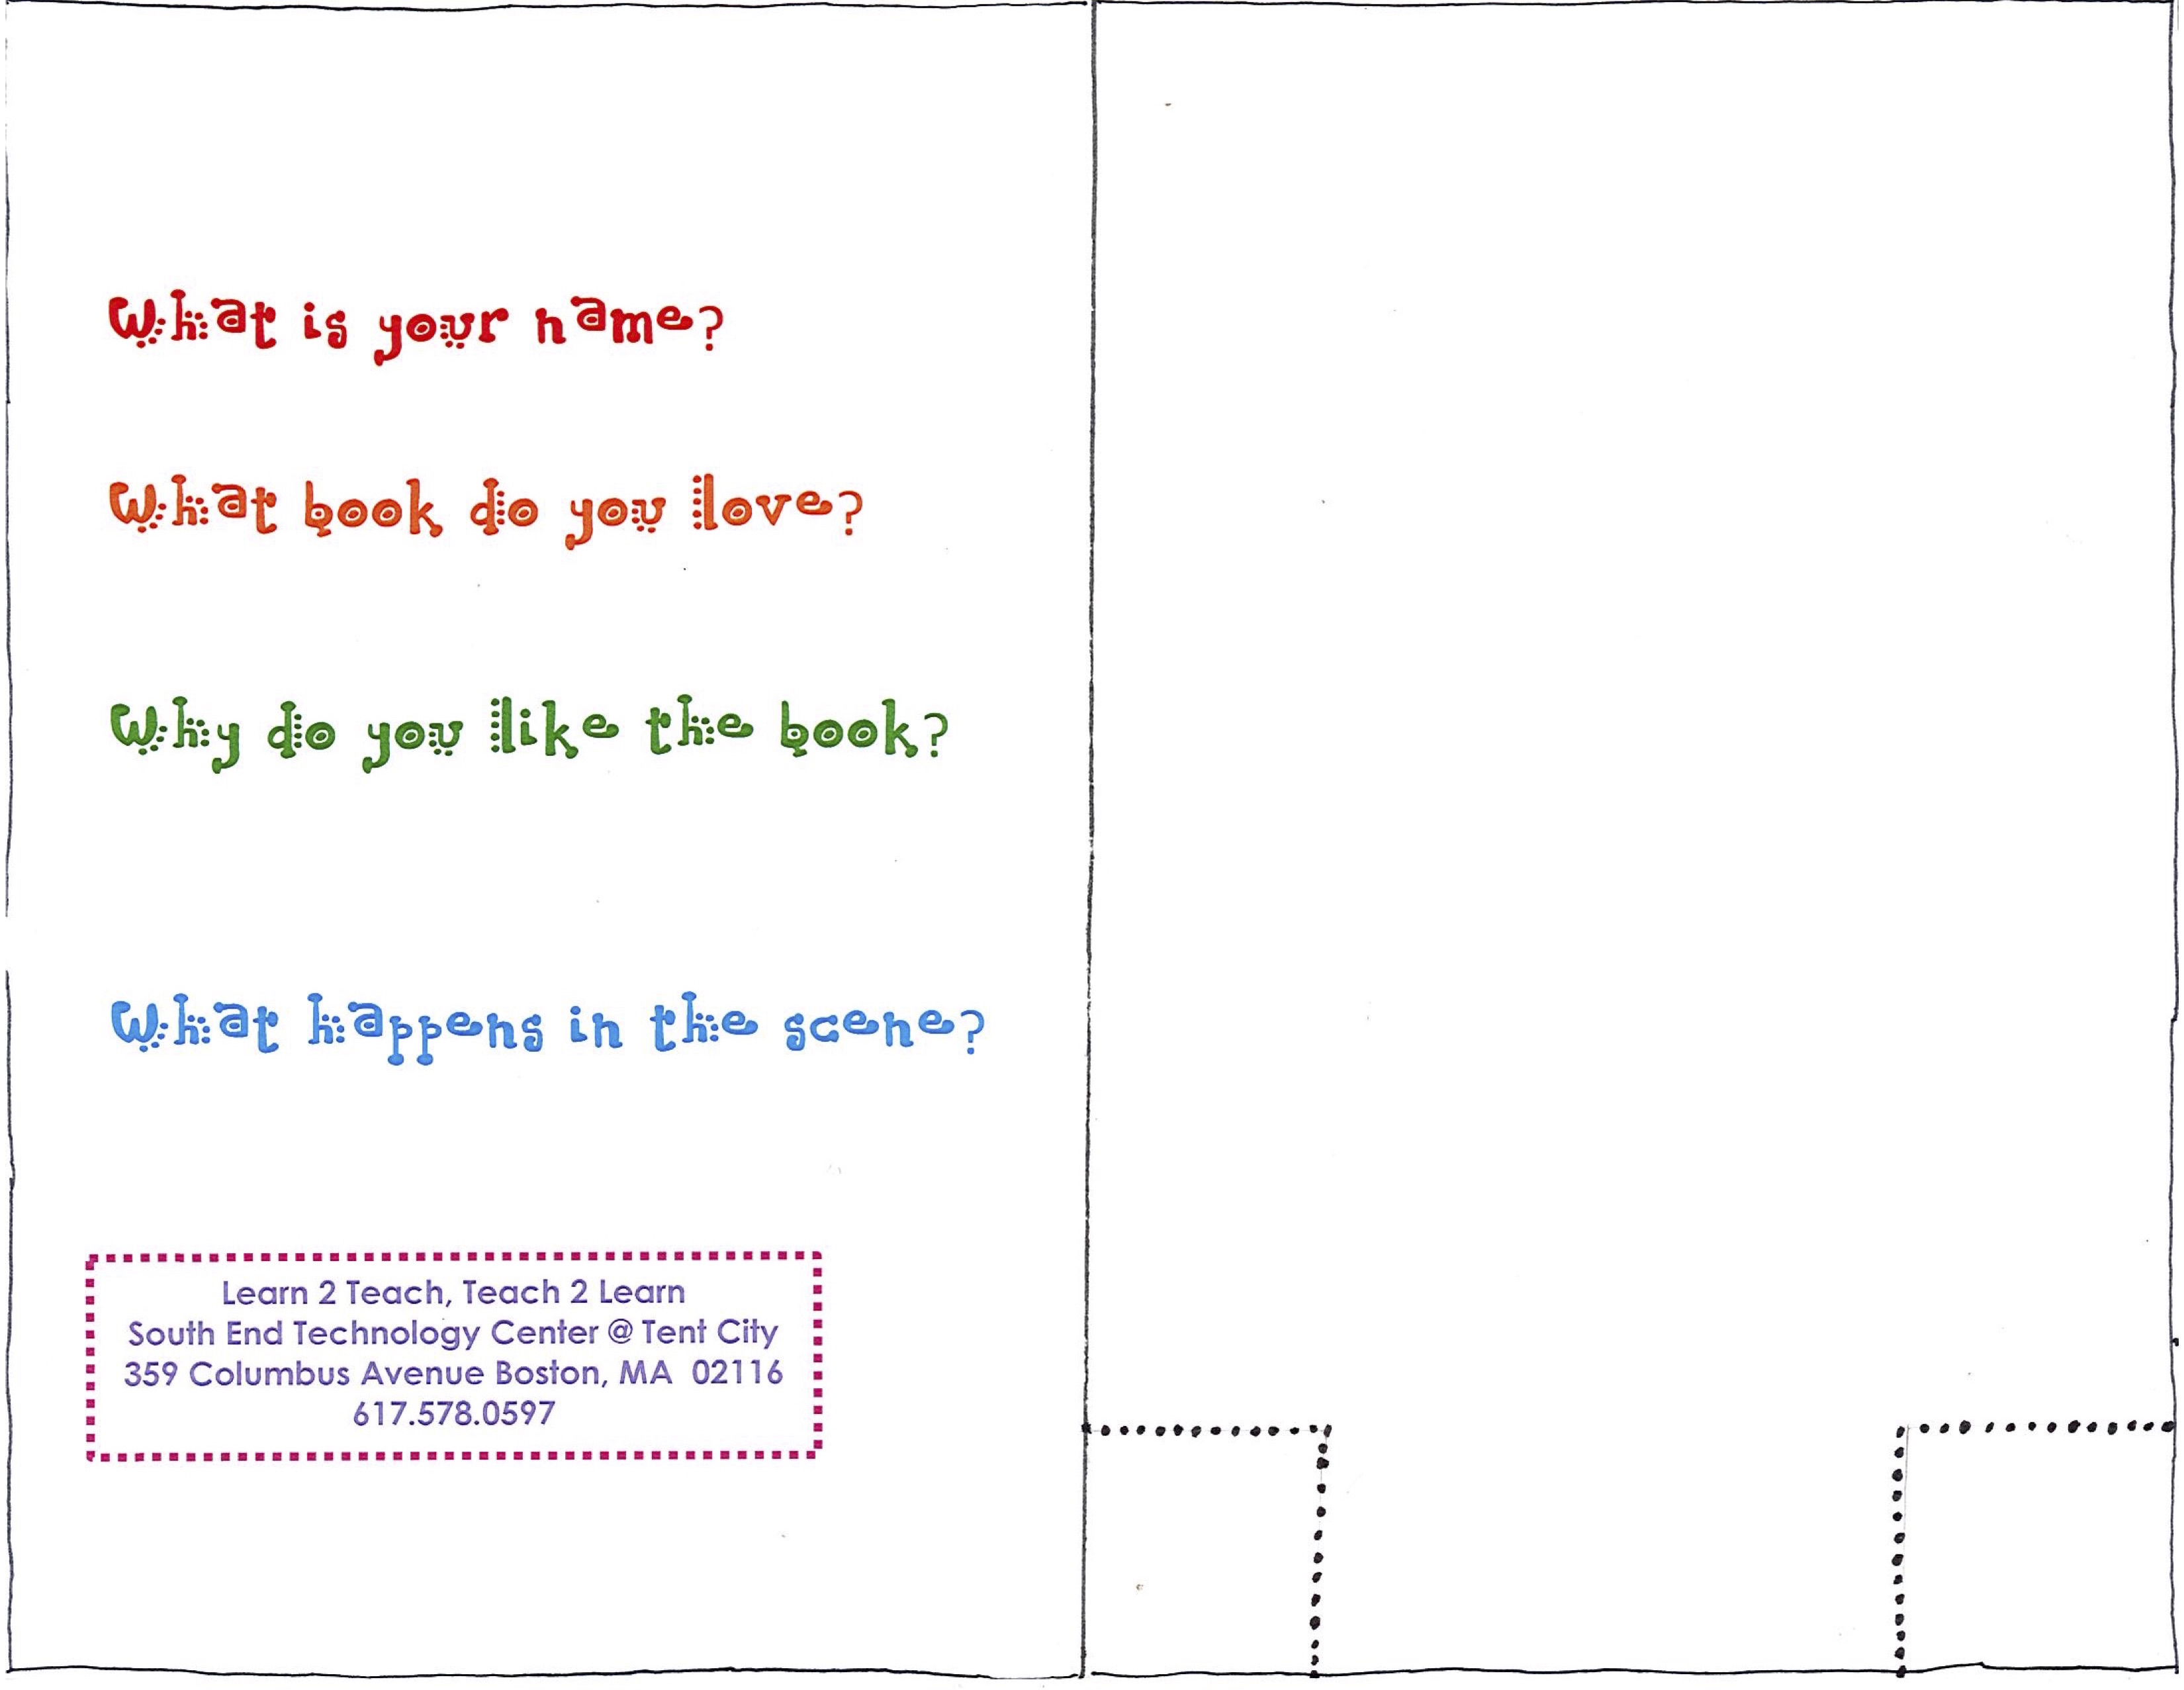
We decided to have a family activity based on favorite book scenes:
“Each parent and child pair will work together to create an “electrifying” scene from their favorite book using LEDs, 3D Printed diffusers and coin cell batteries with the help of teen youth teachers from Boston’s Learn 2 Teach, Teach 2 Learn program!”
To prepare I asked for book recommendations from two friends. Dr. Kim Parker (@TchKimPossible) is a multicultural literacy expert who helps educators connect youth to texts that can change their lives. Joyce King has been collecting children’s books by and for people of color for 50 years. She co-founded St. Joseph’s Community School in the late 1960s, a free parent-run alternative school based on Nguzo Saba principles.
We created a poster of book covers based on their recommendations with the title “Good Books That Can Light Up Your Life!” It had an LED with a heart diffuser and battery that actually lit up the poster:
Refresh “Blinkie Paper” and Inject High Expectations
At L2TT2L, we have been teaching paper electronics, what our youth affectionately call “Blinkie Paper” for over 6 years, inspired by a series of workshops that our friend Jie Qi has offered (She now has her own company, Chibitronics! Check out her new Love to Code chibi chip). We’ve used Blinkie Paper storytelling and pop-up cards as inspirations for the activities in the free summer STEAM camps taught by our teenage youth teachers.
I wanted to try out some ideas for refreshing our Blinkie Paper activity:
3D printed press-fit diffusers for 5mm LEDs. We have been using simple press-fit LED diffusers in a soft circuit bracelet activity. Using Tinkercad to create simple shapes with 5mm holes is very easy and the diffusers are very quick to print in a few minutes. We used shapes like balls, stars, and hearts.
Switch it up! Managing the CR2032 coin cell batteries has always been a challenge in our paper electronic activities. Children drop and lose the batteries easily if they are clipped on with a binder clip. If the batteries are permanently taped on with cellophane tape, they run out very quickly. We’ve been using Jie Qi’s paper battery holders (making them ahead of time – the paper folding seems difficult for the children to do — and even challenging for some of our teen youth teachers). The children also have a hard time manipulating the paper tab to turn the battery on and off.
Children love interaction, so finding some cool switches seemed like a great solution. That way, we could use the paper battery holders (fixed in the “on” position) and pressing buttons or push/pull tabs could complete the circuit and turn the LED on.
Engage with solder! I believe that introducing children to soldering at an early age is very empowering and has a positive impact.
We usually use copper tape that is conductive on only one side to save money. It’s often hard to get children to fold down the places where two sets of copper tape have to join to complete the circuit. Those connections and LED legs connections are often easily disrupted if just cellophane tape is used to hold them in place. So, soldering the connections between copper tape and the LED is one solution!
We decided to have the children participate in the soldering by holding either the solder OR the soldering iron (if they were very good at the solder!). Just touching the solder to the soldering iron tip was very exciting for the children.
Updating a Childhood Inspiration for Paper Electronics
When asked to name a beloved childhood object during the first week of the Lifelong Kindergarten Group’s online “Learning Creative Learning” class, I chose embroidery and spoke about the elaborate embroidery samplers I stitched as a child to learn all the stitches — sort of like this one:
During the second week, we were assigned a project that involved animating a name. I came up with the idea of updating my childhood love to express my new interests by making a “Switch” sampler for the Boston Book Festival as a touchable and playful inspiration for children & youth teachers.
Having this manipulative, as well as a “boss” Harry Potter example made by our Tisch Scholar Rohun Dhar, turned out to provide a lot of smiles and inspiration as they got passed along at the Festival. Rohun even made his circuit look like an “H” for Harry Potter!
Collaborating with young friend on teaching strategies
The South End Technology Center @ Tent City is located in a mixed-income housing development that came about because of a “Tent City” protest in the 1960s led by Mel King, our executive director. Every Thursday we offer free open access to our Fab Lounge and many young people like Damani from Tent City Apartment drop in to make things with our teen “Fab Stewards.”
During Fab Lounge, I was working on my Switch Sampler and 4th grader Damani was fascinated. Her class is studying energy at school and she had many interesting theories in her mind about how the circuit worked that she was eager to test.
The first one — which startled me with its brilliant simplicity — was that Damani said: “Hey can’t you close the switch with ANYTHING that is metal?” This resulted in her and other children running (with gleeful chaos!) around SETC, looking for metal stuff to test. They used scissors! rings! spoons! needlenose pliers! pieces of scrap copper tape! wires. . . you name it! Some found shiny things that were not metal and did not close the circuit. I got so energized listening to their conversation with each other about why some things worked to light the LEDs and some things did not.
It reminded me of something Mitch Resnick always says,
“children don’t have ideas, they make ideas!”
I decided to bring a lot of metal things with us to the festival so that the children attending could try this too.
When Damani was playing with the sampler circuit, she realized that all four switches did not work at the same time: only pairs would light up together. She came up with many theories about why and tested them out! We had a great time together asking questions and testing out her ideas. Finally, she decided to make one a mini-sampler with two of the switches. Damani proudly showed it to her teacher who gave her “bonus points” for her efforts, even though she was already at the top of her science class!
Doin’ it at a Festival: Strategies & Lessons Learned
Our youth teachers from L2TT2L have offered activities at a variety of festivals through the years that range from the World Maker Faire to the Cambridge Science Festival. So we’ve learned to be prepared for anything and everything beyond what we planned to do!
Bring at least 3x as many materials as you imagine you need.For this book festival, we offered to do an organized 2-hour workshop for 8 parent/child pairs. When we arrived, we were in a large room shared with 5-6 other activities, with no way to easily manage who participated & when they started! The actual number of Parent/Child pairs we served: 30! We might have done more, but we ran out of materials (which was actually a blessing because it limited the numbers and allowed participants to finish on time).
It gets hectic to facilitate, so have a template for the project & do prep ahead of time! We made all the paper battery holders and 3D printed diffusers ahead of time and made a template for the paper electronics activity. Here’s the template: Inside: Outside:
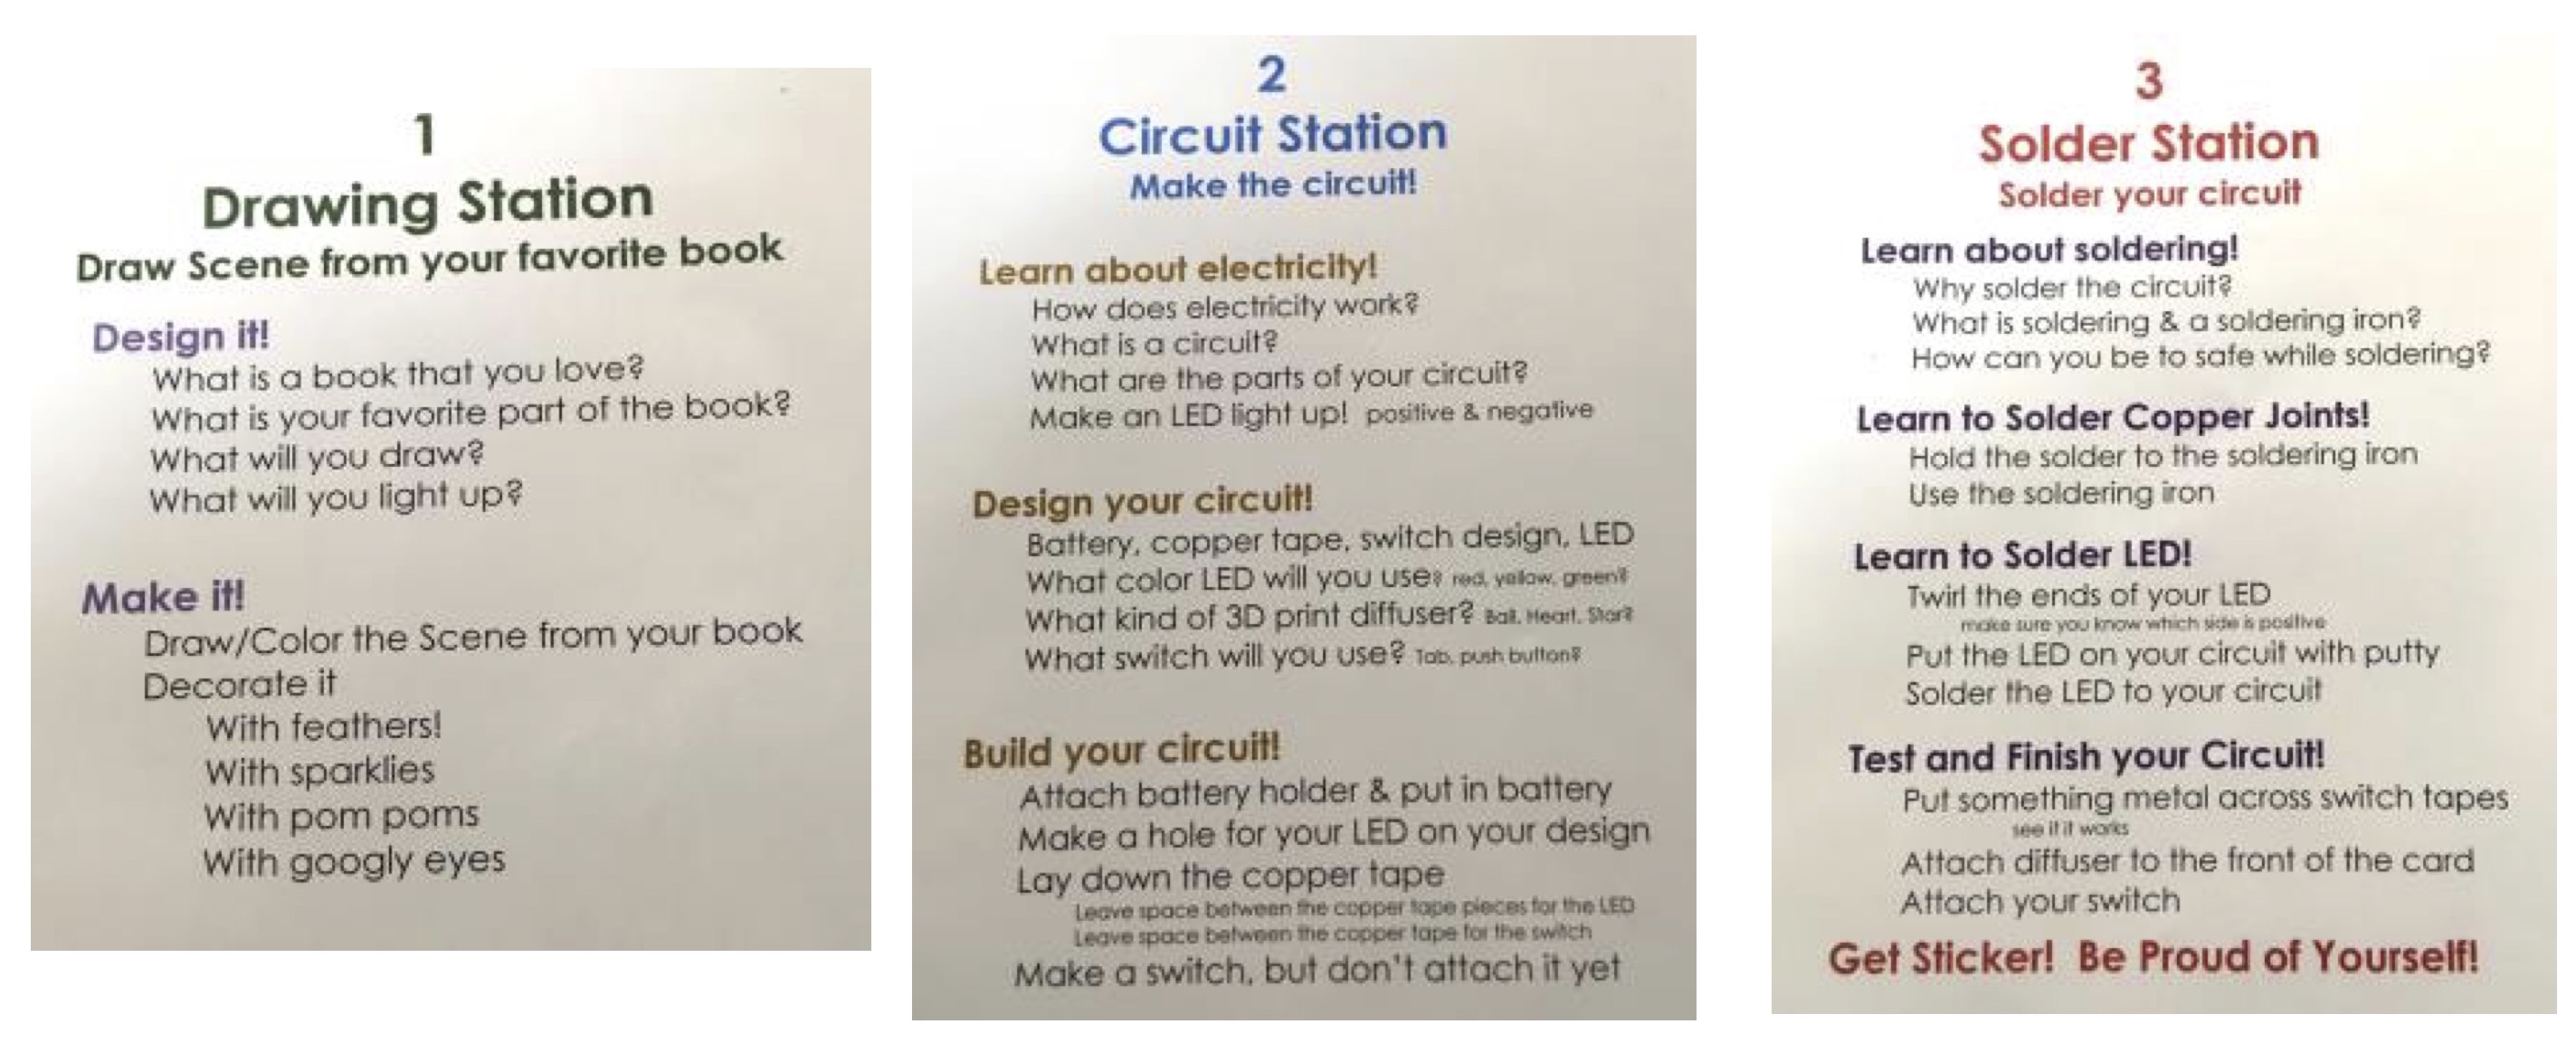
Divide the activity into parts and create stations. We set up the activity with three stations that the festival parent-child participants moved between Drawing, Circuit, and Solder. On each table, we had several signs with instructions to help teen youth teachers with guiding activities at the station.
Make lists, many lists of materials! I LOVE lists, especially because it really helps when I work with teen youth teachers. Here is our materials list, organized by station.
Packing and organizing are key! I am a “box whisperer” fishing out wonderful boxes from the dumpster behind my building and whisking them away from folks who receive boxed gifts. So different materials were put in labeled boxes or in Altoid tins (that our youth teachers love to spray paint).
Materials for each station were packed in separate bags. I have a sewing volunteer who makes large bags with outside pockets for folders from remnant upholstery fabric and we put cardboard reinforcing bases covered with scrap vinyl from vinyl cutter projects in the bottom. Then I staple labels on the outside of the bags. Here’s an example from our summer STEAM camps, but you get the idea!
The Festival was a success!
Most of the participants really enjoyed the activity. What was cool was that many parents were super excited about circuit-building and soldering. Their eager enthusiasm to share what they loved with their children was infectious. Overall, we engaged participants in a pretty high quality of “hard fun.”
Of course, it wasn’t perfect! I always take 10 minutes immediately afterward to jot down notes that help me remember how to get better.
There were a number of parents who would have preferred a quick 15-minute activity with spectacular results to the hour-long learning engagement we planned for each parent-child pair.
To increase the quality of learning that happens:
Better engage participants in troubleshooting. We needed at least two soldering irons going (only had one!) and a guide so that the parent-child participants could have been more independent in troubleshooting.
Increase youth teacher facilitators & add dedicated explainers. To get the most learning out of the activity, we needed more activity “how to do it” facilitators and a youth teacher at each station who was a dedicated “explainer,” engaging participants in conversation about what they were doing (we only had five of us).
I got so busy helping with soldering and troubleshooting that I did not have much time to take photos (Reminder to self: bring someone dedicated to photographing!). However here are a few photos of the 30 sets of family participants that I did take:
Each One Teach One: Final Thoughts
One of the most powerful things about Learn 2 Teach, Teach 2 Learn – and that I believe should be part of any Maker Education Manifesto – is that all youth should have the opportunity (and be responsible!) to teach what they learn, share their knowledge with others. For the past eight years, when given an opportunity to identify the most important part of L2TT2L to them, youth teachers consistently report that being part of an effort to create positive community change and teaching children at community organizations rank the highest (surprisingly, getting paid ranks the lowest).
The 30 families participating in our workshop at the Boston Book Festival increased the number of Boston children (800+) that our youth have taught and for whom they have been role models of color enthusiastic about technology, coding, engineering . . . and of course, making!
Recently, I have been reading the excellent and very inspiring interviews posted on the website People of Color in Tech (POCIT). Asia Hoe, a product designer (who believes that curiosity is her superpower – I LOVE that!) says that this is also her top advice for young people of color aspiring to careers in tech:
Each one, teach one. Whether through teaching, mentoring, writing, or speaking, passing on your knowledge is of critical importance to not only improve the state of the world but to help you develop in [a tech career]. When you impart your knowledge to someone else, you must first break it down into the smallest components so that someone new might understand, further validating and ingraining your knowledge.
Being part of an effort to create community change for “People of Color in Tech” was also one of the inspirations for Ruth Mesfun who founded POCIT. She says, “The main goal of the site is to help people of color realize that, even though the numbers are low, there are so many of us who want to support each other.”
Shout Outs!
To awesome Learn 2 Teach, Teach 2 Learn youth teachers Ke’Brant (KB) Almond, Nyari (ND) Davis, Trinity Merren, and Dee Dee Pimentel who taught this activity at the Boston Book Festival.
To Bill from our Personal and Professional Empowerment program at the South End Technology Center @ Tent City who took time away to help out.
And, as always to Eva Kerr, a wonderful eagle eye editor and a 16-year volunteer at the South End Technology Center @ Tent City. No piece of my writing ever leaves SETC without being greatly improved by her careful edits and suggestions!
Studies show that a curious mind is fertile ground for learning, so combining the freedom of play and exploration with more structured learning goals is a more powerful formula than a 100% teacher driven approach to lessons (Gruber, 2014). If you can set aside your notions about what a classroom should sound, smell or look like, you will discover that constructionist learning environments work well to foster authentic inquiry (STEM/STEAM), and the creative use of available resources (innovation). Facilitating a constructivist or constructionist learning space can be intimidating to many, but rest assured it can be done in a structured and mindful manner, especially when combined with good documentation.
Cute Case Study
In my new role as STEM lab manager for the Asheville Museum of Science, I have the honor of designing STEM/STEAM related learning experiences for all ages. The age group I am currently most excited about are children aged two to five. Twice a month at the museum we offer a preschool STEM program called Little Explorers Club (LEC). I am learning how to use prompts with these very young learners to facilitate an informal constructionist learning space.
In LEC, we practice skills like measurement, color mixing, counting, cutting, sharing ideas, and now the design cycle. A successful LEC based on prompts took place in September. The theme was inventors. We read What Do You Do with an Idea by Kobi Yamada and The Most Magnificent Thing by Ashley Spires, & Rosie Revere Engineer by Andrea Beaty. These books tell stories of a diverse range of makers without glossing over the frustration and self doubt that being an inventor can bring.
Alison Gooding reads to AMOS Little Explorers, stories about ideas, inventions and failures.
After our story time, participants were asked to draw a design of something that helps mom or dad clean up. After sketching with crayons, they were asked to gather materials to make a 3D model of their idea.
3D models next to their original 2D model and the inside of one makers model of a rocket.
If we define success by consistency in form between original idea, to sketch, to 3D model, the four to five years olds were the most successful at this open ended design challenge.
This young man worked on several iterations of his cleaning robot and struggled with stability.
During our showcase, this maker showed us the inner workings of her design for a cleaning tool.
Another surprising moment came when I witnessed two participants standing at the materials table. They were holding their sketch in one hand, counting the parts that made up their drawing, then gathering the exact same amount of parts in felt squares. In this one behavior at the materials table, these young learners showed number sense, as well as the ability to translate a 2D model into a 3D model of an idea.
Using a 2D plan for materials reinforces counting and spatial reasoning.
By the end of our 45 minute program, at least one participant went through several iterations of a cleaning robot, until he discovered the key to stabilizing tall, narrow structures. Yet another participant made an object that had a flag or cape component that was tested with a fan. “It works!” proclaimed the proud inventor after testing. And he was right to celebrate, his design did not fall apart when tested. Having a first prototype that works enough to test is a big deal, for a maker of any age. I was awe struck to see such young learners thrive and struggle through the design process. Many participants did not finish their designs in the time allotted and elected to take some extra materials along with their prototype, to finish building at home.
Plan, Play or Prompt
The rewarding part of working in a learning environment designed for constructionism, is standing back and witnessing the creativity and curiosity that students are naturally gifted with, when allowed to explore without overt adult direction. Before you judge a student for being “off task” ask yourself, is she acting out of curiosity and taking risks to answer her own questions? If so, stand back and observe.
Over structuring a lesson kills opportunity for students to develop and practice agency and curiosity of their own. Allowing time for play and exploration in science, time that is free of assessment and the pressures of productivity, is key to not only creating a joyful atmosphere for students to learn in, it is also key to their learning. We as facilitators need to optimize what, to some, looks like chaos or to others like “just play.”
That is where the well designed prompt, a respect for play, and informed planning comes in. If you only have access to learners for a short time, such as in a museum or library setting, focus your hard work into planning a good prompt. For example, is one hour a safe space to play with the idea of lots of failure with very young learners? Maybe not. Maybe exposure to well planned experiences that feel like play, especially when compared to regular school, are a better model.
That said, if you have long term relationships with your learners, you will not regret making the time and space to explore through play and failed attempts, within a well curated environment. Once you pick the inspiring artifacts or tools to expose learners to, spend your hard work planning how to help learners answer their own questions.
Next Steps
Discovering science through open exploration, or constructivism, breeds entrepreneurialism, self-direction, empathy, curiosity and creativity – all superpowers that an uncertain future will most certainly reward. Furthermore, having a literacy about how things are made (constructionism), including increasingly complex technologies, will empower learners in ways we can’t even imagine.
Try beginning a unit with the open exploration of materials and tools relevant to your unit and allow their natural curiosities to blossom. For instance, rather than over plan a lesson on microscopy, keep a microscope handy for spontaneous questions about the hidden structures of everyday things from a human eyelash to an insect’s parts. Explore electricity with lots of different tools, from LEDs, and 9volts to scraps of wire and harvested e-waste (deconstructed toys make good sources) motors and fans.
See what learners gravitate towards, then work your lessons in from that entry point. Some will focus on getting lights to work brighter and brighter (voltage, series or parallel circuits) and others may focus on making things move (mechatronics) with motors and craft materials. Through honoring the natural diversity of learning styles that your learners are allowed to express, and then share with each other, you may find that your entire electricity unit will be covered. Notice what questions and or creative ideas your learners engage with, as they interact with the learning environment you took care to design. In this manner, you can utilize all three tools (play, prompts, and planning) in an optimized manner.
References
Flores, C. (2015). Making Science: Reimagining STEM Education in Middle School and Beyond. Constructing Modern Knowledge Press. Torrance, Ca.
Gruber, M. J., Gelman, B. D., & Ranganath, C. (2014). States of curiosity modulate hippocampus-dependent learning via the dopaminergic circuit. Neuron, 84(2), 486-496.
Martinez, S. L., & Stager, G. (2013). Invent to learn. Constructing Modern Knowledge Press. Torrance, Ca.
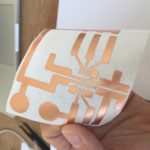
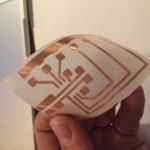
Circuit stickers are electronic circuits made of copper tape cut with a vinyl cutter. It’s a very easy and extremely cheap way to create your own circuits. In this blog post you will find the information on how to use this technique.
Idea
The idea to build circuits made with copper tape is not a new one. Some time ago, it became clear you might be able to cut copper tape with a vinyl cutter. The only problem was to find suitable tape. The options available are often very expensive…too expensive to use for classes with 30 students.
Out of frustration I searched other ways. In particular, I wanted to program the paper circuits with an ATTiny. (The ATTiny is a small and cheap programmable chip.) The idea eventually evolved in toa technique for screen printing the circuit traces. You can find worksheets here. Programming is done with blocks (mBlocks) so it’s accessible for everyone.
During the 2016 FabLearn conference, I met Jeannine Huffman and fellow Fablearn Fellow Susan Klimczak. They have been working on this kind of material (ATTiny, paper circuits) for a lot longer and do wonderful things! They were very excited about the ATTiny circuit trace we designed, which I demonstrated to them. During that conversation, we also found that we shared an enthusiasm to find new ways to use programmable and expressive paper circuits with students. We are inspired by the poetic work of Jie Qi.
Susan started to use the break-out and a few months later I got a tweet saying that she had made the circuit traces by vinylcutting copper tape. What! Wait! She uses this to make small pieces of kinetic ‘art with a message. Crazy! Soldering also proved to be easy to do. What a great idea! She wrote a deliciously detailed blog post on it. (with drawings by Marten!)
Encouraged by Susan’s enthusiastic tweets and even more convinced of the usefulness of her work, I gave the idea another chance. A reasonably priced roll of wide copper tape was found; this blog post is the result.
What do you need?
Making is about using materials. So we need to buy stuff. The key piece of equipment needed for this technique is the vinyl cutter (although you might also be able to cut circuits with a sharp knife). With a vinyl cutter, you can cut a lot more than just circuits. To have an idea and to be able to make it and hold it in your hands is a powerful thing. Come to think of it… there should be a vinyl cutter in every school. Cheap and easy to use. It’s the ideal stepping stone towards digital fabrication! Digital fabrication has so many possible education benefits.
One-time purchase:
-vinyl cutter (to be sure, order an extra knife)
-ATtiny programer
-tweezers
-power supply (adjustable)
-power jack to crocodile clips adapter
-soldering iron
Consumables:
-copper tape 3mm, 5mm and 100mm wide
-transfer film
-ATtiny
-DIP 8 socket
-SMD LEDS 1206
-solder
Tips en tricks
Creating a circuit takes four steps:
– Drawing of the circuit
– Cutting the design
-Transfer the design and solder the components
– Programming of the ATtiny
Drawing of the circuit
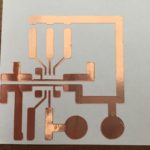
You need a vector drawing program. There are plenty to be found. I use Affinity Designer for the designs and Adobe Illustrator to operate the vinyl cutter. I build the designs from parts and finally unite them into one circuit trace design. Remember to do this, otherwise they will be cut as loose parts.
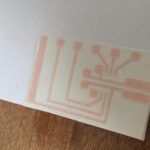
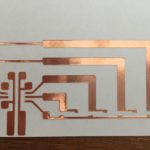
Cutting the design
Do not draw too many line traces that are too thin while designing your circuit because the design may be cut all the way through. Lines thinner than 1.5 mm are likely to break during cutting. Because we use a 100mm wide roll of copper tape, your design can be up to 200mm (width of our vinyl cutter, Roland Stika SV8 ) and 100mm wide. You always have some loss, so the actual size is a bit smaller.
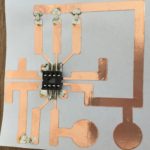
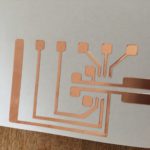
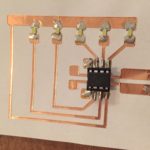
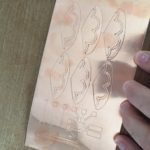
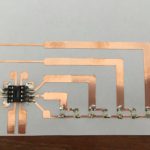
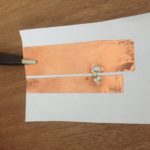
Transfer the design and solder the components
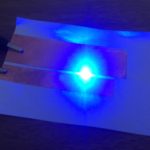
After weeding – or taking off the extra copper pieces to leave only the copper circuit trace (which is easy to do with tweezers) — transfer the design with transfer tape. You can stick it on plain paper or any smooth surface you like. Soldering is very simple. Put the tip of the soldering iron on the copper tape, wait for a second and apply some solder. To solder the socket or SMD-LED, I place a little puddle of solder at the place where I want the components to go. Then, with the tweezers, I put the socket or SMD-LED in place. Just heat the solder again and everything flows together. Did you make a mistake? Just reheat the puddle and remove the component! The leftover pieces can be used to make a a SMD test strip. Just use strips of copper tape with a gap of 2mm on a piece of paper, then connect the power supply (3V) with crocodile and you’re ready to go. You can test all LEDs before soldering them in place. You can also test them afterwards by keeping the crocodile clips in the right place, powering each component. You can do this without having the ATTiny in the circuit.
Programming the ATtiny
There’s a little learning curve, if you have never programmed anything with the Arduino IDE. The good news: you probably only have to do it once and it is really not that hard. All it takes is time and attention. You can always ask others help you. There’s always someone around with Arduino experience or you can also visit a neighboring Fab Lab, library, or makerspace to find folks that can help.
You can use the Arduino IDE to create programs for your circuit. If your not familiar with Arduino you may use Circuits on Tinkercad. It’s a simulation (with the ATtiny!) and uses blocks programming. It’s really easy. Once you get your simulation to work you can download the program as a Arduino compatible file! Hooray!
To use the ATtiny programmer, follow these directions.
Why bother?
It’s probably not the best way to get started with maker education. But I think it has a lot to offer for a classroom. Here are some reasons I’m enthusiastic about this technique:
Solving problems
As with any design or creation, you have to deal with limits. I think limits really help with the creative process. Here the space for your design is limited. The ATTiny is very powerful, but it has only a finite number of possibilities. When making my prototypes, I had to solve a lot of little puzzles. How do I get what I want? Thinking, trying, thinking again … That’s a powerful engine to learning. And it gets you focused.
It became once again clear that the level of understanding I get when I make something is really different from when I learn from reading a circuit on paper. When I was designing the circuit (for the charlieplexing) I finally “got” how it works. I thought I had already understood by studying the circuit on paper. Wrong!
High ceiling
Often, you can use this activity in different ways. You can use it to learn a technique, such as learning programming or learning to make an electronic circuit (and to understand it!). But you can also use it creatively and expressively. What could you do with the subject that you teach? Can LEDs indicate the metric rhythm of a poem? Students usually invent unexpected things when they have expressive freedom. There is more on this in this post.
Even though the ATTiny is very small (tiny, duh ..!), it is really powerful! The pins are touch-sensitive. You use all PWM pins (two of which are hardware PWM). With Charlieplexing you can control more than 5 LEDs. In short, there are so many possibilities. At the end of this post there are some helpful resources to give you ideas about the various possibilities of the ATTiny. I don’t include them here for the sake of readability.
Circuit stickers and cardboard are natural partners. An ATTiny, a servo, Make Do and cardboard. Imagine the possibilities!
Iterate
I think this is a very powerful point. Because we use digital manufacturing, you can quickly make your idea into a prototype and have it in hand. You’ll soon find out if your idea works. That’s the fun partl. Your concepts and ideas can be tested in the real world. Did you do something wrong, because it doesn’t it work? Then, you can make changes quickly, redo the circuit and you can have a new prototype in your hands within minutes. This is the major advantage of digital manufacturing. It’s shifted what used to be just making skills to “thinking through making” skills. Paulo Blikstein calls this “The Democratization of Invention”.
That does not mean that maker skills are not important either. But to understand something, the strong iterative character of digital fabrication is of great value.
Affordable
Affordable? Making takes money. That’s just the way it is. What I like here is that you have a working project for about a dollar. Students can take their projects home. They can reuse the chip, to create a new project for a few cents. I know of few techniques that are so affordable. For around $500 you are all set, including the vinylcutter. Keep in mind you can do so much more with a vinyl cutter.
Low floor
You can already see “the low floor” between the lines. The 2D drawing, programming, the vinyl cutter, it all has very as a low floor. And because it’s cheap, you can repeat it and use it in different ways.
In addition, the #makered community is very open. Help is never far away.
What’s next?
In a tweet, I got the tip to use an ESP8266 module instead of an ATtiny . Somewhat more expensive ($1.75 instead of $0.85) but, much more powerful, more pins and WiFi enabled.
You could also use the micro:bit as a ‘brain,’ using crocodile clips to control your design. However this makes letting students take their design home is a lot more expensive.
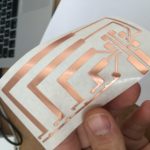
Because the circuits bend, Susan suggested making bracelets. You can use a 3V coin cell to power it (and a magnet as the clip for both turning on the circuit and fastening the bracelet). The good thing here is that you your circuit traces can become the design. Imagine beautiful patterns decorated with working LEDs!
I’m thinking of doing something with the ATTiny touch sensitive pins. I just have a feeling there’s a meaningful activity to do. Maybe touching the parts of a cell after which an LED highlights a text that explains its function.
How would you like to use this technique? Let me know. For example, with a tweet using #circuitstickers. At the bottom of this post are some sources full of ideas for further exploration!
As always, comments, additions and improvements, it’s all welcome!
Per-Ivar Kloen
@___pi
I wish to thank Susan and Eva for their help translating the Dutch post. I’m so thankful and a bit blown away by your kindness.
One of my duties in Copernicus Science Centre (Warsaw, Poland) is to develop and maintain our in-house fablab. A lot of people ask me how to start a makerspace in school, classroom or somewhere else. There are tons of great guides, articles, how-tos you can find on the web. Here are some good resources which I used and strongly recommend for everyone interested in building the makerspace:
Before even starting thinking about what tools you should purchase and how much money do you need, I always advise to start with some essential questions like:
Why do you need a makerspace?
What type of activities do you want to happen in your space?
Who will be using your space?
What do you already have (i.e. tools, space, materials, experience, money, people, skills)?
Everyone has different situation, needs, constraints and possibilities. That’s why every makerspace / fablab is different and it’ almost impossible to copy everything 1:1. I would like to show you in that post, how this whole process of building a mobile fablab in Copernicus Science Centre looked like.
One year and a half ago I was given a task to build our in-house makerspace. It was quite a challenge for my institution, because no one in Poland has created similar space before. Moreover we had very tight budget and no space available. At the beginning I needed to answer for some crucial questions listed above.
Requirements and constraints
Here are some requirements, needs and constraints we have regarding building a fablab at our place. I think that everyone needs to define his/her own guidelines at the first place.
Our FabLab operates in a shared space. We don’t have a space only for our own.
The main purpose of the fablab is to provide different maker activities for students and teachers. Additionally, we would like to use this space by employes for prototyping and creating new exhibits, workshop formats, educational tools.
We have some safety, legal and organizational requirements, so we are not allowed to use for instance heavy duty power tools in our space.
Tools
Due to some constraints we’re not allowed to use some tools inside our space. Likewise we don’t have money to purchase all kinds of tools commonly used in makerspaces or fablabs. So we had to decide which tools we would like to use. Besides money we have also some more requirements such as:
We would like to conduct workshops for kids and this requires some more safe tools comparing to circular saws, etc.
Our FabLab is not fixed, but mobile. We share space with others, so we don’t want to use tools and materials which produce a lot of dust and dirt. Of course, we do have fume extractors, industrial vacuum cleaners and dust collector, but keeping the whole space clean is our priority,
Most of our activities are designed for beginners, so we don’t need professional and high-end tools. We rely on entry level and user friendly machines.
Given these requirements and constraints we came up with complete list of tools we would like to use in our space:
Digital fabrication machines (3d printer, CNC router, laser cutter)
It also determines which materials we are able to cut, shape, join and work with. So we use only basic materials like different types of wood i.e. regular wood, plywood, hardwood, etc. Besides of different variety of wooden materials, we also use all kinds of plastics (PP, PE, PS, ABS, PVC, etc.), cardboard (great construction material), some minor metal elements made out of steel or aluminium (profiles, rods, brackets).
Equipment
Due to our space limitations we need to set up a fablab every time before any activity and wrap up everything after. The best way to tackle this problem is to create mobile equipment. Every piece of equipment like tool walls, soldering stations, heavy duty workbench, storage cabinet (besides workshop tables) we put on casters. Moreover every furniture was built by only using tools you can find in our fablab. Someone said that you cannot buy a makerspace, you can only make it and I completely agree with that statement. Here are some more features of our mobile fablab:
Every piece of equipment is on wheels, so you can roll only carts you currently need. If you would like to do some basic work using only hand tools, then you take one tool wall and a workbench. There is no need to set up complete fablab every time (based on our experience it happens rarely).
Almost every cart has the same base – standard wooden euro pallet (EPAL). That solution provides very strong and robust foundation for every cart. Euro pallet is a good solution, when you want to move carts around the building (it’s only 80 cm wide so it can fit in almost any door). Sometimes we use our carts at different location during special events like hackathons or other workshops.
Setting up a whole fablab doesn’t take too much time. Based on our experience it usually takes approx. 5-7 minutes to roll every cart and set up the space.
Building mobile fablab is not a finished process. We constantly develop and experiment with new carts in order to find a solution which fits our current needs.
This is a brief article about our experiences with building a mobile fablab. If you would like to make your own mobile makerspace and have some questions, feel free to contact me!
We started with the Makerspace Playbook. Wait, that’s not true, we started with me becoming a Resnick groupie and traveling to Boston to a DML conference to meet him. The rest is a lively, scrappy history of my team and I carving out space at a rural public high school for a maker space, connecting it to our existing metal and woodshops, the art department, the County Office of Education, and our private sector community. At this point in time, we are still needing to be very scrappy in order to survive, as well as being part of a Statewide network of 8 Career Technical Education programs recognized for their interdisciplinary curriculum. It’s the public school dichotomy of perpetual justification and recognition of excellence.
I’ve attached the course framework we developed and implemented when we started our adventure. It lists the Playbook in the supplemental materials section. Have at it, just perhaps attach the correct attribution if you use it. It comes from the Innovation Design Institute at Arcata High School in Arcata, California. Authors are Jason Sidell and Anne Bown-Crawford.
; )
Share your #MakersOfColor story with @DesignMakeTeach on Twitter. Contact me or leave a comment if you would like to be featured or know #MakersOfColor that need their story told.


 When asked to name a beloved childhood object during the first week of the Lifelong Kindergarten Group’s online “Learning Creative Learning” class, I chose embroidery and spoke about the elaborate embroidery samplers I stitched as a child to learn all the stitches — sort of like this one:

 It reminded me of something Mitch Resnick always says,
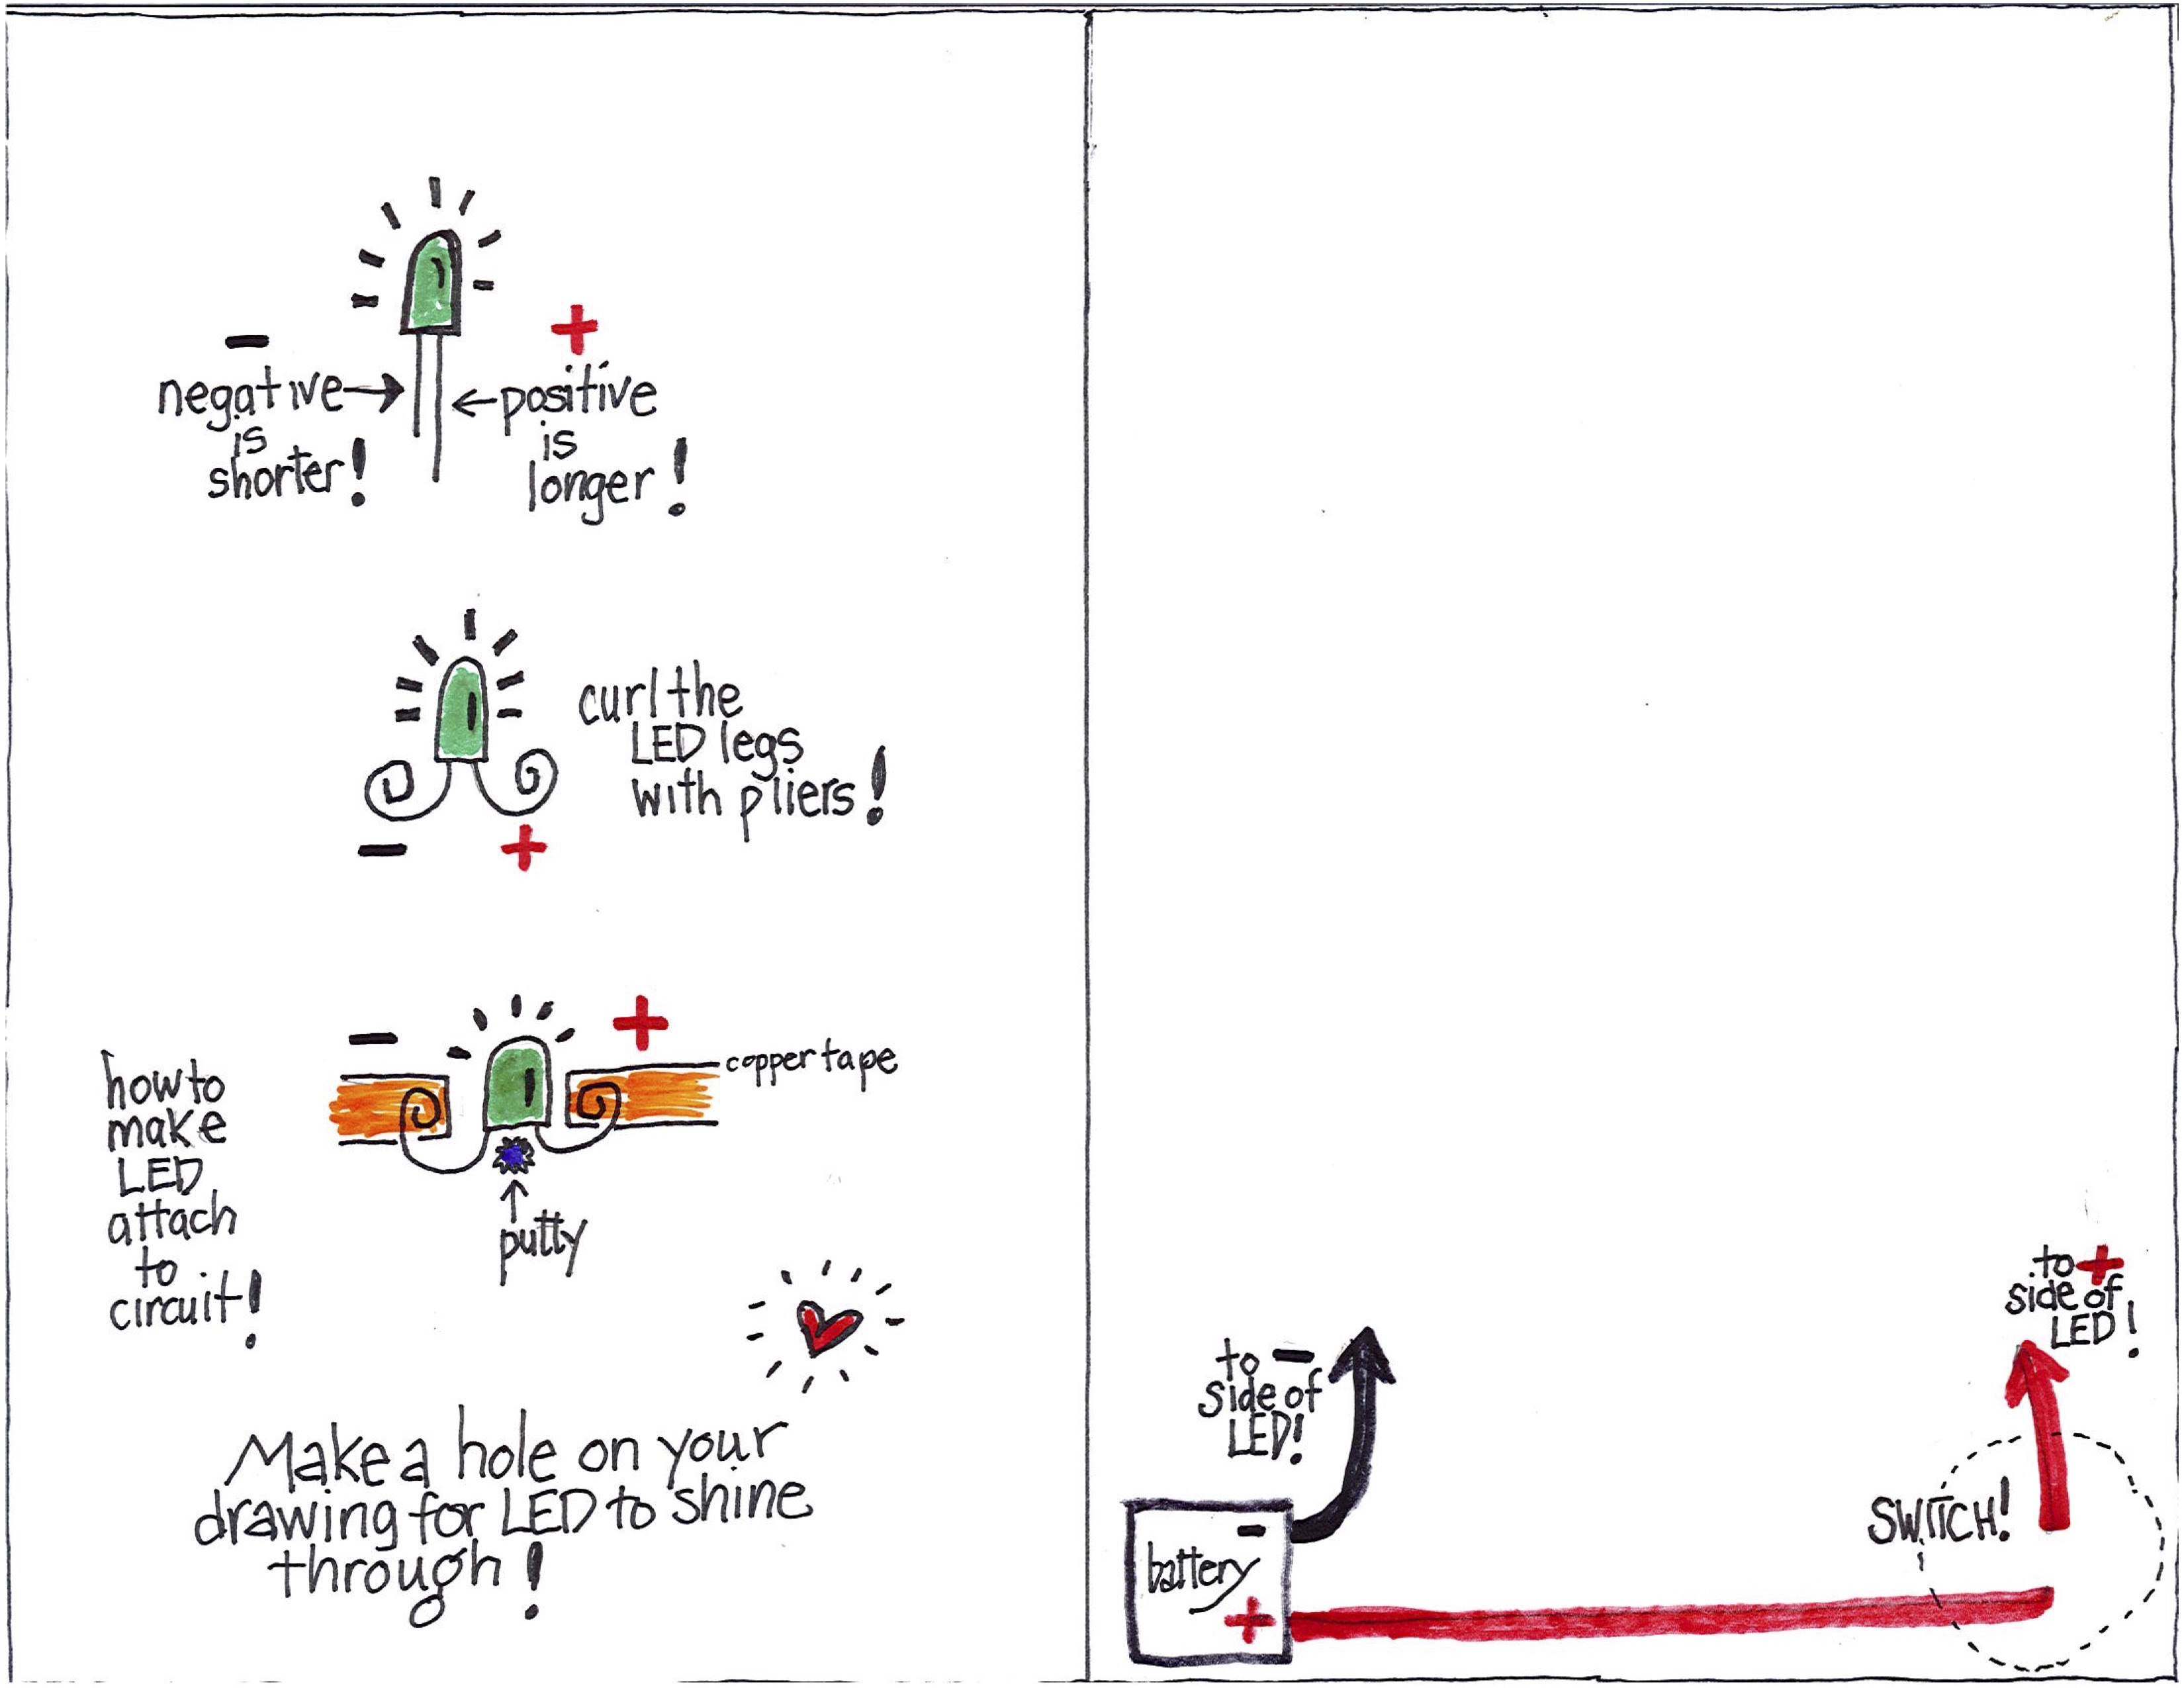
 Make lists, many lists of materials
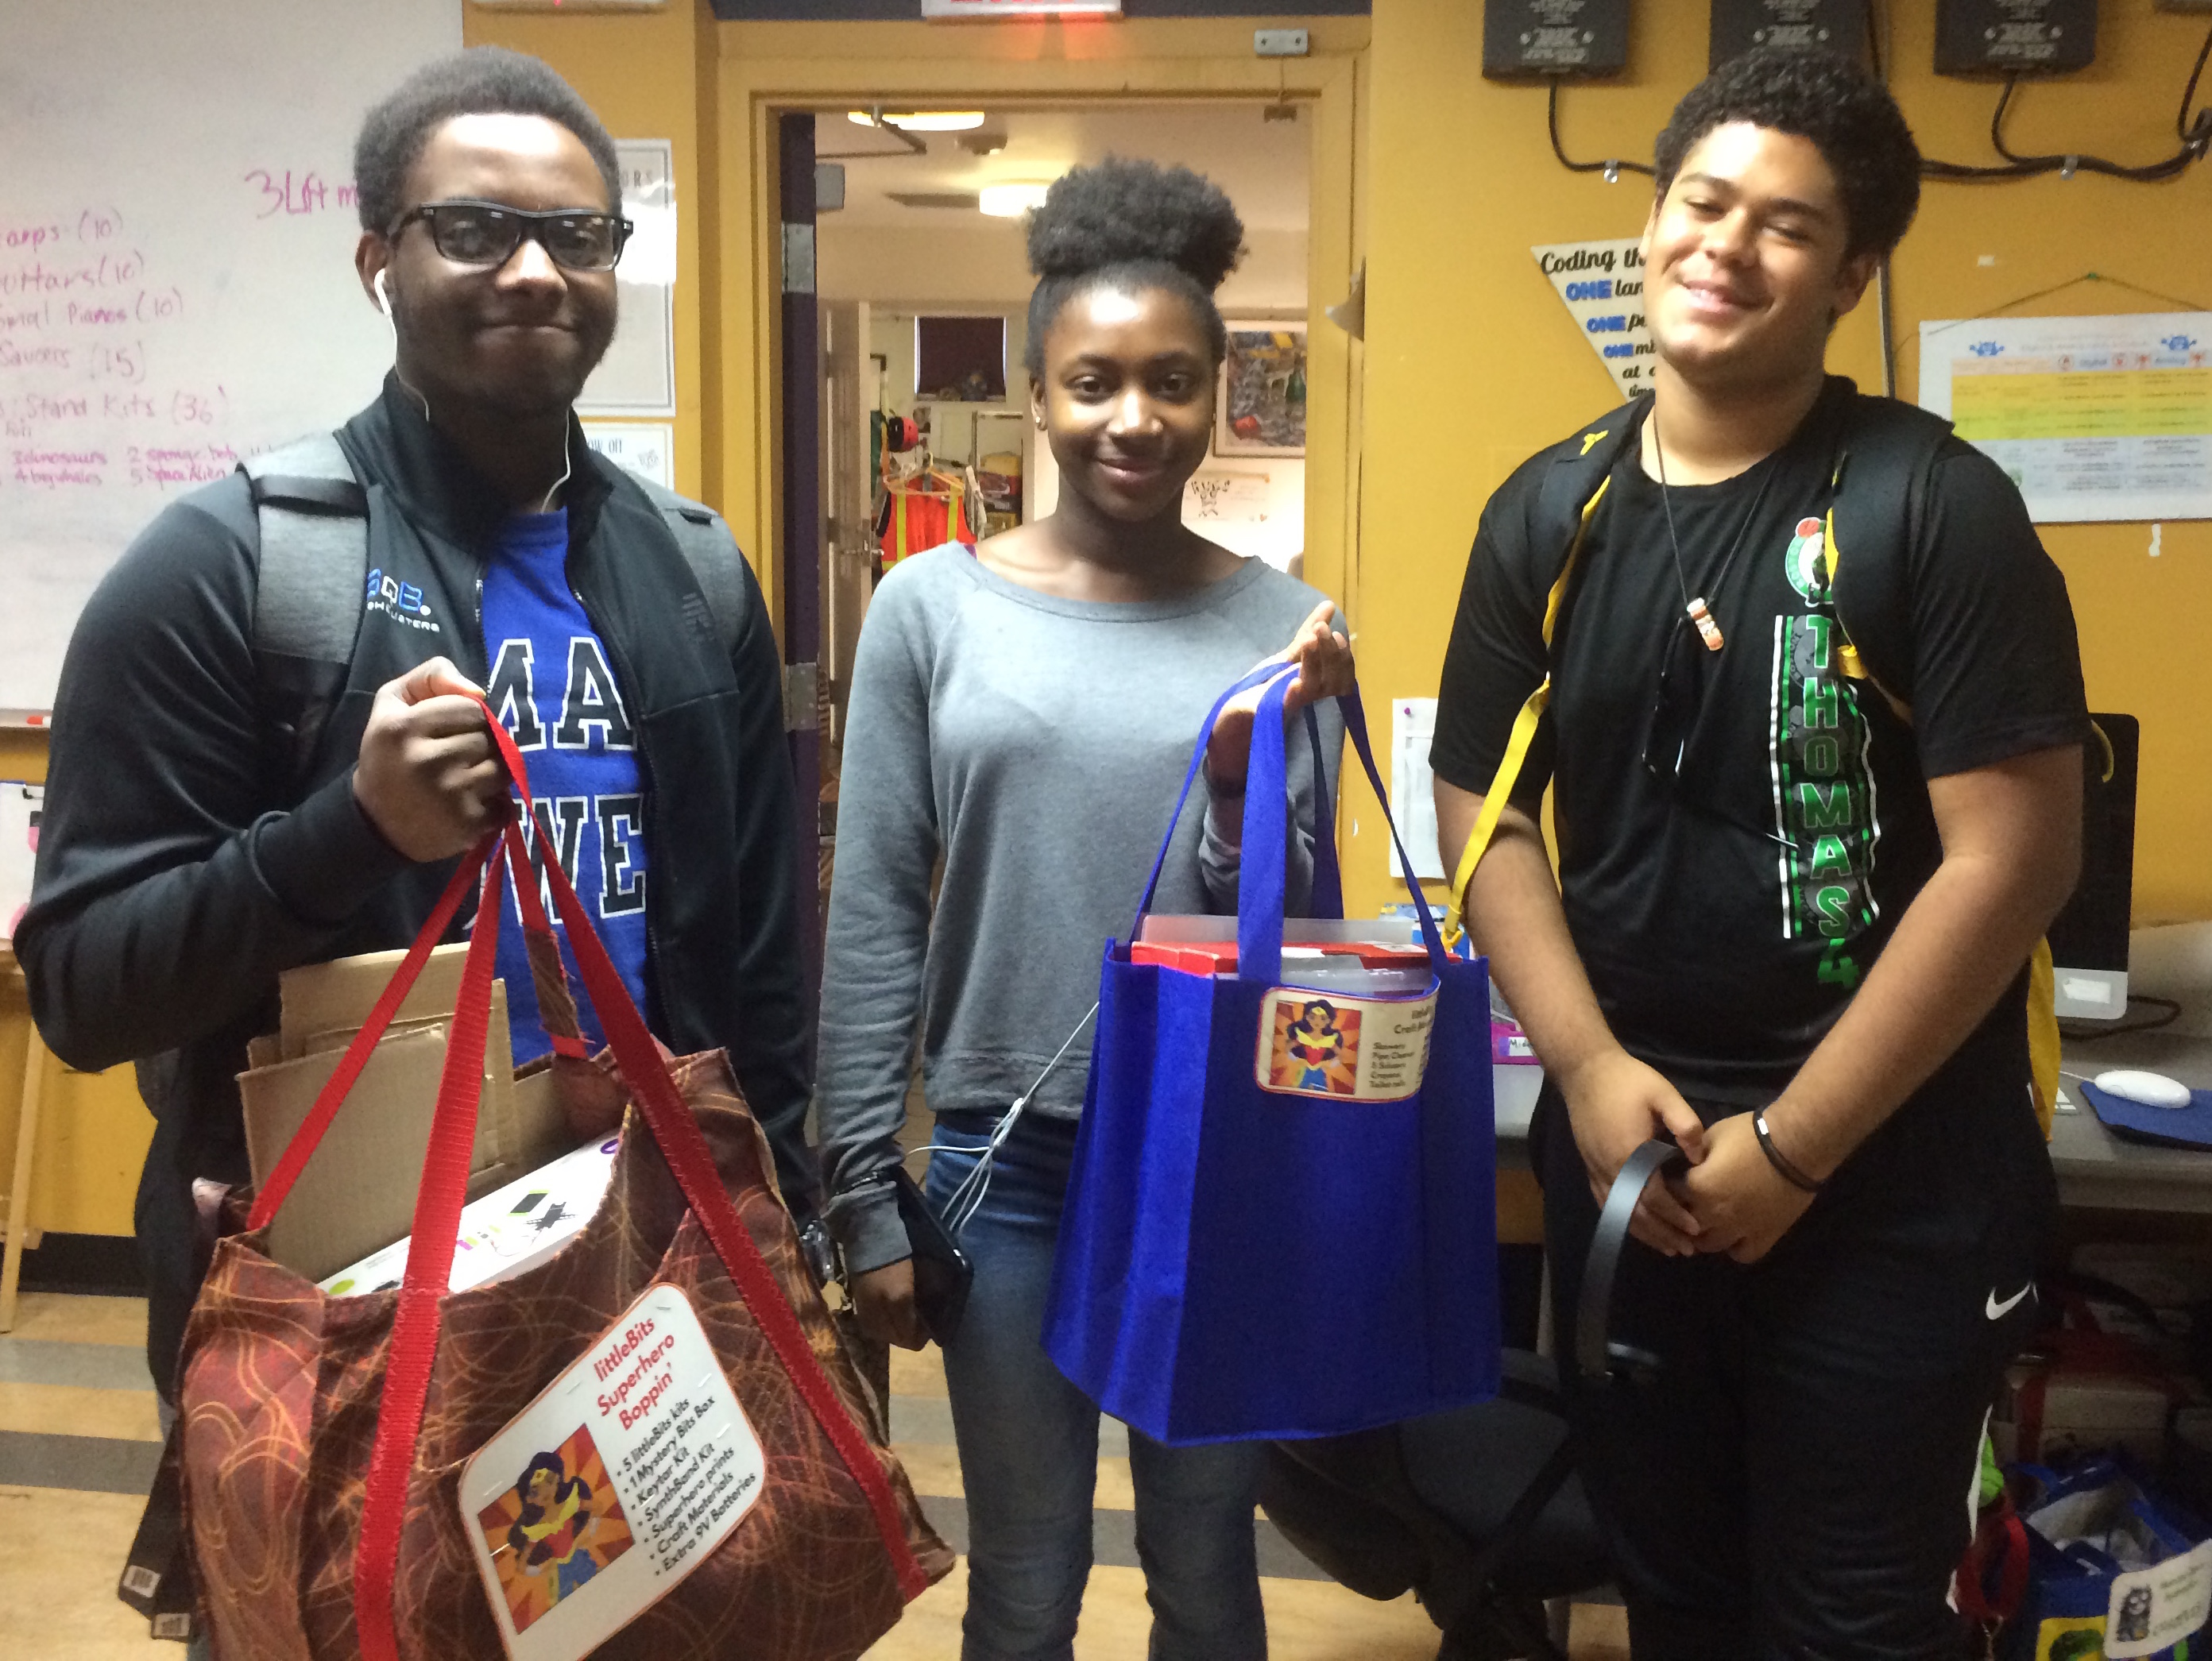


 Being part of an effort to create community change for “People of Color in Tech” was also one of the inspirations for Ruth Mesfun who founded POCIT.


